QML 视频示例
转换视频和相机取景器内容。
QML Video演示了可应用于 QMLVideoOutput 和Camera 类型的各种变换(移动、调整大小、旋转、改变宽高比)。
它还展示了如何将本地代码与 QML 结合以实现更高级的功能--在本例中,C++ 代码用于计算 QML 帧频。该值在 QML 中以半透明的形式呈现,并覆盖在视频内容上。
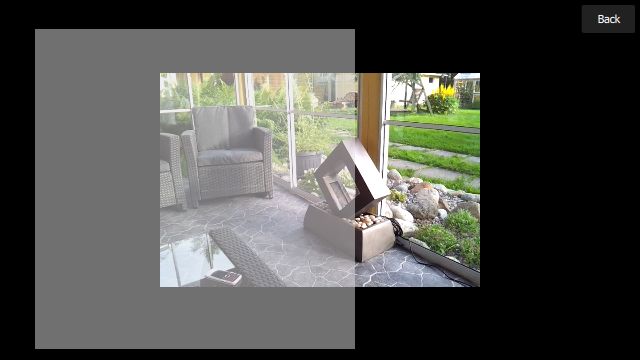
下图显示了执行视频叠加场景的应用程序,它创建了一个虚拟叠加项(只是一个半透明的Rectangle ),并在VideoOutput 项上移动。

运行示例
运行示例 Qt Creator,打开Welcome 模式,然后从Examples 中选择示例。更多信息,请参阅Qt Creator: 教程:构建和运行。
应用程序结构
Main.qml 文件创建的用户界面包括以下项目:
- 两个
Button实例,每个实例显示一个文件名,可用于启动FileDialog。 - 一个退出
Button。 - 一个
SceneSelectionPanel,它是一个可滑动的列表,显示可用的场景。 - 左下方有一个显示 QML 重绘率的项目,上面的数字是瞬时帧率,下面的数字是过去一秒的平均帧率。

可闪烁列表中的每个场景都在各自的 QML 文件中实现--例如,视频基本场景(只在屏幕中央显示一个静态的VideoOutput )在VideoBasic.qml 文件中实现。从代码中可以看出,这使用了一种继承类型;VideoBasic 项 ...
SceneBasic {
    contentType: "video"
}
... 属于SceneBasic 类型 ...
import QtQuick
import QtQuick.Controls

Scene {
    id: root
    property string contentType
    ...
    Content {
        id: content
    ...
    }

    Label {
        anchors {
            horizontalCenter: parent.horizontalCenter
            bottom: parent.bottom
            margins: 20
        }
        text: content.started ? qsTr("Tap the screen to stop content")
                              : qsTr("Tap the screen to start content")
        z: 2.0
    }

    MouseArea {
        anchors.fill: parent
        onClicked: {
            if (content.started)
                content.stop()
            else
                content.start()
        }
    }

    Component.onCompleted: root.content = content
}
... 本身就是一个Scene :
import QtQuick
import QtQuick.Controls

Rectangle {
    id: root
    ...
    property QtObject content
    ...
    Button {
        id: closeButton
        anchors {
            top: parent.top
            right: parent.right
            margins: root.margins
        }
        z: 2.0
        text: qsTr("Back")
        onClicked: root.close()
    }
}
SceneBasic......描述了场景的结构和行为,但与将要显示的内容类型无关--这被Content 所抽象。
这种模式允许我们定义一个特定的用例(在本例中,只需显示一段静态内容),然后为视频内容 (VideoBasic) 和摄像机内容 (({CameraBasic})) 实例化该用例。这种方法被用于实现许多其他场景--例如,"从左到右反复滑动内容,然后再返回 "由SceneMove 实现,而VideoMove 和CameraMove 正是基于这种方法。
根据顶层场景实例中 contentType 属性的值,嵌入的Content 项目会创建MediaPlayer 或Camera 项目。
计算和显示 QML 绘制率
QML 上色速率由 FrequencyMonitor 类计算,它将事件流(通过 notify() 槽接收)转化为瞬时频率和平均频率:
class FrequencyMonitor : public QObject
{
    Q_OBJECT
    QML_ELEMENT
    Q_PROPERTY(qreal instantaneousFrequency READ instantaneousFrequency NOTIFY
                       instantaneousFrequencyChanged)
    Q_PROPERTY(qreal averageFrequency READ averageFrequency NOTIFY averageFrequencyChanged)
    ...
public slots:
    Q_INVOKABLE void notify();
};
如上图所示,FrequencyMonitor 类通过在类声明中添加宏QML_ELEMENT 暴露于 QML,其数据通过定义名为 FrequencyItem 的 QML 项目显示,如图所示:
import frequencymonitor

Rectangle {
    id: root
    ...
    function notify() {
        monitor.notify()
    }

    FrequencyMonitor {
        id: monitor
        onAverageFrequencyChanged: {
            averageFrequencyText.text = monitor.averageFrequency.toFixed(2)
        }
    }

    Text {
        id: labelText
        anchors {
            left: parent.left
            top: parent.top
            margins: 10
        }
        color: root.textColor
        font.pixelSize: 0.6 * root.textSize
        text: root.label
        width: root.width - 2*anchors.margins
        elide: Text.ElideRight
    }

    Text {
        id: averageFrequencyText
        anchors {
            right: parent.right
            bottom: parent.bottom
            margins: 10
        }
        color: root.textColor
        font.pixelSize: root.textSize
    }
}
结果如下所示:

剩下的工作就是将QQuickView 对象的 afterRendering() 信号连接到 JavaScript 函数,该函数最终将调用frequencyItem.notify() :
int main(int argc, char *argv[])
{
    QGuiApplication app(argc, argv);
    ...
    QQuickView viewer;
    ...
    QQuickItem *rootObject = viewer.rootObject();
    ...
    QObject::connect(&viewer, SIGNAL(afterRendering()), rootObject, SLOT(qmlFramePainted()));
© 2025 The Qt Company Ltd. Documentation contributions included herein are the copyrights of their respective owners. The documentation provided herein is licensed under the terms of the GNU Free Documentation License version 1.3 as published by the Free Software Foundation. Qt and respective logos are trademarks of The Qt Company Ltd. in Finland and/or other countries worldwide. All other trademarks are property of their respective owners.

