Qt Quick 3D - 快速球示例
演示如何使用 Quick3D 创建一个简单的游戏。

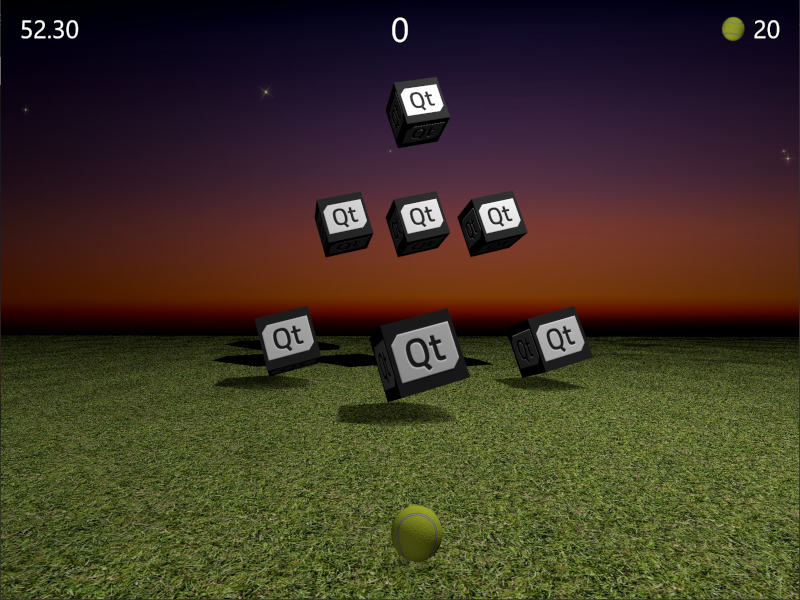
本示例演示如何结合Qt Quick 和Qt Quick 3D 创建一个简单的 3D 游戏。游戏的目标是通过投球击中目标框。得分取决于击倒所有目标的速度和用球的数量。瞄准要准,速度要快!
考虑到这是一款完全可玩的游戏,我们将源代码放在一个 QML 文件中,以突出本示例的紧凑性。我们先来看看主要属性。这些属性不言自明,你可以轻松调整它们,了解它们对游戏的影响。
// Scaling helpper
readonly property real px: 0.2 + Math.min(width, height) / 800
// This is false until the first game has started
property bool playingStarted: false
// This is true whenever game is on
property bool gameOn: false
// Sizes of our 3D models
readonly property real ballSize: 40
readonly property real targetSize: 120
// Playing time in seconds
readonly property real gameTime: 60
property real currentTime: 0
// Amount of balls per game
readonly property int gameBalls: 20
property int currentBalls: 0
// Scores
property int score: 0
property int timeBonus: 0
property int ballsBonus: 0
View3D 包含一个启动游戏的函数,该函数会(重新)初始化所有必要的变量并创建关卡目标。它还包含一个在游戏结束时计算最终积分的函数。
function createLevel1() {
    // Simple level of target items
    var level1 = [{ "x": 0, "y": 100, "z": -100, "points": 10 },
                  { "x": -300, "y": 100, "z": -400, "points": 10 },
                  { "x": 300, "y": 100, "z": -400, "points": 10 },
                  { "x": -200, "y": 400, "z": -600, "points": 20 },
                  { "x": 0, "y": 400, "z": -600, "points": 20 },
                  { "x": 200, "y": 400, "z": -600, "points": 20 },
                  { "x": 0, "y": 700, "z": -600, "points": 30 }];
    targetsNode.addTargets(level1);
}

function startGame() {
    ballModel.resetBall();
    targetsNode.resetTargets();
    createLevel1();
    score = timeBonus = ballsBonus = 0;
    currentBalls = gameBalls;
    gameOn = true;
    playingStarted = true;
}

function endGame() {
    if (targetsNode.currentTargets == 0) {
        // If we managed to get all targets down -> bonus points!
        timeBonus = mainWindow.currentTime;
        ballsBonus = currentBalls * 10;
    }
    gameOn = false;
    ballModel.resetBall();
}
视图还包含一个PointLight 节点,用于点亮场景。它位于物体上方,并被设置为投射阴影。请注意亮度是如何在游戏结束时使游戏区域变暗的。ambientColor 属性用于弱化光线对比度,因为如果没有它,物体的底部会非常暗。
PointLight {
    x: 400
    y: 1200
    castsShadow: true
    shadowMapQuality: Light.ShadowMapQualityHigh
    shadowFactor: 50
    quadraticFade: 2
    ambientColor: "#202020"
    brightness: mainWindow.gameOn ? 200 : 40
    Behavior on brightness {
        NumberAnimation {
            duration: 1000
            easing.type: Easing.InOutQuad
        }
    }
}
扔球使用Qt Quick MouseArea 项,只有在游戏开启且球尚未移动时才会启用。
MouseArea {
    anchors.fill: parent
    enabled: mainWindow.gameOn && !ballModel.ballMoving
    onPressed: {
        ballModel.moveBall(mouseX, mouseY);
    }
    onPositionChanged: {
        ballModel.moveBall(mouseX, mouseY);
    }
    onReleased: {
        ballModel.throwBall();
    }
}
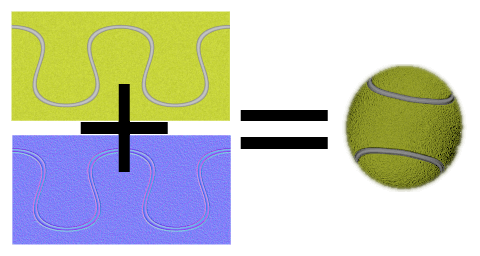
然后我们进入实际的 3D 模型。球模型是最大的模型,因为它包含了球的行为逻辑、动画和击球检测。让我们先看看球的属性。球使用内置的球体模型,根据ballSize 缩放。我们使用PrincipledMaterial 以及baseColorMap 和normalMap 来创建网球的外观。

Model {
    id: ballModel
    property real directionX: 0
    property real directionY: 0
    // How many ms the ball flies
    readonly property real speed: 2000
    readonly property real ballScale: mainWindow.ballSize / 100
    property var moves: []
    readonly property int maxMoves: 5
    readonly property bool ballMoving: ballAnimation.running

    source: "#Sphere"
    scale: Qt.vector3d(ballScale, ballScale, ballScale)

    materials: PrincipledMaterial {
        baseColorMap: Texture {
            source: "images/ball.jpg"
        }
        normalMap: Texture {
            source: "images/ball_n.jpg"
        }
        normalStrength: 1.0
    }
当鼠标移动或触摸屏轻扫时,释放球之前的最后maxMoves 位置将存储到moves 数组中。当用户释放球时,throwBall() 将被调用,它将根据这些最新位置计算出球的方向,并开始制作动画。
function resetBall() {
    moves = [];
    x = 0;
    y = mainWindow.ballSize/2;
    z = 400;
}

function moveBall(posX, posY) {
    if (!mainWindow.gameOn) return;
    var pos = view3D.mapTo3DScene(Qt.vector3d(posX, posY, ballModel.z + mainWindow.ballSize));
    pos.y = Math.max(mainWindow.ballSize / 2, pos.y);
    var point = {"x": pos.x, "y": pos.y };
    moves.push(point);
    if (moves.length > maxMoves) moves.shift();
    // Apply position into ball model
    ballModel.x = pos.x;
    ballModel.y = pos.y;
}

function throwBall() {
    if (!mainWindow.gameOn) return;
    mainWindow.currentBalls--;
    var moveX = 0;
    var moveY = 0;
    if (moves.length >= 2) {
        var first = moves.shift();
        var last = moves.pop();
        moveX = last.x - first.x;
        moveY = last.y - first.y;
        if (moveY < 0) moveY = 0;
    }
    directionX = moveX * 20;
    directionY = moveY * 4;
    ballAnimation.start();
}
球的位置在不同的轴上分别进行动画。这些动画使用之前分配的directionX 和directionY 来定义球的移动位置,并使用speed 来定义球的飞行时间。垂直位置有两个连续的动画,因此我们可以使用缓和来实现球的弹跳。位置动画结束后,我们将检查是否还有球,或者游戏是否应该结束。最后,我们还要制作球的旋转动画,以便用户可以投掷曲线球。
ParallelAnimation {
    id: ballAnimation
    running: false
    // Move forward
    NumberAnimation {
        target: ballModel
        property: "z"
        duration: ballModel.speed
        to: -ballModel.directionY * 5
        easing.type: Easing.OutQuad
    }
    // Move up & down with a bounce
    SequentialAnimation {
        NumberAnimation {
            target: ballModel
            property: "y"
            duration: ballModel.speed * (1 / 3)
            to: ballModel.y + ballModel.directionY
            easing.type: Easing.OutQuad
        }
        NumberAnimation {
            target: ballModel
            property: "y"
            duration: ballModel.speed * (2 / 3)
            to: mainWindow.ballSize / 4
            easing.type: Easing.OutBounce
        }
    }
    // Move sideways
    NumberAnimation {
        target: ballModel
        property: "x"
        duration: ballModel.speed
        to: ballModel.x + ballModel.directionX
    }

    onFinished: {
        if (mainWindow.currentBalls <= 0)
            view3D.endGame();
        ballModel.resetBall();
    }
}

NumberAnimation on eulerRotation.z {
    running: ballModel.ballMoving
    loops: Animation.Infinite
    from: ballModel.directionX < 0 ? 0 : 720
    to: 360
    duration: 10000 / (2 + Math.abs(ballModel.directionX * 0.05))
}
游戏的重要部分是检测球何时击中目标。每当球的 Z 位置发生变化时,我们就会在targets 数组中循环,并使用fuzzyEquals() 检测球是否触碰到其中任何一个目标。每当检测到目标被击中时,我们就会调用目标hit() 函数,检查是否所有目标都被击中。
onZChanged: {
    // Loop through target items and detect collisions
    var hitMargin = mainWindow.ballSize / 2 + mainWindow.targetSize / 2;
    for (var i = 0; i < targetsNode.targets.length; ++i) {
        var target = targetsNode.targets[i];
        var targetPos = target.scenePosition;
        var hit = ballModel.scenePosition.fuzzyEquals(targetPos, hitMargin);
        if (hit) {
            target.hit();
            if (targetsNode.currentTargets <= 0)
                view3D.endGame();
        }
    }
}
然后我们就可以切换到目标。这些目标会动态生成一个分组节点,其中包含辅助函数,并允许将所有目标作为一个组进行动画处理。请注意currentTargets 属性是需要的,因为在 QML 数组中,变化不会触发绑定,所以我们将手动更新目标数量。
Node {
    id: targetsNode

    property var targets: []
    property int currentTargets: 0

    function addTargets(items) {
        items.forEach(function (item) {
            let instance = targetComponent.createObject(
                    targetsNode, { "x": item.x, "startPosY": item.y, "z": item.z, "points": item.points});
            targets.push(instance);
        });
        currentTargets = targets.length;
    }

    function removeTarget(item) {
        var index = targets.indexOf(item);
        targets.splice(index, 1);
        currentTargets = targets.length;
    }

    function resetTargets() {
        while (targets.length > 0)
            targets.pop().destroy();
        currentTargets = targets.length;
    }
}
目标是带有立方体模型和显示点的文本元素的节点。与球模型类似,我们使用baseColorMap 和normalMap 纹理来创建带有 Qt XML 徽标的立方体。检测到击中目标后,我们会按顺序将立方体动画化,并显示从该目标获得的分数。动画完成后,我们将动态移除目标节点。
Component {
    id: targetComponent
    Node {
        id: targetNode

        property int points: 0
        property real hide: 0
        property real startPosY: 0
        property real posY: 0
        property real pointsOpacity: 0

        function hit() {
            targetsNode.removeTarget(this);
            mainWindow.score += points;
            hitAnimation.start();
            var burstPos = targetNode.mapPositionToScene(Qt.vector3d(0, 0, 0));
            hitParticleEmitter.burst(100, 200, burstPos);
        }

        y: startPosY + posY
        SequentialAnimation {
            running: mainWindow.gameOn && !hitAnimation.running
            loops: Animation.Infinite
            NumberAnimation {
                target: targetNode
                property: "posY"
                from: 0
                to: 150
                duration: 3000
                easing.type: Easing.InOutQuad
            }
            NumberAnimation {
                target: targetNode
                property: "posY"
                to: 0
                duration: 1500
                easing.type: Easing.InOutQuad
            }
        }

        SequentialAnimation {
            id: hitAnimation
            NumberAnimation {
                target: targetNode
                property: "hide"
                to: 1
                duration: 800
                easing.type: Easing.InOutQuad
            }
            NumberAnimation {
                target: targetNode
                property: "pointsOpacity"
                to: 1
                duration: 1000
                easing.type: Easing.InOutQuad
            }
            NumberAnimation {
                target: targetNode
                property: "pointsOpacity"
                to: 0
                duration: 200
                easing.type: Easing.InOutQuad
            }
            ScriptAction {
                script: targetNode.destroy();
            }
        }

        Model {
            id: targetModel

            readonly property real targetScale: (1 + targetNode.hide) * (mainWindow.targetSize / 100)

            source: "#Cube"
            scale: Qt.vector3d(targetScale, targetScale, targetScale)
            opacity: 0.99 - targetNode.hide * 2
            materials: PrincipledMaterial {
                baseColorMap: Texture {
                    source: "images/qt_logo.jpg"
                }
                normalMap: Texture {
                    source: "images/qt_logo_n.jpg"
                }
                normalStrength: 1.0
            }
            Vector3dAnimation on eulerRotation {
                loops: Animation.Infinite
                duration: 5000
                from: Qt.vector3d(0, 0, 0)
                to: Qt.vector3d(360, 360, 360)
            }
        }
        Text {
            anchors.centerIn: parent
            scale: 1 + targetNode.pointsOpacity
            opacity: targetNode.pointsOpacity
            text: targetNode.points
            font.pixelSize: 60 * mainWindow.px
            color: "#808000"
            style: Text.Outline
            styleColor: "#f0f000"
        }
    }
}
我们还需要一些游戏区域的模型。地面模型是一个矩形,带有草地纹理,可以按比例填充更大的区域。
Model {
    source: "#Rectangle"
    scale: Qt.vector3d(50, 50, 1)
    eulerRotation.x: -90
    materials: PrincipledMaterial {
        baseColorMap: Texture {
            source: "images/grass.jpg"
            tilingModeHorizontal: Texture.Repeat
            tilingModeVertical: Texture.Repeat
            scaleU: 25.0
            scaleV: 25.0
        }
        normalMap: Texture {
            source: "images/grass_n.jpg"
        }
        normalStrength: 0.6
    }
}
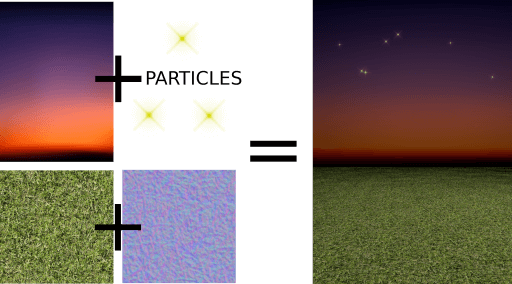
天空模型位于更靠后的位置,我们不希望阴影投射到天空中,因此将receivesShadows 设置为 false。对于天空,我们还使用 Qt Quick Particles模块添加一些星星。与其他二维Qt Quick 元素类似,粒子也可以直接添加到三维节点中。
Model {
    id: sky
    property real scaleX: 100
    property real scaleY: 20
    source: "#Rectangle"
    scale: Qt.vector3d(sky.scaleX, sky.scaleY, 1)
    position: Qt.vector3d(0, 960, -2000)
    // We don't want shadows casted into sky
    receivesShadows: false
    materials: PrincipledMaterial {
        baseColorMap: Texture {
            source: "images/sky.jpg"
        }
    }
    // Star particles
    Node {
        z: 500
        y: 30
        // Stars are far away, scale up to half the resolution
        scale: Qt.vector3d(2 / sky.scaleX, 2 / sky.scaleY, 1)
        ParticleSystem {
            anchors.horizontalCenter: parent.horizontalCenter
            anchors.top: parent.top
            width: 3000
            height: 400
            ImageParticle {
                source: "qrc:///particleresources/star.png"
                rotationVariation: 360
                color: "#ffffa0"
                colorVariation: 0.1
            }
            Emitter {
                anchors.fill: parent
                emitRate: 4
                lifeSpan: 6000
                lifeSpanVariation: 4000
                size: 30
                sizeVariation: 20
            }
        }
    }
}
当我们将地面和天空模型组合在一起时,就会得到一个这样的 3D 世界:

最后,我们为目标添加了一些火花,这次使用的是QtQuick3D.Particles3D 模块。ParticleSystem3D 包含一个SpriteParticle3D ,我们分配200 或它们,这足以让两个100 粒子同时爆发。ParticleEmitter3D 定义了粒子的发射属性,如缩放、旋转、速度和生命周期。我们还添加了Gravity3D affector,以适当的幅度拖拽粒子。
ParticleSystem3D {
    id: psystem
    SpriteParticle3D {
        id: sprite
        sprite: Texture {
            source: "images/particle.png"
        }
        color: Qt.rgba(1.0, 1.0, 0.0, 1.0)
        colorVariation: Qt.vector4d(0.4, 0.6, 0.0, 0.0)
        unifiedColorVariation: true
        maxAmount: 200
    }
    ParticleEmitter3D {
        id: hitParticleEmitter
        particle: sprite
        particleScale: 4.0
        particleScaleVariation: 2.0
        particleRotationVariation: Qt.vector3d(0, 0, 180)
        particleRotationVelocityVariation: Qt.vector3d(0, 0, 250)
        velocity: VectorDirection3D {
            direction: Qt.vector3d(0, 300, 0)
            directionVariation: Qt.vector3d(200, 150, 100)
        }
        lifeSpan: 800
        lifeSpanVariation: 200
        depthBias: 100
    }
    Gravity3D {
        magnitude: 600
    }
}
至此,游戏的 3D 部分结束。仍有一些 2DQt Quick 元素用于显示时间、分数、开始按钮等,这些元素对游戏很重要,但与本快速 3D 文档无关。
现在球在你这边(双关语)。请随意以不同方式扩展游戏,并生成新的古怪关卡!
© 2025 The Qt Company Ltd. Documentation contributions included herein are the copyrights of their respective owners. The documentation provided herein is licensed under the terms of the GNU Free Documentation License version 1.3 as published by the Free Software Foundation. Qt and respective logos are trademarks of The Qt Company Ltd. in Finland and/or other countries worldwide. All other trademarks are property of their respective owners.

