
Qt Quick 3D - View3D 示例
演示了如何使用View3D 从多个摄像机视角展示场景。
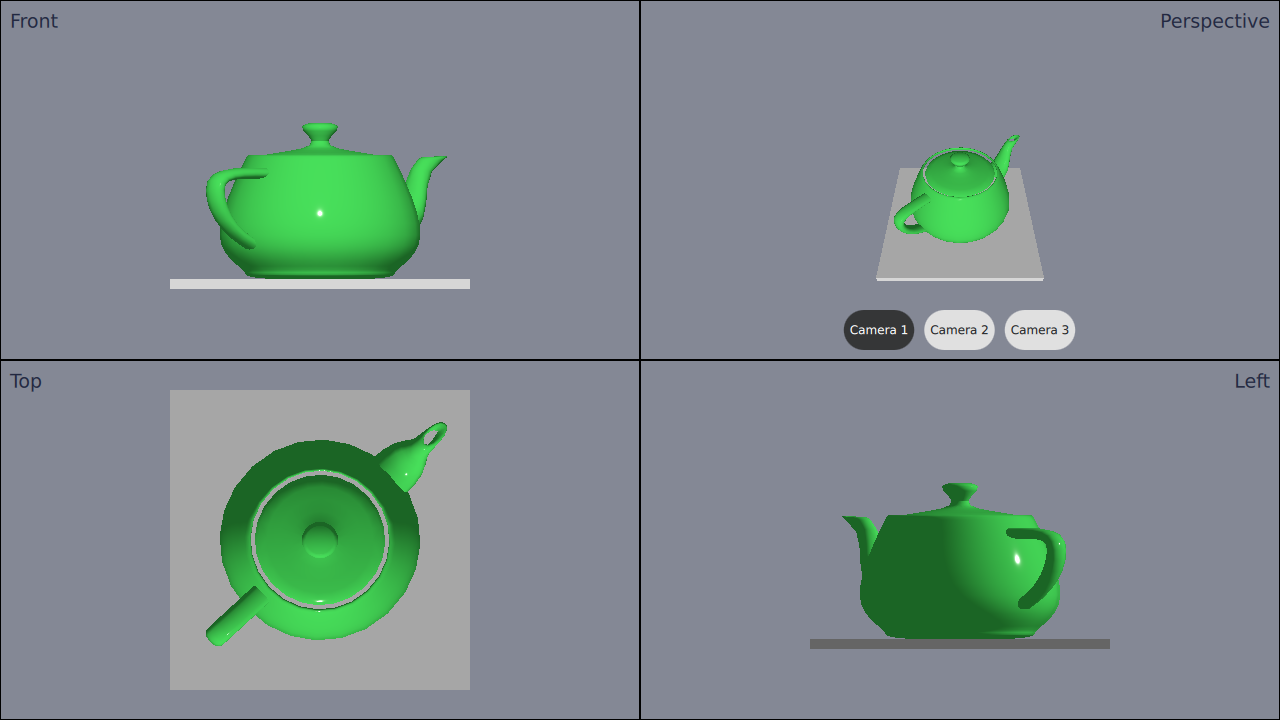
本示例演示了在应用程序中使用四个独立的View3D,每个都配置了不同的摄像机。
定义摄像机
首先,我们定义cameras 。尽管最终只添加4个视图,但我们会定义多个不同的摄像机。这样做是为了能够在其中一个视图中切换摄像机。
相机必须在根Node 内部进行定义。以下是相机的定义方式:
Node {
    id: standAloneScene
    ...
// The predefined cameras. They have to be part of the scene, i.e. inside the root node.
// Animated perspective camera
Node {
    PerspectiveCamera {
        id: cameraPerspectiveOne
        z: 600
    }

    PropertyAnimation on eulerRotation.x {
        loops: Animation.Infinite
        duration: 5000
        to: -360
        from: 0
    }
}

// Stationary perspective camera
PerspectiveCamera {
    id: cameraPerspectiveTwo
    z: 600
}
    ...
    // Stationary orthographic camera viewing from left
    OrthographicCamera {
        id: cameraOrthographicLeft
        x: -600
        eulerRotation.y: -90
    }
}
添加视图
定义完相机后,我们可以添加views 。我们将屏幕划分为四个部分,并像这样逐个添加视图:
// The views
Rectangle {
    id: topLeft
    anchors.top: parent.top
    anchors.left: parent.left
    width: parent.width * 0.5
    height: parent.height * 0.5
    color: "#848895"
    border.color: "black"

    View3D {
        id: topLeftView
        anchors.fill: parent
        importScene: standAloneScene
        camera: cameraOrthographicFront
    }

    Label {
        text: "Front"
        anchors.top: parent.top
        anchors.left: parent.left
        anchors.margins: 10
        color: "#222840"
        font.pointSize: 14
    }
}
    ...
右上角的视图中包含三个按钮。这些按钮可用于实时切换该视图中使用的摄像头。切换操作仅需设置摄像头属性即可:
RoundButton {
    text: "Camera 1"
    highlighted: topRightView.camera == cameraPerspectiveOne
    implicitWidth: controlsContainer.buttonWidth
    onClicked: {
        topRightView.camera = cameraPerspectiveOne
    }
}
...© 2026 The Qt Company Ltd. Documentation contributions included herein are the copyrights of their respective owners. The documentation provided herein is licensed under the terms of the GNU Free Documentation License version 1.3 as published by the Free Software Foundation. Qt and respective logos are trademarks of The Qt Company Ltd. in Finland and/or other countries worldwide. All other trademarks are property of their respective owners.
