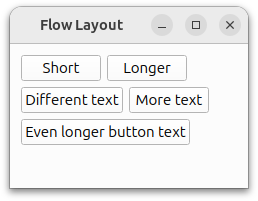
流程布局示例
展示如何针对不同的窗口尺寸安排部件。
Flow Layout实现了一种可处理不同窗口尺寸的布局。窗口部件的位置会根据应用程序窗口的宽度发生变化。

Flowlayout 类主要使用QLayout 和QWidgetItem ,而 Window 使用QWidget 和QLabel 。
更多信息,请访问布局管理页面。
运行示例
运行示例 Qt Creator,打开Welcome 模式,然后从Examples 中选择示例。更多信息,请参阅Qt Creator: 教程:构建并运行。
FlowLayout 类定义
FlowLayout 类继承于QLayout 。它是一个自定义布局类,用于水平和垂直排列其子部件。
class FlowLayout : public QLayout
{
public:
    explicit FlowLayout(QWidget *parent, int margin = -1, int hSpacing = -1, int vSpacing = -1);
    explicit FlowLayout(int margin = -1, int hSpacing = -1, int vSpacing = -1);
    ~FlowLayout();

    void addItem(QLayoutItem *item) override;
    int horizontalSpacing() const;
    int verticalSpacing() const;
    Qt::Orientations expandingDirections() const override;
    bool hasHeightForWidth() const override;
    int heightForWidth(int) const override;
    int count() const override;
    QLayoutItem *itemAt(int index) const override;
    QSize minimumSize() const override;
    void setGeometry(const QRect &rect) override;
    QSize sizeHint() const override;
    QLayoutItem *takeAt(int index) override;

private:
    int doLayout(const QRect &rect, bool testOnly) const;
    int smartSpacing(QStyle::PixelMetric pm) const;

    QList<QLayoutItem *> itemList;
    int m_hSpace;
    int m_vSpace;
};
我们重新实现了从QLayout 继承的函数。这些函数将项目添加到布局中,并处理它们的方向和几何形状。
我们还声明了两个私有方法:doLayout() 和smartSpacing() 。doLayout() 布局项,而smartSpacing() 函数计算布局项之间的间距。
FlowLayout 类的实现
我们首先来看构造函数:
FlowLayout::FlowLayout(QWidget *parent, int margin, int hSpacing, int vSpacing)
    : QLayout(parent), m_hSpace(hSpacing), m_vSpace(vSpacing)
{
    setContentsMargins(margin, margin, margin, margin);
}

FlowLayout::FlowLayout(int margin, int hSpacing, int vSpacing)
    : m_hSpace(hSpacing), m_vSpace(vSpacing)
{
    setContentsMargins(margin, margin, margin, margin);
}
在构造函数中,我们调用setContentsMargins() 来设置左、上、右和下边距。默认情况下,QLayout 使用当前样式提供的值(参见QStyle::PixelMetric )。
FlowLayout::~FlowLayout()
{
    QLayoutItem *item;
    while ((item = takeAt(0)))
        delete item;
}
在本例中,我们重新实现了addItem() ,这是一个纯虚拟函数。使用addItem() 时,布局项的所有权将转移给布局,因此删除布局项是布局的责任。
void FlowLayout::addItem(QLayoutItem *item)
{
    itemList.append(item);
}
addItem() 实现 和 的目的是向布局中添加项目。
int FlowLayout::horizontalSpacing() const
{
    if (m_hSpace >= 0) {
        return m_hSpace;
    } else {
        return smartSpacing(QStyle::PM_LayoutHorizontalSpacing);
    }
}

int FlowLayout::verticalSpacing() const
{
    if (m_vSpace >= 0) {
        return m_vSpace;
    } else {
        return smartSpacing(QStyle::PM_LayoutVerticalSpacing);
    }
}
我们执行horizontalSpacing() 和verticalSpacing() 来获取布局内部件之间的间距。如果该值小于或等于 0,将使用该值。否则,将调用smartSpacing() 来计算间距。
int FlowLayout::count() const
{
    return itemList.size();
}

QLayoutItem *FlowLayout::itemAt(int index) const
{
    return itemList.value(index);
}

QLayoutItem *FlowLayout::takeAt(int index)
{
    if (index >= 0 && index < itemList.size())
        return itemList.takeAt(index);
    return nullptr;
}
然后,我们执行count() 来返回布局中的项目数。为了浏览项目列表,我们使用itemAt() 和 takeAt() 从列表中删除和返回项目。如果删除了一个项目,其余项目将重新编号。这三个函数都是来自QLayout 的纯虚拟函数。
Qt::Orientations FlowLayout::expandingDirections() const
{
    return { };
}
expandingDirections() 返回Qt::Orientations,其中布局可利用的空间大于其sizeHint() 。
bool FlowLayout::hasHeightForWidth() const
{
    return true;
}

int FlowLayout::heightForWidth(int width) const
{
    int height = doLayout(QRect(0, 0, width, 0), true);
    return height;
}
为了适应高度取决于宽度的部件,我们实现了heightForWidth() 。函数hasHeightForWidth() 用于测试这种依赖关系,而heightForWidth() 则将宽度传递给doLayout() ,后者则将宽度作为布局矩形的参数,即项目布局的边界。此矩形不包括布局 margin()。
void FlowLayout::setGeometry(const QRect &rect)
{
    QLayout::setGeometry(rect);
    doLayout(rect, false);
}

QSize FlowLayout::sizeHint() const
{
    return minimumSize();
}

QSize FlowLayout::minimumSize() const
{
    QSize size;
    for (const QLayoutItem *item : std::as_const(itemList))
        size = size.expandedTo(item->minimumSize());

    const QMargins margins = contentsMargins();
    size += QSize(margins.left() + margins.right(), margins.top() + margins.bottom());
    return size;
}
setGeometry() 通常用于实际布局,即计算布局项的几何尺寸。在本例中,它调用doLayout() 并传递布局矩形。
sizeHint() 返回布局的首选尺寸,minimumSize() 返回布局的最小尺寸。
int FlowLayout::doLayout(const QRect &rect, bool testOnly) const
{
    int left, top, right, bottom;
    getContentsMargins(&left, &top, &right, &bottom);
    QRect effectiveRect = rect.adjusted(+left, +top, -right, -bottom);
    int x = effectiveRect.x();
    int y = effectiveRect.y();
    int lineHeight = 0;
doLayout() 如果horizontalSpacing() 或verticalSpacing() 没有返回默认值,则将处理布局。它使用getContentsMargins() 计算布局项的可用面积。
    for (QLayoutItem *item : std::as_const(itemList)) {
        const QWidget *wid = item->widget();
        int spaceX = horizontalSpacing();
        if (spaceX == -1)
            spaceX = wid->style()->layoutSpacing(
                QSizePolicy::PushButton, QSizePolicy::PushButton, Qt::Horizontal);
        int spaceY = verticalSpacing();
        if (spaceY == -1)
            spaceY = wid->style()->layoutSpacing(
                QSizePolicy::PushButton, QSizePolicy::PushButton, Qt::Vertical);
然后,它会根据当前样式为布局中的每个部件设置适当的间距。
        int nextX = x + item->sizeHint().width() + spaceX;
        if (nextX - spaceX > effectiveRect.right() && lineHeight > 0) {
            x = effectiveRect.x();
            y = y + lineHeight + spaceY;
            nextX = x + item->sizeHint().width() + spaceX;
            lineHeight = 0;
        }

        if (!testOnly)
            item->setGeometry(QRect(QPoint(x, y), item->sizeHint()));

        x = nextX;
        lineHeight = qMax(lineHeight, item->sizeHint().height());
    }
    return y + lineHeight - rect.y() + bottom;
}
然后,通过将项目宽度和行高与初始 x 坐标和 y 坐标相加,计算出布局中每个项目的位置。这样,我们就能知道下一个项目是适合当前行,还是必须向下移动到下一行。我们还会根据部件的高度来确定当前行的高度。
int FlowLayout::smartSpacing(QStyle::PixelMetric pm) const
{
    QObject *parent = this->parent();
    if (!parent) {
        return -1;
    } else if (parent->isWidgetType()) {
        QWidget *pw = static_cast<QWidget *>(parent);
        return pw->style()->pixelMetric(pm, nullptr, pw);
    } else {
        return static_cast<QLayout *>(parent)->spacing();
    }
}
smartSpacing() 是为了获取顶层布局或子布局的默认间距。当父级布局为QWidget 时,顶层布局的默认间距将通过查询样式来确定。当父布局是QLayout 时,子布局的默认间距将通过查询父布局的间距来确定。
© 2025 The Qt Company Ltd. Documentation contributions included herein are the copyrights of their respective owners. The documentation provided herein is licensed under the terms of the GNU Free Documentation License version 1.3 as published by the Free Software Foundation. Qt and respective logos are trademarks of The Qt Company Ltd. in Finland and/or other countries worldwide. All other trademarks are property of their respective owners.

