订单示例
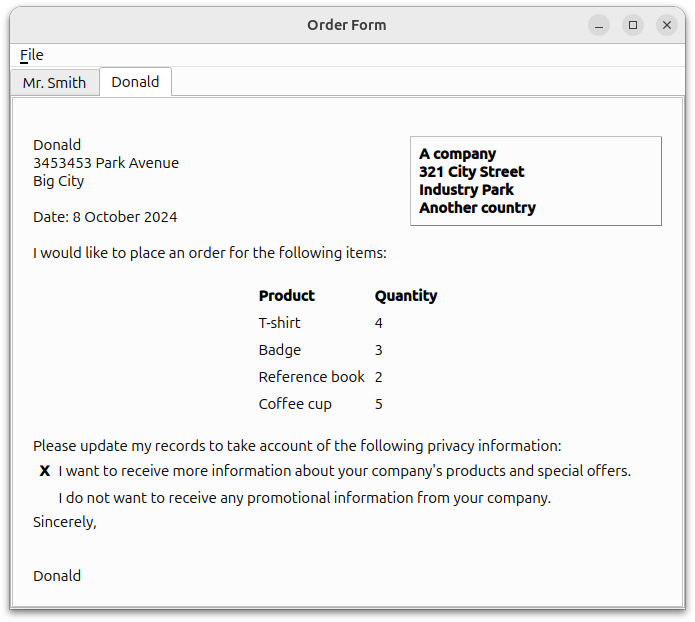
订购表单示例展示了如何通过将简单模板与用户在对话框中输入的数据相结合来生成富文本文档。

DetailsDialog 定义
DetailsDialog 类是QDialog 的子类,实现了一个插槽verify() ,以便稍后验证DetailsDialog 中的内容。DetailsDialog 实现中对此有进一步解释。
class DetailsDialog : public QDialog
{
    Q_OBJECT

public:
    DetailsDialog(const QString &title, QWidget *parent);

public slots:
    void verify();

public:
    QList<QPair<QString, int> > orderItems();
    QString senderName() const;
    QString senderAddress() const;
    bool sendOffers();

private:
    void setupItemsTable();

    QLabel *nameLabel;
    QLabel *addressLabel;
    QCheckBox *offersCheckBox;
    QLineEdit *nameEdit;
    QStringList items;
    QTableWidget *itemsTable;
    QTextEdit *addressEdit;
    QDialogButtonBox *buttonBox;
};
DetailsDialog 的构造函数接受参数title 和parent 。该类定义了四个getter函数:orderItems()、senderName() 、senderAddress() 和sendOffers() ,以便从外部访问数据。
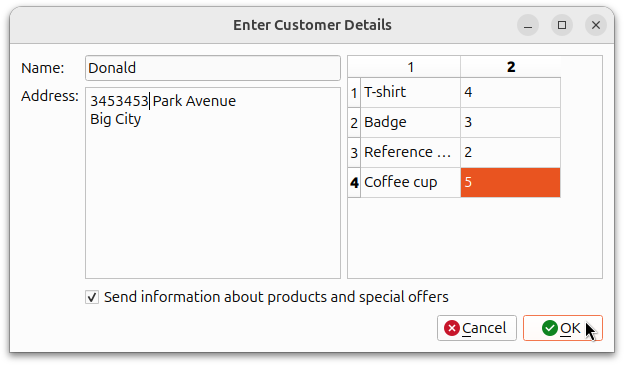
该类的定义包括必填字段的输入部件nameEdit 和addressEdit 。此外,还定义了QCheckBox 和QDialogButtonBox ;前者为用户提供接收产品和优惠信息的选项,后者则确保所使用的按钮根据用户的本地平台进行排列。此外,QTableWidget,itemsTable 用于保存订单详细信息。
下面的截图显示了我们打算创建的DetailsDialog 。

详细信息对话框的实现
DetailsDialog 的构造函数实例化了先前定义的字段及其各自的标签。设置offersCheckBox 的标签,并调用setupItemsTable() 函数来设置和填充itemsTable 。QDialogButtonBox 对象buttonBox 与OK 和Cancel 按钮一起实例化。buttonBox 的accepted() 和rejected() 信号连接到DetailsDialog 中的verify() 和reject() 插槽。
DetailsDialog::DetailsDialog(const QString &title, QWidget *parent)
    : QDialog(parent)
{
    nameLabel = new QLabel(tr("Name:"));
    addressLabel = new QLabel(tr("Address:"));
    addressLabel->setAlignment(Qt::AlignLeft | Qt::AlignTop);

    nameEdit = new QLineEdit;
    addressEdit = new QTextEdit;

    offersCheckBox = new QCheckBox(tr("Send information about products and "
                                      "special offers"));

    setupItemsTable();

    buttonBox = new QDialogButtonBox(QDialogButtonBox::Ok
                                     | QDialogButtonBox::Cancel);

    connect(buttonBox, &QDialogButtonBox::accepted, this, &DetailsDialog::verify);
    connect(buttonBox, &QDialogButtonBox::rejected, this, &DetailsDialog::reject);
QGridLayout 用于将所有对象放置在DetailsDialog 上。
    QGridLayout *mainLayout = new QGridLayout;
    mainLayout->addWidget(nameLabel, 0, 0);
    mainLayout->addWidget(nameEdit, 0, 1);
    mainLayout->addWidget(addressLabel, 1, 0);
    mainLayout->addWidget(addressEdit, 1, 1);
    mainLayout->addWidget(itemsTable, 0, 2, 2, 1);
    mainLayout->addWidget(offersCheckBox, 2, 1, 1, 2);
    mainLayout->addWidget(buttonBox, 3, 0, 1, 3);
    setLayout(mainLayout);

    setWindowTitle(title);
}
setupItemsTable() 函数实例化了QTableWidget 对象itemsTable ,并根据QStringList 对象items 设置了行数, 保存了排序项目的类型。列数设置为 2,提供 "名称 "和 "数量 "布局。for 循环用于填充itemsTable ,name 项目的标志设置为Qt::ItemIsEnabled 或Qt::ItemIsSelectable 。为演示起见,quantity 项目设置为 1,itemsTable 中的所有项目的数量都是这个值;但可以在运行时通过编辑单元格内容进行修改。
void DetailsDialog::setupItemsTable()
{
    items << tr("T-shirt") << tr("Badge") << tr("Reference book")
          << tr("Coffee cup");

    itemsTable = new QTableWidget(items.count(), 2);

    for (int row = 0; row < items.count(); ++row) {
        QTableWidgetItem *name = new QTableWidgetItem(items[row]);
        name->setFlags(Qt::ItemIsEnabled | Qt::ItemIsSelectable);
        itemsTable->setItem(row, 0, name);
        QTableWidgetItem *quantity = new QTableWidgetItem("1");
        itemsTable->setItem(row, 1, quantity);
    }
}
orderItems() 函数从itemsTable 中提取数据,并以QList<QPair<QString,int>> 的形式返回,其中每个QPair 对应一个项目和订购数量。
QList<QPair<QString, int> > DetailsDialog::orderItems()
{
    QList<QPair<QString, int> > orderList;

    for (int row = 0; row < items.count(); ++row) {
        QPair<QString, int> item;
        item.first = itemsTable->item(row, 0)->text();
        int quantity = itemsTable->item(row, 1)->data(Qt::DisplayRole).toInt();
        item.second = qMax(0, quantity);
        orderList.append(item);
    }

    return orderList;
}
senderName() 函数用于返回QLineEdit 的值,该值用于存储订货单的名称字段。
QString DetailsDialog::senderName() const
{
    return nameEdit->text();
}
senderAddress() 函数用于返回包含订货单地址的QTextEdit 的值。
QString DetailsDialog::senderAddress() const
{
    return addressEdit->toPlainText();
}
sendOffers() 函数用于返回true 或false 的值,以确定订单中的客户是否希望收到有关公司优惠和促销活动的更多信息。
bool DetailsDialog::sendOffers()
{
    return offersCheckBox->isChecked();
}
verify() 函数是一个额外实现的槽,用于验证用户在DetailsDialog 中输入的详细信息。如果输入的详细信息不完整,则会显示QMessageBox ,让用户选择放弃DetailsDialog 。否则,将接受详细信息并调用accept() 函数。
void DetailsDialog::verify()
{
    if (!nameEdit->text().isEmpty() && !addressEdit->toPlainText().isEmpty()) {
        accept();
        return;
    }

    QMessageBox::StandardButton answer;
    answer = QMessageBox::warning(this, tr("Incomplete Form"),
        tr("The form does not contain all the necessary information.\n"
           "Do you want to discard it?"),
        QMessageBox::Yes | QMessageBox::No);

    if (answer == QMessageBox::Yes)
        reject();
}
主窗口定义
MainWindow 类是QMainWindow 的子类,实现了两个插槽 -openDialog() 和printFile() 。它还包含QTabWidget 的私有实例letters 。
class MainWindow : public QMainWindow
{
    Q_OBJECT

public:
    MainWindow();
    void createSample();

public slots:
    void openDialog();
    void printFile();

private:
    void createLetter(const QString &name, const QString &address,
                      QList<QPair<QString,int> > orderItems,
                      bool sendOffers);

    QAction *printAction;
    QTabWidget *letters;
};
主窗口的实现
MainWindow 构造函数设置了fileMenu 以及所需的操作newAction 和printAction 。这些操作的triggered() 信号连接到额外实现的 openDialog() 插槽和默认的 close() 插槽。QTabWidget 和letters 被实例化并设置为窗口的中心部件。
MainWindow::MainWindow()
{
    QMenu *fileMenu = new QMenu(tr("&File"), this);
    QAction *newAction = fileMenu->addAction(tr("&New..."));
    newAction->setShortcuts(QKeySequence::New);
    printAction = fileMenu->addAction(tr("&Print..."), this, &MainWindow::printFile);
    printAction->setShortcuts(QKeySequence::Print);
    printAction->setEnabled(false);
    QAction *quitAction = fileMenu->addAction(tr("E&xit"));
    quitAction->setShortcuts(QKeySequence::Quit);
    menuBar()->addMenu(fileMenu);

    letters = new QTabWidget;

    connect(newAction, &QAction::triggered, this, &MainWindow::openDialog);
    connect(quitAction, &QAction::triggered, this, &MainWindow::close);

    setCentralWidget(letters);
    setWindowTitle(tr("Order Form"));
}
createLetter() 函数创建了一个新的QTabWidget ,其父节点是QTextEdit,editor 。该函数接受四个参数,与我们通过DetailsDialog 获取的参数相对应,以便 "填充 "editor 。
void MainWindow::createLetter(const QString &name, const QString &address,
                              QList<QPair<QString,int> > orderItems,
                              bool sendOffers)
{
    QTextEdit *editor = new QTextEdit;
    int tabIndex = letters->addTab(editor, name);
    letters->setCurrentIndex(tabIndex);
然后,我们使用QTextEdit::textCursor() 获取editor 的光标。然后使用QTextCursor::Start 将cursor 移到文档的起始位置。
    QTextCursor cursor(editor->textCursor());
    cursor.movePosition(QTextCursor::Start);
回想一下富文本文档的结构,框架和表格的序列总是由文本块分隔,其中一些文本块可能不包含任何信息。
在订单示例中,这部分的文档结构如下表所示:
| 带参考框架格式的框架 | |
| 块 | A company |
| 块 | |
| 块 | 321 City Street |
| 块 | |
| 块 | Industry Park |
| 块 | |
| 块 | Another country |
可通过以下代码实现:
    QTextFrame *topFrame = cursor.currentFrame();
    QTextFrameFormat topFrameFormat = topFrame->frameFormat();
    topFrameFormat.setPadding(16);
    topFrame->setFrameFormat(topFrameFormat);

    QTextCharFormat textFormat;
    QTextCharFormat boldFormat;
    boldFormat.setFontWeight(QFont::Bold);

    QTextFrameFormat referenceFrameFormat;
    referenceFrameFormat.setBorder(1);
    referenceFrameFormat.setPadding(8);
    referenceFrameFormat.setPosition(QTextFrameFormat::FloatRight);
    referenceFrameFormat.setWidth(QTextLength(QTextLength::PercentageLength, 40));
    cursor.insertFrame(referenceFrameFormat);

    cursor.insertText("A company", boldFormat);
    cursor.insertBlock();
    cursor.insertText("321 City Street");
    cursor.insertBlock();
    cursor.insertText("Industry Park");
    cursor.insertBlock();
    cursor.insertText("Another country");
请注意,topFrame 是editor 的顶层框架,并没有显示在文档结构中。
然后,我们将cursor 的位置设置回topFrame 中的最后一个位置,并填写客户的姓名(由构造函数提供)和地址--使用基于范围的 for 循环遍历QString,address 。
    cursor.setPosition(topFrame->lastPosition());

    cursor.insertText(name, textFormat);
    const QStringList lines = address.split('\n');
    for (const QString &line : lines) {
        cursor.insertBlock();
        cursor.insertText(line);
    }
cursor 现在回到了topFrame 中,上述部分代码的文档结构为
| 块 | Donald |
| 块 | 47338 Park Avenue |
| 块 | Big City |
为了间隔起见,我们调用了两次insertBlock() 。currentDate() 得到并显示。我们使用setWidth() 增加bodyFrameFormat 的宽度,并插入一个具有该宽度的新框架。
    cursor.insertBlock();
    cursor.insertBlock();

    QDate date = QDate::currentDate();
    cursor.insertText(tr("Date: %1").arg(date.toString("d MMMM yyyy")),
                      textFormat);
    cursor.insertBlock();

    QTextFrameFormat bodyFrameFormat;
    bodyFrameFormat.setWidth(QTextLength(QTextLength::PercentageLength, 100));
    cursor.insertFrame(bodyFrameFormat);
下面的代码将标准文本插入订购表。
    cursor.insertText(tr("I would like to place an order for the following "
                         "items:"), textFormat);
    cursor.insertBlock();
    cursor.insertBlock();
现在,文档结构的这一部分包含日期、一个包含bodyFrameFormat 的框架以及标准文本。
| 块 | |
| 块 | |
| 块 | Date: 25 May 2007 |
| 块 | |
| 带有bodyFrameFormat的框架 | |
| 块 | I would like to place an order for the following items: |
| 块 | |
| 块 |
QTextTableFormat 对象orderTableFormat 用于保存项目类型和订购数量。
    QTextTableFormat orderTableFormat;
    orderTableFormat.setAlignment(Qt::AlignHCenter);
    QTextTable *orderTable = cursor.insertTable(1, 2, orderTableFormat);

    QTextFrameFormat orderFrameFormat = cursor.currentFrame()->frameFormat();
    orderFrameFormat.setBorder(1);
    cursor.currentFrame()->setFrameFormat(orderFrameFormat);
我们使用cellAt() 为orderTable 设置标题。
    cursor = orderTable->cellAt(0, 0).firstCursorPosition();
    cursor.insertText(tr("Product"), boldFormat);
    cursor = orderTable->cellAt(0, 1).firstCursorPosition();
    cursor.insertText(tr("Quantity"), boldFormat);
然后,我们遍历QList 的QPair 对象,填充orderTable 。
    for (int i = 0; i < orderItems.count(); ++i) {
        QPair<QString,int> item = orderItems[i];
        int row = orderTable->rows();

        orderTable->insertRows(row, 1);
        cursor = orderTable->cellAt(row, 0).firstCursorPosition();
        cursor.insertText(item.first, textFormat);
        cursor = orderTable->cellAt(row, 1).firstCursorPosition();
        cursor.insertText(QString("%1").arg(item.second), textFormat);
    }
本节的文档结构如下
orderTable 与orderTableFormat | |
| 块 | Product |
| 块 | Quantity |
| 块 | T-shirt |
| 块 | 4 |
| 块 | Badge |
| 块 | 3 |
| 块 | Reference book |
| 块 | 2 |
| 块 | Coffee cup |
| 块 | 5 |
然后将cursor 移回到topFrame 的lastPosition() 中,并插入更多标准文本。
    cursor.setPosition(topFrame->lastPosition());

    cursor.insertBlock();
    cursor.insertText(tr("Please update my records to take account of the "
                         "following privacy information:"));
    cursor.insertBlock();
插入另一个QTextTable ,以显示客户对报价的偏好。
    QTextTable *offersTable = cursor.insertTable(2, 2);

    cursor = offersTable->cellAt(0, 1).firstCursorPosition();
    cursor.insertText(tr("I want to receive more information about your "
                         "company's products and special offers."), textFormat);
    cursor = offersTable->cellAt(1, 1).firstCursorPosition();
    cursor.insertText(tr("I do not want to receive any promotional information "
                         "from your company."), textFormat);

    if (sendOffers)
        cursor = offersTable->cellAt(0, 0).firstCursorPosition();
    else
        cursor = offersTable->cellAt(1, 0).firstCursorPosition();

    cursor.insertText("X", boldFormat);
这部分的文档结构如下
| 块 | |
| 块 | Please update my... |
| 块 | |
offersTable | |
| 块 | I want to receive... |
| 块 | I do not want to receive... |
| 块 | X |
移动cursor ,插入 "Sincerely "和客户姓名。为保持间距,插入了更多的块。启用printAction 表示现在可以打印订单。
    cursor.setPosition(topFrame->lastPosition());
    cursor.insertBlock();
    cursor.insertText(tr("Sincerely,"), textFormat);
    cursor.insertBlock();
    cursor.insertBlock();
    cursor.insertBlock();
    cursor.insertText(name);

    printAction->setEnabled(true);
}
文件结构的底部为
| 块 | |
| 块 | Sincerely, |
| 块 | |
| 块 | |
| 块 | |
| 块 | Donald |
createSample() 函数用于创建订单示例表。
void MainWindow::createSample()
{
    DetailsDialog dialog("Dialog with default values", this);
    createLetter("Mr. Smith", "12 High Street\nSmall Town\nThis country",
                 dialog.orderItems(), true);
}
openDialog() 函数打开一个DetailsDialog 对象。如果dialog 中的详细信息被接受,就会使用从dialog 中提取的参数调用createLetter() 函数。
void MainWindow::openDialog()
{
    DetailsDialog dialog(tr("Enter Customer Details"), this);

    if (dialog.exec() == QDialog::Accepted) {
        createLetter(dialog.senderName(), dialog.senderAddress(),
                     dialog.orderItems(), dialog.sendOffers());
    }
}
如下图所示,为了打印出订购表,还包括一个printFile() 函数:
void MainWindow::printFile()
{
#if defined(QT_PRINTSUPPORT_LIB) && QT_CONFIG(printdialog)
    QTextEdit *editor = static_cast<QTextEdit*>(letters->currentWidget());
    QPrinter printer;

    QPrintDialog dialog(&printer, this);
    dialog.setWindowTitle(tr("Print Document"));
    if (editor->textCursor().hasSelection())
        dialog.setOption(QAbstractPrintDialog::PrintSelection);
    if (dialog.exec() != QDialog::Accepted) {
        return;
    }

    editor->print(&printer);
#endif
}
该函数还允许用户使用QTextCursor::hasSelection() 打印选定区域,而不是打印整个文档。
main() 函数
main() 函数将MainWindow 实例化,并将其大小设置为 640x480 像素,然后调用show() 函数和createSample() 函数。
int main(int argc, char *argv[])
{
    QApplication app(argc, argv);
    MainWindow window;
    window.resize(640, 480);
    window.show();
    window.createSample();
    return app.exec();
}
© 2025 The Qt Company Ltd. Documentation contributions included herein are the copyrights of their respective owners. The documentation provided herein is licensed under the terms of the GNU Free Documentation License version 1.3 as published by the Free Software Foundation. Qt and respective logos are trademarks of The Qt Company Ltd. in Finland and/or other countries worldwide. All other trademarks are property of their respective owners.

