Python-QML integration
This tutorial provides a quick walk-through of a python application that loads, and interacts with a QML file. QML is a declarative language that lets you design UIs faster than a traditional language, such as C++. The QtQml and QtQuick modules provides the necessary infrastructure for QML-based UIs.
In this tutorial, you will learn how to integrate Python with a QML application. This mechanism will help us to understand how to use Python as a backend for certain signals from the UI elements in the QML interface. Additionally, you will learn how to provide a modern look to your QML application using one of the features from Qt Quick Controls 2.
The tutorial is based on an application that allow you to set many text properties, like increasing the font size, changing the color, changing the style, and so on. Before you begin, install the PySide6 Python packages.
The following step-by-step process will guide you through the key elements of the QML based application and PySide6 integration:
First, let’s start with the following QML-based UI:
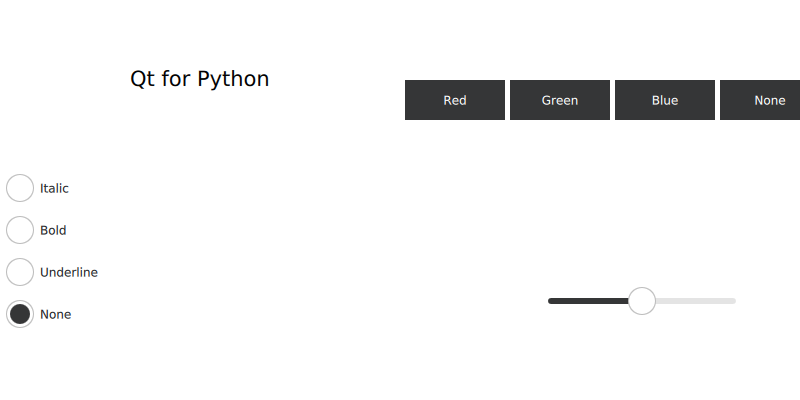
The design is based on a GridLayout, containing two ColumnLayout. Inside the UI you will find many RadioButton, Button, and a Slider.
With the QML file in place, you can load it from Python:
 1if __name__ == '__main__':
 2    app = QGuiApplication(sys.argv)
 3    QQuickStyle.setStyle("Material")
 4    engine = QQmlApplicationEngine()
 5    # Add the current directory to the import paths and load the main module.
 6    engine.addImportPath(sys.path[0])
 7    engine.loadFromModule("QmlIntegration", "Main")
 8
 9    if not engine.rootObjects():
10        sys.exit(-1)
11
12    exit_code = app.exec()
13    del engine
14    sys.exit(exit_code)
Notice that we only need a
QQmlApplicationEnginetoloadthe QML file.Define the
Bridgeclass, containing all the logic for the element that will be register in QML:1# To be used on the @QmlElement decorator 2# (QML_IMPORT_MINOR_VERSION is optional) 3QML_IMPORT_NAME = "io.qt.textproperties" 4QML_IMPORT_MAJOR_VERSION = 1 5 6 7@QmlElement 8class Bridge(QObject): 9 10 @Slot(str, result=str) 11 def getColor(self, s): 12 if s.lower() == "red": 13 return "#ef9a9a" 14 if s.lower() == "green": 15 return "#a5d6a7" 16 if s.lower() == "blue": 17 return "#90caf9" 18 return "white" 19 20 @Slot(float, result=int) 21 def getSize(self, s): 22 size = int(s * 34) 23 return max(1, size) 24 25 @Slot(str, result=bool) 26 def getItalic(self, s): 27 return s.lower() == "italic" 28 29 @Slot(str, result=bool) 30 def getBold(self, s): 31 return s.lower() == "bold" 32 33 @Slot(str, result=bool) 34 def getUnderline(self, s): 35 return s.lower() == "underline" 36
Notice that the registration happens thanks to the
QmlElementdecorator, that underneath uses the reference to theBridgeclass and the variablesQML_IMPORT_NAMEandQML_IMPORT_MAJOR_VERSION.Now, go back to the QML file and connect the signals to the slots defined in the
Bridgeclass:Bridge { id: bridge }
Inside the
ApplicationWindowwe declare a component with the same name as the Python class, and provide anid:. Thisidwill help you to get a reference to the element that was registered from Python.1 RadioButton { 2 id: italic 3 Layout.alignment: Qt.AlignLeft 4 text: "Italic" 5 onToggled: { 6 leftlabel.font.italic = bridge.getItalic(italic.text) 7 leftlabel.font.bold = bridge.getBold(italic.text) 8 leftlabel.font.underline = bridge.getUnderline(italic.text) 9 10 } 11 }
The properties Italic, Bold, and Underline are mutually exclusive, this means only one can be active at any time. To achieve this each time we select one of these options, we check the three properties via the QML element property as you can see in the above snippet. Only one of the three will return True, while the other two will return False, that is how we make sure only one is being applied to the text.
Put the file into into a directory named
QmlIntegrationalong with a file namedqmldirto describe a basic QML module:module QmlIntegration Main 254.0 Main.qml
Each slot verifies if the selected option contains the text associated to the property:
1    @Slot(str, result=bool)
2    def getBold(self, s):
3        return s.lower() == "bold"
Returning True or False allows you to activate and deactivate the properties of the QML UI elements.
It is also possible to return other values that are not Boolean, like the slot in charge of returning the font size:
1    @Slot(float, result=int)
2    def getSize(self, s):
3        size = int(s * 34)
4        return max(1, size)
Now, for changing the look of our application, you have two options:
Use the command line: execute the python file adding the option,
--style:python main.py --style material
Use a
qtquickcontrols2.conffile:1[Controls] 2Style=Material 3 4[Universal] 5Theme=System 6Accent=Red 7 8[Material] 9Theme=Dark 10Accent=Red
Then add it to your
.qrcfile:1<!DOCTYPE RCC><RCC version="1.0"> 2<qresource prefix="/"> 3 <file>qtquickcontrols2.conf</file> 4</qresource> 5</RCC>
Generate the rc file running,
pyside6-rcc style.qrc -o rc_style.pyAnd finally import it from yourmain.pyscript.
1import sys
2
3from PySide6.QtCore import QObject, Slot
4from PySide6.QtGui import QGuiApplication
5from PySide6.QtQml import QQmlApplicationEngine, QmlElement
6from PySide6.QtQuickControls2 import QQuickStyle
7
8import rc_style  # noqa F401
You can read more about this configuration file here.
The final look of your application will be:

You can download Main.qml,
qmldir and main.py
to try this example.