Displaying Data Using a Table Widget
If you want to display data arranged in a table, use a QTableWidget to do
so, without dealing with much configuration.
Notice that using a QTableWidget is not the only path to display
information in tables. You can also create a data model and display it using
a QTableView, but that is not in the scope of this tutorial.
Note
This Widget is a ready-to-use version of something you can customize further on. To know more about the Model/View architecture in Qt, refer to its official documentation.
Import
QTableWidget,QTableWidgetItem, andQColorto display background colors:import sys from PySide6.QtGui import QColor from PySide6.QtWidgets import (QApplication, QTableWidget, QTableWidgetItem)
Create a simple data model containing the list of names and hex codes for different colors:
colors = [("Red", "#FF0000"),
          ("Green", "#00FF00"),
          ("Blue", "#0000FF"),
          ("Black", "#000000"),
          ("White", "#FFFFFF"),
          ("Electric Green", "#41CD52"),
          ("Dark Blue", "#222840"),
          ("Yellow", "#F9E56d")]
Define a function to translate the hex code into an RGB equivalent:
def get_rgb_from_hex(code):
    code_hex = code.replace("#", "")
    rgb = tuple(int(code_hex[i:i+2], 16) for i in (0, 2, 4))
    return QColor.fromRgb(rgb[0], rgb[1], rgb[2])
Initialize the
QApplicationsingleton:app = QApplication()
Configure the
QTableWidgetto have a number of rows equivalent to the amount of items from thecolorsstructure, and a number of columns with the members of one color entry, plus one. You can set the column name using thesetHorizontalHeaderLabelsas described below:table = QTableWidget() table.setRowCount(len(colors)) table.setColumnCount(len(colors[0]) + 1) table.setHorizontalHeaderLabels(["Name", "Hex Code", "Color"])
Note
the reason of using
+ 1is to include a new column where we can display the color.Iterate the data structure, create the
QTableWidgetItemsinstances, and add them into the table using ax, ycoordinate. Here the data is being assigned row-per-row:for i, (name, code) in enumerate(colors): item_name = QTableWidgetItem(name) item_code = QTableWidgetItem(code) item_color = QTableWidgetItem() item_color.setBackground(get_rgb_from_hex(code)) table.setItem(i, 0, item_name) table.setItem(i, 1, item_code) table.setItem(i, 2, item_color)
Show the table and execute the
QApplication.table.show() sys.exit(app.exec())
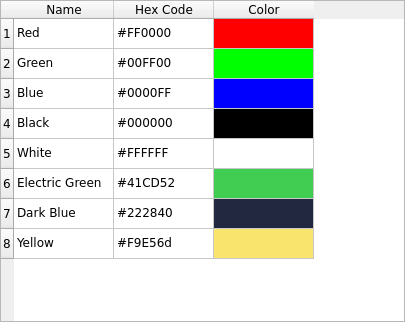
The final application will look like this: