C
Multiscreen Launcher
Demonstrates usage of the Qt Android Apps Utils API with multi-screen support.
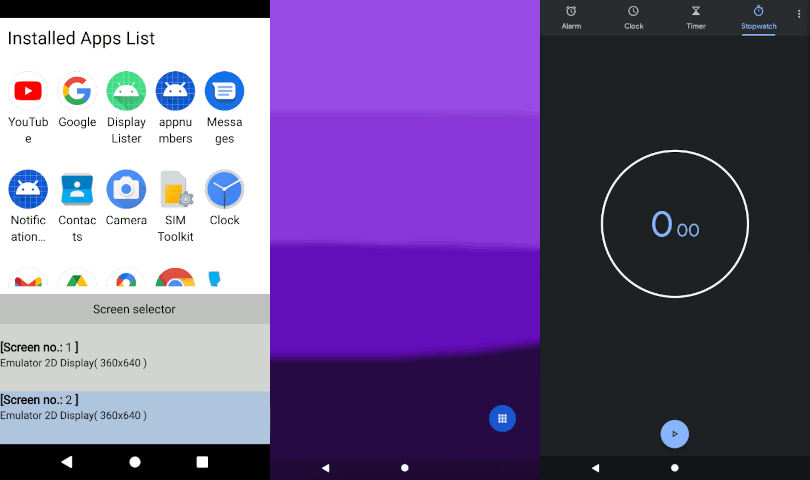
This example demonstrates how to use Qt Android Automotive Base to show a list of installed apps in an Android or Android Automotive device and how to run particular application on the chosen screen. The application UI is created by using Qt Quick.
When starting the app, a list of all installed apps, excluding system apps, is shown as GridView. Pressing the icon starts the app. Below the applications grid, is the list of available screens. Selected application will run on the screen chosen from the list.
Running the Example
To run the example from Qt Creator, open the Welcome mode and select the example from Examples. For more information, see Qt Creator: Tutorial: Build and run.
Using the Model
The installed apps model is based on a QAbstractListModel from C++ and it is extended to QML. The model can be used with ListView or GridView as needed in a same way like in App Lister example.
In this example, a ListView is used to present available screens. The model is attached to the list of the screens as follows:
    ListView {
        id: screensListView
        anchors.left: parent.left
        anchors.right: parent.right
        anchors.bottom: parent.bottom
        height: 200

        model: Application.screens
Now, we set the list's delegate to show the available screens information, and choose the preffered one. The chosen screen will be the target for running the app.
        id: screenItemDelegate
        Rectangle {
            color: ListView.isCurrentItem ? "lightsteelblue" : "lightgrey"
            width: window.width
            height: 80 - window.marginSize
            Column {
                Text {
                    id: screenItemIdLabel
                    font.pointSize: 16
                    text: "<b>[Screen no.:</b> " + index + " <b>]</b>"
                    horizontalAlignment: Text.AlignLeft
                    maximumLineCount: 1
                }
                Text {
                    id: screenItemNameLabel
                    font.pointSize: 14
                    text: modelData.name + "( " + modelData.width + "x" +
                          modelData.height + " )"
                }
            }
            MouseArea {
                id: screenItemArea
                anchors.fill: parent
                onClicked: {
                    screensListView.currentIndex = index
                }
            }
        }
    }
Using the API Calls
Inside the ListView delegate, we can access some information from Android Apps Utils, and use them to start an app for example:
                        AndroidAppsUtils.startAppOnScreen(model.packageName, screen)
                    }
                }
            }

            Text {
                id: appName
                text: model.appName
                width: delegate.width
                anchors.top: appIcon.bottom
                anchors.topMargin: window.marginSize / 3
                horizontalAlignment: Text.AlignHCenter
                elide: Text.ElideRight
                wrapMode: Text.Wrap
                maximumLineCount: 2
            }
        }
    }

    ListView {
        id: screensListView
        anchors.left: parent.left
        anchors.right: parent.right
        anchors.bottom: parent.bottom
        height: 200

        model: Application.screens
        headerPositioning: ListView.OverlayHeader
        header: screensListHeader
        delegate: screenItemDelegate
        focus: true
        clip: true
    }

    Component {
        id: screensListHeader
        Rectangle {
            z: 2
            width: window.width
            height: 40
            visible: true
            color: "silver"
            Text {
                anchors.centerIn: parent
                text: qsTr("Screen selector")
            }
        }
    }

    Component {
        id: screenItemDelegate
        Rectangle {
            color: ListView.isCurrentItem ? "lightsteelblue" : "lightgrey"
            width: window.width
            height: 80 - window.marginSize
            Column {
                Text {
                    id: screenItemIdLabel
                    font.pointSize: 16
                    text: "<b>[Screen no.:</b> " + index + " <b>]</b>"
                    horizontalAlignment: Text.AlignLeft
                    maximumLineCount: 1
                }
                Text {
                    id: screenItemNameLabel
                    font.pointSize: 14
                    text: modelData.name + "( " + modelData.width + "x" +
                          modelData.height + " )"
                }
            }
            MouseArea {
                id: screenItemArea
                anchors.fill: parent
                onClicked: {
                    screensListView.currentIndex = index
See also Qt for Android.
Available under certain Qt licenses.
Find out more.
