Application Features Example
Showcases client applications with various features and QML modularization.
Note: Please read this if you want to build the example on a Linux machine.
Introduction
This example demonstrates how to implement some particular features you may require in an application, such as:
- how to implement a nested compositor
- how to simulate a crash and recover from it
- how to analyze glitches with the watchdog
- how to show multiple top-level windows simultaneously
- how to use the native runtime, with no QML
Most of these features are only supported properly in multi-process mode.
The example focuses on the application (client) side. The System UI (compositor/server) is based on the Desktop System UI Example with some modifications. Refer to that example for more details on how to implement a System UI.
In addition, this example shows how to write and use QML modules in the application manager context, see below.
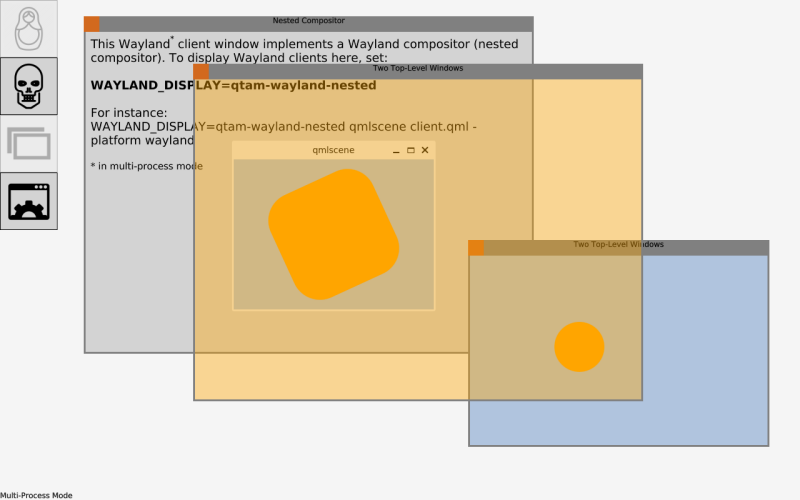
Nested Compositor
The nested compositor application shows how to implement a Wayland compositor inside an application (Wayland client) window. The compositor is implemented in pure QML and kept to a minimum. To display Wayland clients within this compositor, you need to set the WAYLAND_DISPLAY environment variable appropriately.
To start a client with this environment variable set via command line:
WAYLAND_DISPLAY=qtam-wayland-nested qml client.qml -platform waylandThis command only works in multi-process mode, since the nested compositor needs a real window as its root element.
The QML code for the nested compositor application is as follows:
import QtQuick
import QtApplicationManager.Application
import QtWayland.Compositor
import QtWayland.Compositor.XdgShell
import QtWayland.Compositor.WlShell

Item {
    id: root

    function close() {
        shellSurfaces.clear();
    }

    Text {
        anchors.fill: parent
        anchors.margins: 8
        font.pointSize: 14
        wrapMode: Text.Wrap
        textFormat: Text.RichText
        text: "This Wayland<sup>*</sup> client window implements a Wayland compositor (nested compositor). " +
              "To display Wayland clients here, set:<br><br><b>WAYLAND_DISPLAY=qtam-wayland-nested</b>" +
              "<br><br>For instance:<br>WAYLAND_DISPLAY=qtam-wayland-nested qml client.qml -platform wayland" +
              "<br><br><small>* in multi-process mode</small>"
    }

    Loader {
        id: ldr
        active: root.Window.window       // Window attached property might not be available immediately (in-process)
        sourceComponent: Component {
            WaylandCompositor {
                socketName: "qtam-wayland-nested"

                WaylandOutput {
                    window: root.Window.window
                    sizeFollowsWindow: true
                }

                WlShell {
                    onWlShellSurfaceCreated: (shellSurface) => shellSurfaces.append({shellSurface});
                }

                XdgShell {
                    onToplevelCreated: (toplevel, xdgSurface) => shellSurfaces.append({xdgSurface});
                }
            }
        }
    }

    Repeater {
        model: ListModel { id: shellSurfaces }
        ShellSurfaceItem {
            required property var modelData
            required property int index
            shellSurface: modelData
            onSurfaceDestroyed: shellSurfaces.remove(index)
        }
    }

    Connections {
        target: ApplicationInterface
        function onQuit() {
            root.close();
            ApplicationInterface.acknowledgeQuit();
        }
    }

    Component.onCompleted: console.info("Start a client application in the nested compositor for instance with:\n  " +
                                        "WAYLAND_DISPLAY=qtam-wayland-nested QT_WAYLAND_DISABLE_WINDOWDECORATION=1 " +
                                        "QT_WAYLAND_SHELL_INTEGRATION=xdg-shell qml client.qml -platform wayland");
}
Crash Simulation and Recovery
This application provides various means to force a crash in an application, such as a segmentation fault. It utilizes QML modules that include C++ and QML code; in particular, the C++ provided QML types Terminator1 and Terminator2 are used to trigger crashes. The application manager then prints the cause of the crash and related information, like a backtrace. The System UI implements a basic form of crash recovery: restarting the application. Of course, crash recovery only works in multi-process mode. In single-process mode, a crash affects the entire program (the System UI).
The QML code for the crash simulation and recovery application is as follows:
import QtQuick
import QtApplicationManager.Application
import Crash
import Sequel

ApplicationManagerWindow {
    id: root

    readonly property var modes: ({
           illegalMemory: [ "Illegal memory access", root.accessIllegalMemory ],
           illegalMemoryInThread: [ "Illegal memory access in a thread", t2.accessIllegalMemoryInThread ],
           stackOverflow: [ "Force stack overflow", t2.forceStackOverflow ],
           divideByZero: [ "Divide by zero", t2.divideByZero ],
           raise: [ "Raise signal 7", t2.raise ],
           abort: [ "Call abort", Terminator1.abort ],
           unhandledException: [ "Throw unhandled exception", Terminator1.throwUnhandledException ],
           gracefully: [ "Exit gracefully", Terminator1.exitGracefully ]
    })

    property var accessIllegalMemory: (function() {
        let count = 0;
        return function recursive() {
            if (++count > 9)
                t2.accessIllegalMemory();
            else
                root.accessIllegalMemory();
        }
    })()

    color: "black"

    Terminator2 {
        id: t2
        signum: 7
    }

    CrashAnimation {
        id: crashAnimation;
        scaleTarget: content
        colorTarget: root
        onFinished: root.modes[mode][1]();
    }

    Grid {
        id: content
        anchors.centerIn: parent
        columns: 2
        Repeater {
            model: Object.keys(root.modes)
            Rectangle {
                required property var modelData
                width: root.width / 2
                height: root.height / 4
                border.width: 1
                color: "lightgrey"

                Text {
                    anchors.fill: parent
                    horizontalAlignment: Text.AlignHCenter
                    verticalAlignment: Text.AlignVCenter
                    wrapMode: Text.Wrap
                    font.pointSize: 14
                    text: modes[parent.modelData][0]
                }

                MouseArea {
                    anchors.fill: parent
                    onClicked: crashAnimation.mode = parent.modelData;
                }
            }
        }
    }
}
Analyze Glitches with the Watchdog
This application allows to introduce delays in the program execution at various points:
- Sleep GUI: pauses the main (GUI) thread of the application for the given number of seconds
- Sleep sync: pauses the render thread (if the threaded render loops is used) in the sync state. QQuickItems'
updatePaintNodemethods are called in the sync state for instance. - Sleep render: pauses the render thread (if the threaded render loop is used) in the render state. Backend (OpenGL, Vulkan, etc.) draw commands are executed in the render state.
The application manager's Watchdog is enabled in the System UI's, as well as the application's configuration file. Warnings will be printed, if the application is stuck for a certain amount of time and it might even be killed if it is stuck for too long.
Two Top-Level Windows
This application illustrates how you can display multiple top-level windows by having a QtObject as the application's root element.
The QML code for the two top-level windows application is as follows:
import QtQuick
import QtApplicationManager.Application

QtObject {
    id: root

    property var win1: ApplicationManagerWindow {
        color: "lightsteelblue"

        TapHandler {
            onTapped: root.win2.visible = !root.win2.visible;
        }

        Rectangle {
            width: 80; height: 80; radius: 40
            color: "orange"

            MouseArea {
                anchors.fill: parent
                drag.target: parent
            }
        }
    }

    property var win2: ApplicationManagerWindow {
        color: "transparent"

        Rectangle {
            id: rect
            anchors.fill: parent
            color: "orange"
            opacity: 0.4
        }

        ApplicationManagerWindow {
            id: popup
            width: 300; height: 100

            Rectangle {
                anchors.fill: parent
                border.width: 1
                color: "orangered"
            }

            Text {
                anchors.centerIn: parent
                text: "Click to hide!"
            }

            MouseArea {
                anchors.fill: parent
                onClicked: popup.visible = false;
            }

            Component.onCompleted: setWindowProperty("type", "pop-up");
        }
    }
}
Native Widgets
This application is based on QWidgets. Compared to the other applications in this example, which are QML applications, this one uses the native runtime. Consequently, the application's entry point isn't a main.qml file, but an executable. This application is a basic application that still adheres to this particular System UI. It's meant to illustrate the concept: the System UI needs a type window property to differentiate between normal windows and popups.
This application only works in multi-process mode, as application processes cannot be started in single-process mode.
Linking against the private application manager modules is prohibited by default to prevent potential problems with duplicate symbols coming from QML plugins. However, here building against them is both intended and required, so we need to set the define AM_COMPILING_LAUNCHER:
target_compile_definitions(widgets PRIVATE AM_COMPILING_LAUNCHER)The C++ code for the native widgets application is as follows:
#include <QApplication>
#include <QPushButton>
#include <QDialog>
#include <QVBoxLayout>

#include <QtAppManCommon/logging.h>
#include <QtAppManApplication/applicationmain.h>
#include <QtAppManShared/notification.h>

int main(int argc, char *argv[])
{
    QtAM::Logging::initialize(argc, argv);
    QtAM::Logging::setApplicationId("widgets");

    try {
        QtAM::ApplicationMain am(argc, argv);

        am.setup();

        QWidget window;
        QVBoxLayout layout(&window);

        // Popup using application manager window property
        QPushButton button1(QStringLiteral("Click to open/close a popup"));
        button1.setStyleSheet(QStringLiteral("QPushButton { background-color : limegreen; font-size: 36px; }"));
        layout.addWidget(&button1);

        QDialog *popup1 = new QDialog(&window);
        (new QPushButton(QStringLiteral("I'm a popup!"), popup1))->resize(340, 140);
        popup1->setStyleSheet(QStringLiteral("QPushButton { background-color : limegreen; color : white; font-size: 24px; }"));
        QObject::connect(&button1, &QPushButton::clicked, popup1, [&popup1, &am] () {
            popup1->setVisible(!popup1->isVisible());
            am.setWindowProperty(popup1->windowHandle(), QStringLiteral("type"), QStringLiteral("pop-up"));
        });

        // Notification
        QPushButton button2(QStringLiteral("Click to open a notification"));
        button2.setStyleSheet(QStringLiteral("QPushButton { background-color : darkgrey; font-size: 36px; }"));
        layout.addWidget(&button2);

        QtAM::Notification *notification = am.createNotification(&am);
        notification->setSummary(QStringLiteral("I'm a notification"));
        QObject::connect(&button2, &QPushButton::clicked, notification, &QtAM::Notification::show);

        // Application interface for handling quit
        QObject::connect(&am, &QtAM::ApplicationMain::quit, &am, &QCoreApplication::quit);

        am.processEvents();
        window.showNormal();

        return am.exec();

    } catch (const std::exception &e) {
        qWarning() << "ERROR:" << e.what();
    }
}
Code Structure
The code is structured in a way where the resulting application folders only contain the artifacts necessary to run the application. Consequently, you can package these applications and install them as well.
To build Qt Application Manager, including its examples, you need to pass -DQT_BUILD_EXAMPLES=ON to CMake. For more details, see Build.
The System UI and all applications produce QML modules. These modules are generated as libraries that include all the C++ and QML code and other resources, like images. Consequently, only the libraries need to be loaded from the native file system instead of individual QML files, images, or other such assets. As an additional bonus, you get things like pre-compiled QML, linting checks, and auto-generation of files like qmldir.
System UI QML Module
In the CMakeLists.txt file, the QML module is directly compiled into the application-features executable:
qt_add_qml_module(application-features
    URI "SystemUI"
    QML_FILES
        SystemUi/main.qml
    RESOURCES
        SystemUi/grab.png
        SystemUi/close.png
        am-config.yaml
)
To keep it simple, the module is kept in a directory with the same name as its URI (SystemUi). Two images and the main.qml file are added to the module (there is no C++ code used, though).
Crash Application QML Modules
The Crash application consists of two QML modules: Crash_module and sequelmoduleplugin.
In the apps/Crash/CMakeLists.txt file, the Crash_module is defined:
qt_add_qml_module(
    Crash_module
    URI "Crash"
    NO_PLUGIN
    SOURCES terminator1.cpp
    QML_FILES crashapp.qml
)
The default "qt/qml" resource prefix is used here. By providing the NO_PLUGIN keyword, only a dynamic backing library is created. A QML plugin is unnecessary since the library will be loaded explicitly (see below). To keep it simple, the module is kept in a directory with the same name as its URI (Crash). The crashapp.qml file is added to the module, in addition to the C++ file terminator1.cpp. The generated library is loaded explicitly when the application starts through the following lines in apps/Crash/info.yaml:
  runtimeParameters:
    resources: [ "Crash_module" ]
It provides the crashapp.qml file, which is the application's main QML file and the Terminator1 QML singleton type.
The second module, sequelmoduleplugin is defined as a QML plugin in apps/Crash/Sequel/CMakeLists.txt:
qt_add_qml_module(
    sequelmoduleplugin
    URI "Sequel"
    PLUGIN_TARGET sequelmoduleplugin
    SOURCES terminator2.cpp
    QML_FILES CrashAnimation.qml
)
For convenience, PLUGIN_TARGET is defined with the same argument as the module target name. This creates a plugin that already includes the backing target (see qt_add_qml_module). The plugin is loaded implicitly at runtime through the "import Sequel" statement in crashapp.qml. It provides the CrashAnimation and Terminator2 QML types.
© 2026 The Qt Company Ltd. Documentation contributions included herein are the copyrights of their respective owners. The documentation provided herein is licensed under the terms of the GNU Free Documentation License version 1.3 as published by the Free Software Foundation. Qt and respective logos are trademarks of The Qt Company Ltd. in Finland and/or other countries worldwide. All other trademarks are property of their respective owners.
