
Qt Quick 간행물
Qt Quick Controls 를 사용하여 MQTT 토픽에 게시할 수 있는 애플리케이션을 만드세요.
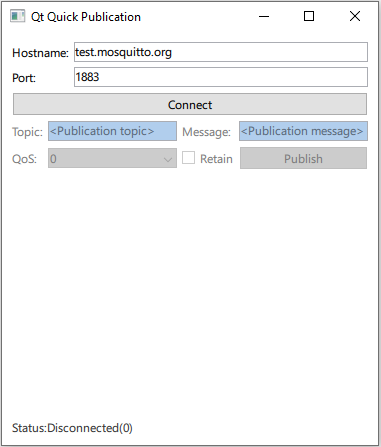
Qt Quick '게시' 예제는 QMqttClient 를 QML 유형으로 등록하고 Qt Quick 애플리케이션에서 이를 사용하는 방법을 보여줍니다.
Qt MQTT 현재 버전에서는 QML API를 제공하지 않습니다. 그러나 모듈의 C++ 클래스를 QML에서 사용할 수 있도록 할 수 있습니다.
클라이언트 생성하기
QMqttClient 를 멤버로 갖는 QmlMqttClient 래퍼 클래스를 생성합니다:
private:
    Q_DISABLE_COPY(QmlMqttClient)
    QMqttClient m_client;
};
생성자에서 QMqttClient 의 메서드에 래퍼 메서드를 연결합니다:
QmlMqttClient::QmlMqttClient(QObject *parent)
    : QObject(parent)
{
    connect(&m_client, &QMqttClient::hostnameChanged, this, &QmlMqttClient::hostnameChanged);
    connect(&m_client, &QMqttClient::portChanged, this, &QmlMqttClient::portChanged);
    connect(&m_client, &QMqttClient::stateChanged, this, &QmlMqttClient::stateChanged);
}
래퍼 메서드는 래핑된 메서드와 동일한 이름을 가집니다. 가장 간단한 경우, 이는 단순히 하나의 메서드 호출일 뿐입니다:
void QmlMqttClient::connectToHost()
{
    m_client.connectToHost();
}
또한 래퍼 메서드에 몇 가지 추가 기능을 확장하여 사용자 정의할 수도 있습니다:
void QmlMqttClient::setPort(int newPort)
{
    if (newPort < 0|| newPort > std::numeric_limits<quint16>::max()) {
        qWarning() << "Trying to set invalid port number";
       return;
    }
    m_client.setPort(static_cast<quint16>(newPort));
QML에서 클래스 등록하기
main.cpp 파일에서 모듈 게시물에서 QML 타입 Main을 불러옵니다:
    QGuiApplication app(argc, argv);
    QQmlApplicationEngine engine;

    QObject::connect(
            &engine, &QQmlApplicationEngine::objectCreationFailed, &app,
            []() { QCoreApplication::exit(EXIT_FAILURE); }, Qt::QueuedConnection);

    engine.loadFromModule(u"publication"_s, u"Main"_s);
이제 Main.qml 파일에서 MqttClient 타입을 사용하여 MQTT 클라이언트를 생성합니다:
    MqttClient {
        id: client
        hostname: hostnameField.text
        port: portField.text
    }
파일:
© 2026 The Qt Company Ltd. Documentation contributions included herein are the copyrights of their respective owners. The documentation provided herein is licensed under the terms of the GNU Free Documentation License version 1.3 as published by the Free Software Foundation. Qt and respective logos are trademarks of The Qt Company Ltd. in Finland and/or other countries worldwide. All other trademarks are property of their respective owners.
