
날씨 정보
'날씨 정보' 예제는 C++ 플러그인에서 사용자의 현재 위치를 활용하여 웹 서비스로부터 지역별 콘텐츠를 가져오는 방법을 보여줍니다 Qt Quick를 사용하여 Qt Positioning를 사용하여 C++ 플러그인 내에서 웹 서비스를 통해 현지 콘텐츠를 가져오는 방법을 보여줍니다.
이 예제에서 사용된 Qt Positioning 이 예제에서 사용되는 주요 클래스:
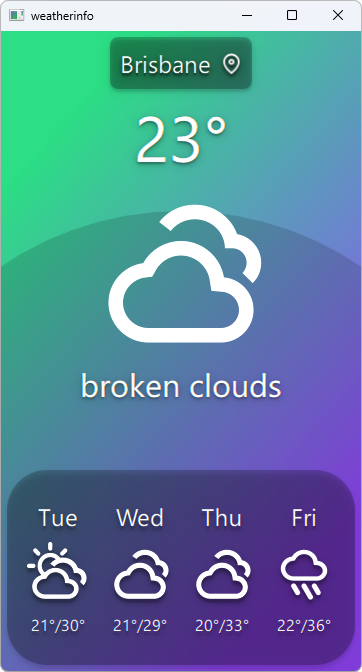
예제 실행하기
다음 위치에서 예제를 실행할 수 있습니다:
- Qt Creator
Welcome 모드를 열고 Examples 에서 예제를 선택하십시오. 자세한 내용은 Qt Creator 의 ‘튜토리얼: 빌드 및 실행’을 참조하십시오.
- Qt Extension for Visual Studio Code
Command Palette 에서 Qt: Open Qt examples 명령을 실행하고 목록에서 예제를 선택하십시오. 자세한 내용은 Qt Extension for Visual Studio Code: 튜토리얼: 빌드 및 실행을 참조하십시오.
기상 데이터 제공업체
이 예제에서는 서로 관련이 없는 여러 기상 데이터 제공자를 사용합니다:
사용할 제공자는 실행 시 자동으로 선택되며, 선택된 제공자를 사용할 수 없는 경우 변경할 수 있습니다. 그러나 수동으로 지정할 수는 없습니다.
참고: 모든 제공업체에무료 요금제가 적용되며, 이는 날씨 요청 횟수에 일정한 제한이 있음을 의미합니다. 제한을 초과할 경우, 제공업체를 일시적으로 사용할 수 없게 됩니다. 모든 제공업체를 사용할 수 없게 되면, 애플리케이션은 어떤 날씨 정보도 표시할 수 없게 됩니다. 이 경우, 제공업체 중 적어도 하나가 다시 사용 가능해질 때까지 기다려야 합니다.
애플리케이션 데이터 모델
이 예제의 핵심은 ` WeatherData ` 및 ` AppModel ` 클래스에 포함된 애플리케이션의 데이터 모델입니다. ` WeatherData `은 HTTP 서비스에서 가져온 날씨 정보를 나타냅니다. 이는 간단한 데이터 클래스이지만, 나중에 QML에서 이를 편리하게 사용할 수 있도록 ` Q_PROPERTY `을 사용합니다. 또한 QML에서 인식될 수 있도록 ` QML_ANONYMOUS ` 매크로를 사용합니다.
class WeatherData : public QObject {
    Q_OBJECT
    Q_PROPERTY(QString dayOfWeek
               READ dayOfWeek WRITE setDayOfWeek
               NOTIFY dataChanged)
    Q_PROPERTY(QString weatherIcon
               READ weatherIcon WRITE setWeatherIcon
               NOTIFY dataChanged)
    Q_PROPERTY(QString weatherDescription
               READ weatherDescription WRITE setWeatherDescription
               NOTIFY dataChanged)
    Q_PROPERTY(QString temperature
               READ temperature WRITE setTemperature
               NOTIFY dataChanged)
    QML_ANONYMOUS

public:
    explicit WeatherData(QObject *parent = 0);
    WeatherData(const WeatherData &other);
    WeatherData(const WeatherInfo &other);

    QString dayOfWeek() const;
    QString weatherIcon() const;
    QString weatherDescription() const;
    QString temperature() const;

    void setDayOfWeek(const QString &value);
    void setWeatherIcon(const QString &value);
    void setWeatherDescription(const QString &value);
    void setTemperature(const QString &value);

signals:
    void dataChanged();
};
AppModel 는 전체 애플리케이션의 상태를 모델링합니다. 시작 시, QGeoPositionInfoSource::createDefaultSource()를 사용하여 플랫폼의 기본 위치 소스를 가져옵니다.
AppModel::AppModel(QObject*parent) :
        QObject(parent),
        d(new AppModelPrivate)
{
    d->src = QGeoPositionInfoSource::createDefaultSource(this);

    if (d->src) {
        d->useGps = true;
        connect(d->src, &QGeoPositionInfoSource::positionUpdated,
                this, &AppModel::positionUpdated);
        connect(d->src, &QGeoPositionInfoSource::errorOccurred,
                this, &AppModel::positionError);
#if QT_CONFIG(permissions)
        QLocationPermission permission;
        permission.setAccuracy(QLocationPermission::Precise);
        permission.setAvailability(QLocationPermission::WhenInUse);

        switch (qApp->checkPermission(permission)) {
        case Qt::PermissionStatus::Undetermined:
            qApp->requestPermission(permission, [this] (const QPermission& permission) {
                if (permission.status()== Qt::PermissionStatus::Granted)
                    d->src->startUpdates();
                else
                    positionError(QGeoPositionInfoSource::AccessError);
            });
            break;
        case Qt::PermissionStatus::Denied:
            qWarning("Location permission is denied");
            positionError(QGeoPositionInfoSource::AccessError);
            break;
        case Qt::PermissionStatus::Granted:
            d->src->startUpdates();
            break;
        }
#else
        d->src->startUpdates();
#endif
    } else {
        d->useGps = false;
        d->city = "Brisbane";
        emit cityChanged();
        requestWeatherByCity();
    }

    QTimer*refreshTimer = new QTimer(this);
    connect(refreshTimer, &QTimer::timeout, this, &AppModel::refreshWeather);
    using namespace std::chrono;
    refreshTimer->start(60s);
}
기본 위치 소스가 없는 경우, 정적 위치를 지정하고 해당 위치의 날씨 정보를 가져옵니다. 반면, 위치 소스가 있는 경우에는 해당 소스의 positionUpdated() 신호를 AppModel 의 슬롯에 연결하고 startUpdates()를 호출하여 기기 위치에 대한 정기적인 업데이트를 시작합니다.
위치 업데이트를 수신하면, 반환된 좌표의 경도와 위도를 사용하여 지정된 위치의 날씨 데이터를 가져옵니다.
void AppModel::positionUpdated(QGeoPositionInfo gpsPos)
{
    d->coord = gpsPos.coordinate();

    if (!d->useGps)
        return;

    requestWeatherByCoordinates();
}
이 과정을 UI에 알리기 위해, 새로운 도시가 사용될 때는 cityChanged() 신호를, 날씨 업데이트가 발생할 때마다 weatherChanged() 신호를 발송합니다.
또한 이 모델은 QML_ELEMENT 매크로를 사용하므로, QML에서도 이를 활용할 수 있습니다.
class AppModel : public QObject
{
    Q_OBJECT
    Q_PROPERTY(bool ready
               READ ready
               NOTIFY readyChanged)
    Q_PROPERTY(bool hasSource
               READ hasSource
               NOTIFY readyChanged)
    Q_PROPERTY(bool hasValidCity
               READ hasValidCity
               NOTIFY cityChanged)
    Q_PROPERTY(bool hasValidWeather
               READ hasValidWeather
               NOTIFY weatherChanged)
    Q_PROPERTY(bool useGps
               READ useGps WRITE setUseGps
               NOTIFY useGpsChanged)
    Q_PROPERTY(QString city
               READ city WRITE setCity
               NOTIFY cityChanged)
    Q_PROPERTY(WeatherData *weather
               READ weather
               NOTIFY weatherChanged)
    Q_PROPERTY(QQmlListProperty<WeatherData> forecast
               READ forecast
               NOTIFY weatherChanged)
    QML_ELEMENT

public:
    explicit AppModel(QObject *parent = 0);
    ~AppModel();

    bool ready() const;
    bool hasSource() const;
    bool useGps() const;
    bool hasValidCity() const;
    bool hasValidWeather() const;
    void setUseGps(bool value);

    QString city() const;
    void setCity(const QString &value);

    WeatherData *weather() const;
    QQmlListProperty<WeatherData> forecast() const;

public slots:
    Q_INVOKABLE void refreshWeather();

signals:
    void readyChanged();
    void useGpsChanged();
    void cityChanged();
    void weatherChanged();
};
일기 예보 정보에는 ‘ QQmlListProperty ’를 사용하며, 여기에는 향후 며칠간의 일기 예보가 포함됩니다(일수는 제공업체에 따라 다름). 이를 통해 QML에서 일기 예보에 쉽게 접근할 수 있습니다.
QML에 사용자 정의 모델 노출하기
모델을 QML UI 계층에 노출하기 위해 QML_ELEMENT 및 QML_ANONYMOUS 매크로를 사용합니다. 이 매크로에 대한 자세한 내용은 QQmlEngine 클래스 설명을 참조하십시오.
QML에서 해당 유형을 사용할 수 있도록 하려면 빌드 설정을 그에 맞게 업데이트해야 합니다.
CMake 빌드
CMake 기반 빌드의 경우, ` CMakeLists.txt` 파일에 다음 내용을 추가해야 합니다:
qt_add_qml_module(weatherinfo
    URI Weather
    VERSION 1.0
    SOURCES
        appmodel.cpp appmodel.h
        openmeteobackend.cpp openmeteobackend.h
        openweathermapbackend.cpp openweathermapbackend.h
        providerbackend.cpp providerbackend.h
        weatherapibackend.cpp weatherapibackend.h
    QML_FILES
        BigForecastIcon.qml
        ForecastIcon.qml
        WeatherIcon.qml
        WeatherInfo.qml
    RESOURCES
        icons/weather-few-clouds.svg
        icons/weather-fog.svg
        icons/weather-haze.svg
        icons/weather-icy.svg
        icons/weather-overcast.svg
        icons/weather-showers.svg
        icons/weather-sleet.svg
        icons/weather-snow.svg
        icons/weather-storm.svg
        icons/weather-sunny-very-few-clouds.svg
        icons/weather-sunny.svg
        icons/weather-thundershower.svg
        icons/weather-showers-scattered.svg
        icons/waypoint.svg
)
qmake 빌드
qmake 빌드의 경우, weatherinfo.pro 파일을 다음과 같이 수정해야 합니다:
CONFIG += qmltypes
QML_IMPORT_NAME = Weather
QML_IMPORT_MAJOR_VERSION = 1

qml_resources.files = \
    qmldir \
    BigForecastIcon.qml \
    ForecastIcon.qml \
    WeatherIcon.qml \
    WeatherInfo.qml \
    icons/weather-few-clouds.svg \
    icons/weather-fog.svg \
    icons/weather-haze.svg \
    icons/weather-icy.svg \
    icons/weather-overcast.svg \
    icons/weather-showers.svg \
    icons/weather-showers-scattered.svg \
    icons/weather-sleet.svg \
    icons/weather-snow.svg \
    icons/weather-storm.svg \
    icons/weather-sunny-very-few-clouds.svg \
    icons/weather-sunny.svg \
    icons/weather-thundershower.svg \
    icons/waypoint.svg

qml_resources.prefix = /qt/qml/Weather

RESOURCES += qml_resources
QML에서 모델 인스턴스화
마지막으로, 실제 QML에서 ` AppModel`를 인스턴스화합니다:
Window {
    id: window
    AppModel {
        id: appModel
        onReadyChanged: {
            if (appModel.ready)
                statesItem.state = "ready"
            else
                statesItem.state = "loading"
        }
    }
}
이렇게 모델이 인스턴스화되면, QML 문서의 다른 곳에서 해당 모델의 속성을 사용할 수 있습니다:
    BigForecastIcon {
        id: current
        Layout.fillWidth: true
        Layout.fillHeight: true

        weatherIcon: (appModel.hasValidWeather
                      ? appModel.weather.weatherIcon
                      : "sunny")
}© 2026 The Qt Company Ltd. Documentation contributions included herein are the copyrights of their respective owners. The documentation provided herein is licensed under the terms of the GNU Free Documentation License version 1.3 as published by the Free Software Foundation. Qt and respective logos are trademarks of The Qt Company Ltd. in Finland and/or other countries worldwide. All other trademarks are property of their respective owners.
