QQuickRenderControl RHI 예제
Qt Quick 씬을 QRhiTexture 로 렌더링하는 방법을 보여줍니다.
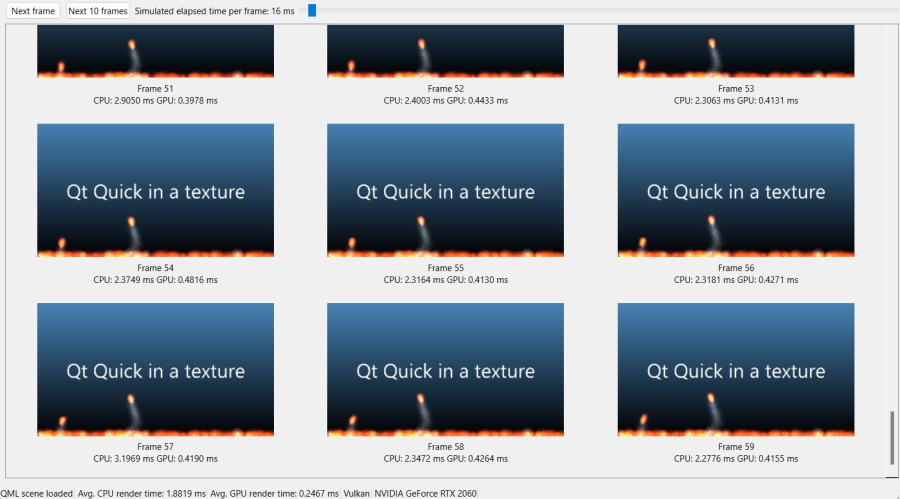
이 예는 렌더링이 QRhiTexture 으로 리디렉션되는 Qt Quick 장면을 설정하는 방법을 보여줍니다. 그러면 애플리케이션은 각 프레임의 결과 텍스처로 원하는 대로 자유롭게 작업할 수 있습니다. 이 예제는 이미지 데이터의 읽기백을 수행한 다음 수집된 프레임별 렌더링을 각각에 대한 CPU 및 GPU 기반 타이밍 정보와 함께 표시하는 QWidget 기반 애플리케이션입니다.
이 예제는 Qt의 3D 그래픽 API 추상화를 사용함으로써 특정 그래픽 API에 종속되지 않습니다. 시작 시 플랫폼에서 잠재적으로 지원되는 3D API가 포함된 대화 상자가 표시됩니다.
    QDialog apiSelect;
    QVBoxLayout *selLayout = new QVBoxLayout;
    selLayout->addWidget(new QLabel(QObject::tr("Select graphics API to use")));
    QListWidget *apiList = new QListWidget;
    QVarLengthArray<QSGRendererInterface::GraphicsApi, 5> apiValues;
#ifdef Q_OS_WIN
    apiList->addItem("Direct3D 11");
    apiValues.append(QSGRendererInterface::Direct3D11);
    apiList->addItem("Direct3D 12");
    apiValues.append(QSGRendererInterface::Direct3D12);
#endif
#if QT_CONFIG(metal)
    apiList->addItem("Metal");
    apiValues.append(QSGRendererInterface::Metal);
#endif
#if QT_CONFIG(vulkan)
    apiList->addItem("Vulkan");
    apiValues.append(QSGRendererInterface::Vulkan);
#endif
#if QT_CONFIG(opengl)
    apiList->addItem("OpenGL / OpenGL ES");
    apiValues.append(QSGRendererInterface::OpenGL);
#endif
    if (apiValues.isEmpty()) {
        QMessageBox::critical(nullptr, QObject::tr("No 3D graphics API"), QObject::tr("No 3D graphics APIs are supported in this Qt build"));
        return 1;
    }
참고: 모든 선택 항목이 특정 플랫폼에서 작동한다는 보장은 없습니다.
선택이 완료되면 QML 파일이 로드됩니다. 그러나 단순히 QQuickView 인스턴스를 생성하고 show()하지 않습니다. 그 대신 Qt Quick 장면을 관리하는 QQuickWindow 은 화면에 표시되지 않습니다. 대신 애플리케이션이 QQuickRenderControl 을 통해 렌더링 시기와 위치를 제어합니다.
void MainWindow::load(const QString &filename) { reset(); m_renderControl.reset(new QQuickRenderControl); m_scene.reset(new QQuickWindow(m_renderControl.get())); // 기본 3D API에서 지원하는 경우 QRhiCommandBuffer에서 lastCompletedGpuTime()을 활성화합니다.    QQuickGraphicsConfiguration config; config.setTimestamps(true);  m_scene->setGraphicsConfiguration(config);#if QT_CONFIG(vulkan) if (m_scene->graphicsApi()==? QSGRendererInterface::Vulkan)  m_scene->setVulkanInstance(m_vulkanInstance);#endifm_qmlEngine.reset(new QQmlEngine); m_qmlComponent.reset(new QQmlComponent(m_qmlEngine.get(), QUrl::fromLocalFile(filename))); if (m_qmlComponent->isError()) { for(const QQmlError &error:  m_qmlComponent->errors())            qWarning() << error.url() << error.line() << error;
        QMessageBox::critical(this, tr("QML 장면을 로드할 수 없습니다"), tr("%1을 로드하지 못했습니다").arg(filename)); reset(); return; }
객체 트리가 인스턴스화되면 루트 항목( Rectangle)이 쿼리되고 크기가 유효한지 확인한 다음 전파됩니다.
참고: 객체 트리 내에서 Window 요소를 사용하는 장면은 지원되지 않습니다.
    QObject *rootObject =  m_qmlComponent->create(); if (m_qmlComponent->isError()) { for(const QQmlError &error:  m_qmlComponent->errors())            qWarning() << error.url() << error.line() << error;
        QMessageBox::critical(this, tr("QML 장면을 로드할 수 없습니다"), tr("컴포넌트를 생성하지 못했습니다")); reset(); return; } QQuickItem *rootItem =  qobject_cast<QQuickItem *>(rootObject); if (!rootItem) { // 루트 객체가 창인 경우 화면의 창을 제거합니다 if (QQuickWindow *w =  qobject_cast<QQuickWindow *>(rootObject)) delete w;  QMessageBox::critical(this,tr("QML 장면에 잘못된 루트 항목이 있습니다."),tr("루트 객체가 QQuickItem이 아닙니다. 창이 포함된 씬인 경우 해당 씬은 지원되지 않습니다.")); reset(); return; } if (rootItem->size().width() < 16)  rootItem->setSize(QSizeF(640, 360));  m_scene->contentItem()->setSize(rootItem->size());  m_scene->setGeometry(0, 0,  rootItem->.width(),  rootItem->height());  rootItem->setParentItem(m_scene->contentItem());  m_statusMsg->setText(tr("QML 장면이 로드되었습니다"));
이 시점에서는 초기화된 렌더링 리소스가 없습니다. 즉, 아직 네이티브 3D 그래픽 API로 수행한 작업이 없습니다. QRhi 은 다음 단계에서만 인스턴스화되며, 이를 통해 Vulkan, Metal, Direct 3D 등의 렌더링 시스템을 내부적으로 설정합니다.
    const bool initSuccess = m_renderControl->initialize();
    if (!initSuccess) {
        QMessageBox::critical(this, tr("Cannot initialize renderer"), tr("QQuickRenderControl::initialize() failed"));
        reset();
        return;
    }

    const QSGRendererInterface::GraphicsApi api = m_scene->rendererInterface()->graphicsApi();
    switch (api) {
    case QSGRendererInterface::OpenGL:
        m_apiMsg->setText(tr("OpenGL"));
        break;
    case QSGRendererInterface::Direct3D11:
        m_apiMsg->setText(tr("D3D11"));
        break;
    case QSGRendererInterface::Direct3D12:
        m_apiMsg->setText(tr("D3D12"));
        break;
    case QSGRendererInterface::Vulkan:
        m_apiMsg->setText(tr("Vulkan"));
        break;
    case QSGRendererInterface::Metal:
        m_apiMsg->setText(tr("Metal"));
        break;
    default:
        m_apiMsg->setText(tr("Unknown 3D API"));
        break;
    }

    QRhi *rhi = m_renderControl->rhi();
    if (!rhi) {
        QMessageBox::critical(this, tr("Cannot render"), tr("No QRhi from QQuickRenderControl"));
        reset();
        return;
    }

    m_driverInfoMsg->setText(QString::fromUtf8(rhi->driverInfo().deviceName));
참고: 이 애플리케이션은 Qt가 QRhi 의 인스턴스를 생성하는 모델을 사용합니다. 이것이 유일한 방법은 아닙니다: 애플리케이션이 자체 QRhi (따라서 OpenGL 컨텍스트, Vulkan 디바이스 등)을 유지한다면 Qt Quick 에 기존 QRhi 을 채택하여 사용하도록 요청할 수 있습니다. 이는 위의 스니펫에서 QQuickGraphicsConfiguration 을 설정하는 방법과 유사하게 QQuickGraphicsDevice::fromRhi()에서 생성한 QQuickGraphicsDevice 을 QQuickWindow 에 전달하여 수행됩니다. 예를 들어 QRhiWidget 에서 Qt Quick 렌더링된 텍스처를 사용하려는 경우 QRhiWidget 의 QRhi 을 Qt Quick 이 자체적으로 생성하도록 하는 대신 Qt Quick 에 전달해야 합니다.
QQuickRenderControl::initialize()가 성공하면 렌더러가 활성화되어 사용할 준비가 된 것입니다. 이를 위해서는 렌더링할 색상 버퍼가 필요합니다.
QQuickRenderTarget 는 텍스처, 렌더 타깃 등을 설명하는 다양한 네이티브 또는 QRhi 객체 집합을 전달하는(소유하지는 않지만) 경량 암시적으로 공유되는 클래스입니다. QQuickWindow (화면에 표시되지 않는 QQuickWindow )에서 setRenderTarget()를 호출하면 Qt Quick 씬 그래프의 렌더링을 애플리케이션에서 제공하는 텍스처로 리디렉션하는 트리거가 실행됩니다. QRhi (OpenGL 텍스처 ID 또는 VkImage 객체와 같은 기본 3D API 객체가 아닌)로 작업하는 경우 애플리케이션은 QRhiTextureRenderTarget 을 설정한 다음 QQuickRenderTarget::fromRhiRenderTarget()을 통해 Qt Quick 에 전달해야 합니다.
    const QSize pixelSize = rootItem->size().toSize(); // no scaling, i.e. the item size is in pixels

    m_texture.reset(rhi->newTexture(QRhiTexture::RGBA8, pixelSize, 1,
                                    QRhiTexture::RenderTarget | QRhiTexture::UsedAsTransferSource));
    if (!m_texture->create()) {
        QMessageBox::critical(this, tr("Cannot render"), tr("Cannot create texture object"));
        reset();
        return;
    }

    m_ds.reset(rhi->newRenderBuffer(QRhiRenderBuffer::DepthStencil, pixelSize, 1));
    if (!m_ds->create()) {
        QMessageBox::critical(this, tr("Cannot render"), tr("Cannot create depth-stencil buffer"));
        reset();
        return;
    }

    QRhiTextureRenderTargetDescription rtDesc(QRhiColorAttachment(m_texture.get()));
    rtDesc.setDepthStencilBuffer(m_ds.get());
    m_rt.reset(rhi->newTextureRenderTarget(rtDesc));
    m_rpDesc.reset(m_rt->newCompatibleRenderPassDescriptor());
    m_rt->setRenderPassDescriptor(m_rpDesc.get());
    if (!m_rt->create()) {
        QMessageBox::critical(this, tr("Cannot render"), tr("Cannot create render target"));
        reset();
        return;
    }

    m_scene->setRenderTarget(QQuickRenderTarget::fromRhiRenderTarget(m_rt.get()));
참고: 렌더링 시 Qt Quick 시나리오에서 이러한 버퍼와 깊이 및 스텐실 테스트를 모두 활용할 수 있으므로 항상 Qt Quick 에 대한 깊이-스텐실 버퍼를 제공하세요.
기본 렌더 루프는 다음과 같습니다. 또한 이미지의 GPU->CPU 읽기백을 수행하는 방법도 보여줍니다. QImage 을 사용할 수 있게 되면 QWidget 기반 사용자 인터페이스가 그에 따라 업데이트됩니다. 여기서는 자세한 설명은 생략하겠습니다.
이 예제에서는 CPU와 GPU에서 프레임을 렌더링하는 데 드는 비용을 측정하는 간단한 방법도 보여줍니다. 오프스크린 렌더링 프레임은 특정 내부 QRhi 동작으로 인해 이에 적합하며, 이는 비동기적(후속 프레임을 렌더링할 때만 완료된다는 의미에서)인 작업이 QRhi::endOffscreenFrame()(즉, QQuickRenderControl::endFrame())이 반환되면 준비가 완료된다는 것을 의미합니다. 텍스처를 다시 읽을 때 이 지식을 사용하며 GPU 타임스탬프에도 적용됩니다. 따라서 애플리케이션은 각 프레임에 대한 GPU 시간을 표시하면서 그 시간이 실제로 그 이전 프레임이 아닌 특정 프레임을 참조하도록 보장할 수 있습니다. GPU 타이밍에 대한 자세한 내용은 lastCompletedGpuTime()를 참조하세요. CPU 측 타이밍은 QElapsedTimer 을 사용하여 측정합니다.
    QElapsedTimer cpuTimer;
    cpuTimer.start();

    m_renderControl->polishItems();

    m_renderControl->beginFrame();

    m_renderControl->sync();
    m_renderControl->render();

    QRhi *rhi = m_renderControl->rhi();
    QRhiReadbackResult readResult;
    QRhiResourceUpdateBatch *readbackBatch = rhi->nextResourceUpdateBatch();
    readbackBatch->readBackTexture(m_texture.get(), &readResult);
    m_renderControl->commandBuffer()->resourceUpdate(readbackBatch);

    m_renderControl->endFrame();

    const double gpuRenderTimeMs = m_renderControl->commandBuffer()->lastCompletedGpuTime() * 1000.0;
    const double cpuRenderTimeMs = cpuTimer.nsecsElapsed() / 1000000.0;

    // m_renderControl->begin/endFrame() is based on QRhi's
    // begin/endOffscreenFrame() under the hood, meaning it does not do
    // pipelining, unlike swapchain-based frames, and therefore the readback is
    // guaranteed to complete once endFrame() returns.
    QImage wrapperImage(reinterpret_cast<const uchar *>(readResult.data.constData()),
                    readResult.pixelSize.width(), readResult.pixelSize.height(),
                    QImage::Format_RGBA8888_Premultiplied);
    QImage result;
    if (rhi->isYUpInFramebuffer())
        result = wrapperImage.flipped();
    else
        result = wrapperImage.copy();
한 가지 중요한 부분은 Qt Quick 애니메이션의 스테핑입니다. 경과 시간 측정, 일반 타이머 또는 프레젠테이션 속도 기반 스로틀링을 통해 애니메이션 시스템을 구동할 수 있는 화면 창이 없기 때문에 Qt Quick 렌더링을 리디렉션하면 애니메이션 구동이 애플리케이션에 의해 인수되어야 하는 경우가 종종 있습니다. 그렇지 않으면 애니메이션이 일반 시스템 타이머를 기반으로 작동하지만 실제 경과 시간은 화면 밖에서 렌더링되는 장면이 인식할 것으로 예상되는 것과는 관련이 없는 경우가 많습니다. 5프레임을 연속으로 타이트한 루프로 렌더링한다고 가정해 보겠습니다. 이 5프레임의 애니메이션이 움직이는 방식은 CPU가 루프 반복을 실행하는 속도에 따라 달라집니다. 이는 거의 이상적이지 않습니다. 일관된 애니메이션을 보장하려면 사용자 지정 QAnimationDriver를 설치하세요. 이것은 고급 사용자를 위한 문서화되지 않은(그러나 공개) API이지만 여기 예제에서는 간단한 사용 예제를 제공합니다.
class AnimationDriver : public QAnimationDriver
{
public:
    AnimationDriver(QObject *parent = nullptr)
        : QAnimationDriver(parent),
          m_step(16)
    {
    }

    void setStep(int milliseconds)
    {
        m_step = milliseconds;
    }

    void advance() override
    {
        m_elapsed += m_step;
        advanceAnimation();
    }

    qint64 elapsed() const override
    {
        return m_elapsed;
    }

private:
    int m_step;
    qint64 m_elapsed = 0;
};
애플리케이션에는 애니메이션 단계 값을 기본 16밀리초에서 다른 값으로 변경하는 데 사용할 수 있는 QSlider 이 있습니다. QAnimationDriver 서브클래스의 setStep() 함수에 대한 호출에 주목하세요.
    QSlider *animSlider = new QSlider;
    animSlider->setOrientation(Qt::Horizontal);
    animSlider->setMinimum(1);
    animSlider->setMaximum(1000);
    QLabel *animLabel = new QLabel;
    QObject::connect(animSlider, &QSlider::valueChanged, animSlider, [this, animLabel, animSlider] {
        if (m_animationDriver)
            m_animationDriver->setStep(animSlider->value());
        animLabel->setText(tr("Simulated elapsed time per frame: %1 ms").arg(animSlider->value()));
    });
    animSlider->setValue(16);
    QCheckBox *animCheckBox = new QCheckBox(tr("Custom animation driver"));
    animCheckBox->setToolTip(tr("Note: Installing the custom animation driver makes widget drawing unreliable, depending on the platform.\n"
                                "This is due to widgets themselves relying on QPropertyAnimation and similar, which are driven by the same QAnimationDriver.\n"
                                "In any case, the functionality of the widgets are not affected, just the rendering may lag behind.\n"
                                "When not checked, Qt Quick animations advance based on the system time, i.e. the time elapsed since the last press of the Next button."));
    QObject::connect(animCheckBox, &QCheckBox::checkStateChanged, animCheckBox, [this, animCheckBox, animSlider, animLabel] {
        if (animCheckBox->isChecked()) {
            animSlider->setEnabled(true);
            animLabel->setEnabled(true);
            m_animationDriver = new AnimationDriver(this);
            m_animationDriver->install();
            m_animationDriver->setStep(animSlider->value());
        } else {
            animSlider->setEnabled(false);
            animLabel->setEnabled(false);
            delete m_animationDriver;
            m_animationDriver = nullptr;
        }
    });
    animSlider->setEnabled(false);
    animLabel->setEnabled(false);
    controlLayout->addWidget(animCheckBox);
    controlLayout->addWidget(animLabel);
    controlLayout->addWidget(animSlider);
참고: 사용자 지정 애니메이션 드라이버 설치는 animCheckBox 확인란을 통해 선택 사항으로 설정할 수 있습니다. 이를 통해 사용자 지정 애니메이션 드라이버를 설치했을 때와 설치하지 않았을 때의 효과를 비교할 수 있습니다. 또한 일부 플랫폼에서는 (테마에 따라) 사용자 정의 드라이버를 활성화하면 위젯 그리기가 지연될 수 있습니다. 이는 예상대로 일부 위젯 애니메이션(예: QPushButton 또는 QCheckBox)의 하이라이트가 QPropertyAnimation 등을 통해 관리되는 경우 해당 애니메이션은 동일한 QAnimationDriver에 의해 구동되며 버튼을 클릭하여 새 프레임을 요청할 때까지 진행되지 않기 때문입니다.
애니메이션 진행은 각 프레임 전(즉, QQuickRenderControl::beginFrame() 호출 전)에 advance()를 호출하여 수행됩니다:
void MainWindow::stepAnimations()
{
    if (m_animationDriver) {
        // Now the Qt Quick scene will think that <slider value> milliseconds have
        // elapsed and update animations accordingly when doing the next frame.
        m_animationDriver->advance();
    }
}
QRhi, QQuickRenderControl, QQuickWindow도 참조하세요 .
© 2026 The Qt Company Ltd. Documentation contributions included herein are the copyrights of their respective owners. The documentation provided herein is licensed under the terms of the GNU Free Documentation License version 1.3 as published by the Free Software Foundation. Qt and respective logos are trademarks of The Qt Company Ltd. in Finland and/or other countries worldwide. All other trademarks are property of their respective owners.
