센서 쇼케이스
센서 쇼케이스 예제에서는 센서 사용법을 시각적 예시와 함께 설명합니다.
개요
애플리케이션을 시작하면 각 센서의 하위 보기를 위한 버튼이 있는 메뉴가 표시됩니다. 센서 보기는 지정된 센서를 인스턴스화하고 센서의 값을 숫자로 표시하며 간단한 그래픽 표현으로 시각화합니다.
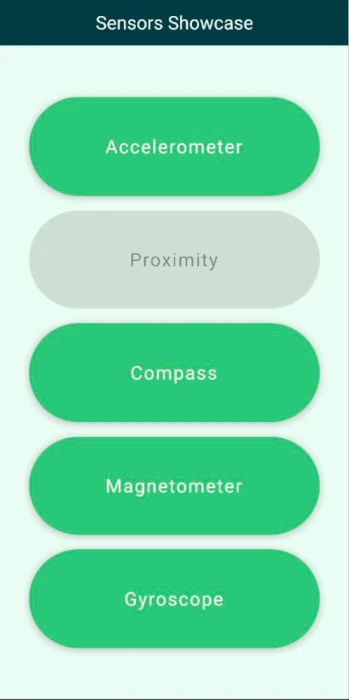
메인 메뉴
메인 보기에는 애플리케이션 이름이 포함된 제목과 각 하위 보기의 버튼이 균등하게 배치된 ColumnLayout 이 표시됩니다. StackView 은 하위 보기와 메인 메뉴 간의 탐색을 관리합니다. 애플리케이션은 시작하는 동안 센서의 사용 가능 여부를 확인하고 사용할 수 없는 센서의 버튼을 비활성화합니다.
참고: 예제를 단순화하기 위해 센서 사용 가능 여부는 시작 중에 한 번만 확인합니다.
가속도계 보기
가속도계 보기는 현재 디바이스 가속도 값을 표시하고 디바이스 가속도와 반대되는 양으로 이미지 주위를 이동하여 디바이스의 움직임에 비례하는 관성 효과를 이미지에 부여합니다.
이미지 주위를 이동하는 것은 가속도계 onReadingChanged 메서드에서 발생합니다.
Accelerometer {
    id: accelerometer

    property real x: 0
    property real y: 0
    property real z: 0

    active: true
    dataRate: 25

    onReadingChanged: {
        x = (reading as AccelerometerReading).x
        y = (reading as AccelerometerReading).y
        z = (reading as AccelerometerReading).z
        imageTranslation.x = -x * 10
        imageTranslation.y = y * 10
    }
}
새로운 가속도계 값이 있을 때마다 이미지 변환 좌표가 그에 따라 업데이트됩니다.
근접 보기
근접 보기는 디바이스의 근접 센서가 가려질 때마다 확대된 이미지를 표시합니다.
나침반 보기
나침반 보기에서는 나침반 센서 판독값에 따라 나침반이 북쪽을 향하도록 회전된 나침반 이미지가 표시됩니다.
자력계 보기
자력계 보기는 x 및 y 자력계 값으로 지정된 벡터의 회전 각도에 따라 결정되는 양을 중심으로 회전하는 자석 이미지를 표시합니다. 이는 일반적으로 나침반이 제공하는 회전과 동일한 결과를 가져오며, 자력계 판독값을 사용할 수 있는 한 가지 사용 사례를 보여줍니다. 자력계는 세 축 모두에서 판독값을 제공하기 때문에 이러한 판독값을 사용하는 방법이 더 자유롭습니다.
Magnetometer {
    id: magnetometer
    active: true
    dataRate: 25
    onReadingChanged: {
        root.magnetometerX = (reading as MagnetometerReading).x
        root.magnetometerY = (reading as MagnetometerReading).y
        root.magnetometerZ = (reading as MagnetometerReading).z
        root.magnetRotation =
            ((Math.atan2(root.magnetometerX, root.magnetometerY) / Math.PI) * 180)
    }
}
자이로스코프 보기
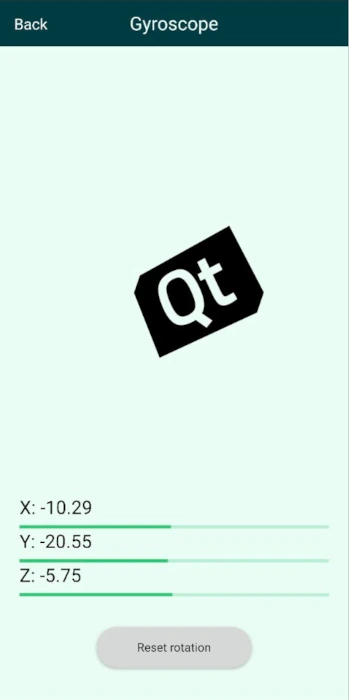
자이로스코프 보기에서는 자이로스코프 판독값에서 계산된 양으로 세 축을 중심으로 회전하는 이미지도 표시합니다. 자이로스코프는 세 개의 공간 축을 중심으로 상대적인 회전 변화를 제공하며 판독값 업데이트 사이의 시간이 다를 수 있으므로 판독값의 시간이 저장되고 판독값 업데이트 사이에 경과한 시간을 기준으로 회전 변화가 정규화됩니다.
Gyroscope {
    id: gyroscope

    property var lastTimeStamp: 0
    property real x: 0
    property real y: 0
    property real z: 0

    active: true
    dataRate: 25

    onReadingChanged: {
        x = (reading as GyroscopeReading).x
        y = (reading as GyroscopeReading).y
        z = (reading as GyroscopeReading).z
        let firstCall = false
        if (lastTimeStamp == 0) {
            firstCall = true
        }
        let timeSinceLast = reading.timestamp - lastTimeStamp
        lastTimeStamp = reading.timestamp

        //Skipping the initial time jump from 0
        if (firstCall === true)
            return
        let normalizedX = x * (timeSinceLast / 1000000)
        imageXRotation.angle += normalizedX
        let normalizedY = y * (timeSinceLast / 1000000)
        imageYRotation.angle -= normalizedY
        let normalizedZ = z * (timeSinceLast / 1000000)
        imageZRotation.angle += normalizedZ
    }
}
재설정 버튼을 누르면 이미지 회전이 0으로 재설정됩니다.
© 2026 The Qt Company Ltd. Documentation contributions included herein are the copyrights of their respective owners. The documentation provided herein is licensed under the terms of the GNU Free Documentation License version 1.3 as published by the Free Software Foundation. Qt and respective logos are trademarks of The Qt Company Ltd. in Finland and/or other countries worldwide. All other trademarks are property of their respective owners.
