SQL 위젯 매퍼 예제
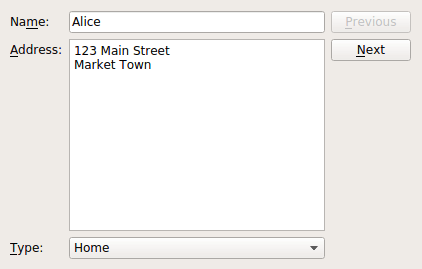
SQL 위젯 매퍼 예제는 데이터베이스의 정보를 폼의 위젯에 매핑하는 방법을 보여줍니다.

콤보 위젯 매퍼 예제에서는 위젯 매퍼와 특수 목적 모델인 QComboBox 위젯 간의 네임드 매핑을 사용하여 모델의 값을 선택 목록과 연관시키는 방법을 보여드렸습니다.
여기에서도 거의 동일한 사용자 인터페이스를 가진 Window 클래스를 만들어 주소를 '집', '직장' 또는 '기타'로 분류할 수 있는 콤보 상자를 제공합니다. 하지만 이러한 주소 유형을 저장하기 위해 별도의 모델을 사용하는 대신 하나의 데이터베이스 테이블에 예제 데이터를 저장하고 다른 데이터베이스 테이블에 주소 유형을 저장합니다. 이러한 방식으로 모든 정보를 같은 위치에 저장합니다.
창 클래스 정의
이 클래스는 생성자, 버튼을 최신 상태로 유지하기 위한 슬롯, 모델을 설정하는 비공개 함수를 제공합니다:
class Window : public QWidget
{
    Q_OBJECT

public:
    Window(QWidget *parent = nullptr);

private slots:
    void updateButtons(int row);

private:
    void setupModel();

    QLabel *nameLabel;
    QLabel *addressLabel;
    QLabel *typeLabel;
    QLineEdit *nameEdit;
    QTextEdit *addressEdit;
    QComboBox *typeComboBox;
    QPushButton *nextButton;
    QPushButton *previousButton;

    QSqlRelationalTableModel *model;
    QItemSelectionModel *selectionModel;
    QDataWidgetMapper *mapper;
    int typeIndex;
};
QDataWidgetMapper 객체와 사용자 인터페이스를 구성하는 데 사용되는 컨트롤 외에도 데이터를 저장하기 위해 QStandardItemModel을 사용하고 각 사람의 데이터에 적용할 수 있는 주소 유형에 대한 정보를 저장하기 위해 QStringListModel 을 사용합니다.
창 클래스 구현
Window 클래스 생성자가 수행하는 첫 번째 작업은 예제 데이터를 보관하는 데 사용되는 모델을 설정하는 것입니다. 이 부분이 예제에서 핵심적인 부분이므로 먼저 살펴보겠습니다.
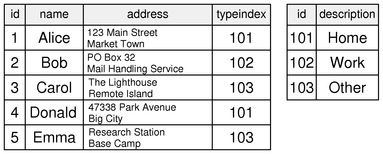
모델은 창의 setupModel() 함수에서 초기화됩니다. 여기에서는 기본 키, 이름, 주소 및 유형 필드가 있는 '사람' 테이블이 포함된 SQLite 데이터베이스를 만듭니다.
void Window::setupModel()
{
    QSqlDatabase db = QSqlDatabase::addDatabase("QSQLITE");
    db.setDatabaseName(":memory:");
    if (!db.open()) {
        QMessageBox::critical(0, tr("Cannot open database"),
            tr("Unable to establish a database connection.\n"
               "This example needs SQLite support. Please read "
               "the Qt SQL driver documentation for information how "
               "to build it."), QMessageBox::Cancel);
        return;
    }

    QSqlQuery query;
    query.exec("create table person (id int primary key, "
               "name varchar(20), address varchar(200), typeid int)");
    query.exec("insert into person values(1, 'Alice', "
               "'<qt>123 Main Street<br/>Market Town</qt>', 101)");
    query.exec("insert into person values(2, 'Bob', "
               "'<qt>PO Box 32<br/>Mail Handling Service"
               "<br/>Service City</qt>', 102)");
    query.exec("insert into person values(3, 'Carol', "
               "'<qt>The Lighthouse<br/>Remote Island</qt>', 103)");
    query.exec("insert into person values(4, 'Donald', "
               "'<qt>47338 Park Avenue<br/>Big City</qt>', 101)");
    query.exec("insert into person values(5, 'Emma', "
               "'<qt>Research Station<br/>Base Camp<br/>"
               "Big Mountain</qt>', 103)");
테이블의 각 행에 이러한 필드에 대한 기본값을 삽입하고 주소 유형에 해당하는 주소 유형에 대한 값은 별도의 테이블에 저장합니다.

'person' 테이블에 사용된 식별자와 해당 문자열이 포함된 'addresstype' 테이블을 만듭니다:
    query.exec("create table addresstype (id int, description varchar(20))");
    query.exec("insert into addresstype values(101, 'Home')");
    query.exec("insert into addresstype values(102, 'Work')");
    query.exec("insert into addresstype values(103, 'Other')");

    model = new QSqlRelationalTableModel(this);
    model->setTable("person");
    model->setEditStrategy(QSqlTableModel::OnManualSubmit);

    typeIndex = model->fieldIndex("typeid");

    model->setRelation(typeIndex,
           QSqlRelation("addresstype", "id", "description"));
    model->select();
}
"person" 테이블의 "typeid" 필드는 QSqlRelationalTableModel. 이러한 종류의 모델은 데이터를 데이터베이스에 저장하는 데 필요한 모든 작업을 수행하며 모든 관계를 그 자체로 모델로 사용할 수 있습니다.
이 경우 "person" 테이블의 "typeid" 필드에 대한 관계를 정의하여 "addresstype" 테이블의 "id" 필드와 연관시키고 "typeid"가 사용자에게 표시되는 모든 곳에서 "description" 필드의 내용을 사용하도록 했습니다. (자세한 내용은 QSqlRelationalTableModel::setRelation() 문서를 참조하세요.)

Window 클래스의 생성자는 세 부분으로 설명할 수 있습니다. 첫 번째 부분에서는 데이터를 보관하는 데 사용되는 모델을 설정한 다음 사용자 인터페이스에 사용되는 위젯을 설정합니다:
Window::Window(QWidget *parent)
    : QWidget(parent)
{
    setupModel();

    nameLabel = new QLabel(tr("Na&me:"));
    nameEdit = new QLineEdit();
    addressLabel = new QLabel(tr("&Address:"));
    addressEdit = new QTextEdit();
    typeLabel = new QLabel(tr("&Type:"));
    typeComboBox = new QComboBox();
    nextButton = new QPushButton(tr("&Next"));
    previousButton = new QPushButton(tr("&Previous"));

    nameLabel->setBuddy(nameEdit);
    addressLabel->setBuddy(addressEdit);
    typeLabel->setBuddy(typeComboBox);
"typeid" 필드에 대해 설정한 관계를 기반으로 기본 모델에서 콤보 상자에 대한 모델을 가져옵니다. 콤보 상자의 setModelColumn()를 호출하면 모델의 필드에서 표시할 필드가 선택됩니다.
이 접근 방식은 콤보 상자에 대한 모델을 설정한다는 점에서 콤보 위젯 매퍼 예제에서 사용된 방식과 유사합니다. 그러나 이 경우에는 별도의 모델을 만드는 대신 QSqlRelationalTableModel 의 관계에 기반한 모델을 가져옵니다.
다음으로 위젯 매퍼를 설정하여 각 입력 위젯을 모델의 필드와 연관시킵니다:
    QSqlTableModel *relModel = model->relationModel(typeIndex);
    typeComboBox->setModel(relModel);
    typeComboBox->setModelColumn(relModel->fieldIndex("description"));

    mapper = new QDataWidgetMapper(this);
    mapper->setModel(model);
    mapper->setItemDelegate(new QSqlRelationalDelegate(this));
    mapper->addMapping(nameEdit, model->fieldIndex("name"));
    mapper->addMapping(addressEdit, model->fieldIndex("address"));
    mapper->addMapping(typeComboBox, typeIndex);
콤보 박스의 경우 setupModel() 함수를 통해 모델에서 필드의 인덱스를 이미 알고 있습니다. 매퍼와 입력 위젯 사이의 프록시로 QSqlRelationalDelegate 을 사용하여 모델의 "typeid" 값을 콤보 상자 모델의 값과 일치시키고 콤보 상자를 정수 값이 아닌 설명으로 채웁니다.
그 결과 사용자는 콤보 상자에서 항목을 선택할 수 있고 관련 값이 모델에 다시 기록됩니다.
나머지 생성자는 연결과 레이아웃을 설정합니다:
    connect(previousButton, &QPushButton::clicked,
            mapper, &QDataWidgetMapper::toPrevious);
    connect(nextButton, &QPushButton::clicked,
            mapper, &QDataWidgetMapper::toNext);
    connect(mapper, &QDataWidgetMapper::currentIndexChanged,
            this, &Window::updateButtons);

    QGridLayout *layout = new QGridLayout();
    layout->addWidget(nameLabel, 0, 0, 1, 1);
    layout->addWidget(nameEdit, 0, 1, 1, 1);
    layout->addWidget(previousButton, 0, 2, 1, 1);
    layout->addWidget(addressLabel, 1, 0, 1, 1);
    layout->addWidget(addressEdit, 1, 1, 2, 1);
    layout->addWidget(nextButton, 1, 2, 1, 1);
    layout->addWidget(typeLabel, 3, 0, 1, 1);
    layout->addWidget(typeComboBox, 3, 1, 1, 1);
    setLayout(layout);

    setWindowTitle(tr("SQL Widget Mapper"));
    mapper->toFirst();
}
완성도를 위해 updateButtons() 슬롯의 구현을 보여드리겠습니다:
void Window::updateButtons(int row)
{
    previousButton->setEnabled(row > 0);
    nextButton->setEnabled(row < model->rowCount() - 1);
}
요약 및 추가 자료
콤보 박스에 별도의 모델을 사용하고 위젯 매퍼에 특수 델리게이트를 사용하면 사용자에게 선택 메뉴를 표시할 수 있습니다. 선택 항목은 사용자 데이터와 동일한 데이터베이스에 저장되지만 별도의 테이블에 보관됩니다. 이 접근 방식을 사용하면 데이터베이스 기능을 적절히 사용하면서 나중에 완전한 레코드를 재구성할 수 있습니다.
SQL 모델을 사용하지 않는 경우에도 두 개 이상의 모델을 사용하여 사용자에게 선택 사항을 표시할 수 있습니다. 이는 콤보 위젯 매퍼 예제에서 다룹니다.
© 2025 The Qt Company Ltd. Documentation contributions included herein are the copyrights of their respective owners. The documentation provided herein is licensed under the terms of the GNU Free Documentation License version 1.3 as published by the Free Software Foundation. Qt and respective logos are trademarks of The Qt Company Ltd. in Finland and/or other countries worldwide. All other trademarks are property of their respective owners.

