
간단한 앵커 레이아웃 예시
그래픽 뷰 씬에서 앵커 레이아웃을 보여줍니다.
'간단한 앵커 레이아웃' 예제는 QGraphicsAnchorLayout 클래스의 기본적인 사용법을 보여줍니다.
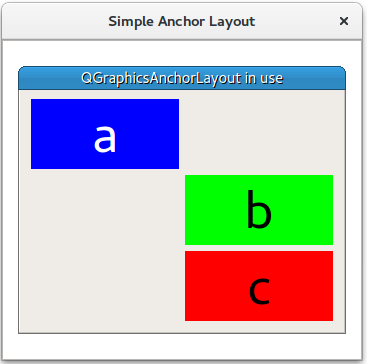
이 예제는 먼저 QGraphicsScene (scene), 3개의 위젯(a, b, c) 및 QGraphicsAnchorLayout(layout)을 생성하는 것으로 시작합니다.
    QGraphicsScene scene;

    Widget *a = new Widget(Qt::blue, Qt::white, "a");
    a->setPreferredSize(100, 100);
    Widget *b = new Widget(Qt::green, Qt::black, "b");
    b->setPreferredSize(100, 100);
    Widget *c = new Widget(Qt::red, Qt::black, "c");
    c->setPreferredSize(100, 100);

    QGraphicsAnchorLayout *layout = new QGraphicsAnchorLayout;
먼저 item a 의 왼쪽 상단 모서리를 layout 의 왼쪽 상단 모서리에 고정합니다. 이는 두 단계로 수행할 수 있습니다:
    layout->addAnchor(a, Qt::AnchorTop, layout, Qt::AnchorTop);
    layout->addAnchor(a, Qt::AnchorLeft, layout, Qt::AnchorLeft);
또는 한 단계로 수행할 수도 있습니다:
그런 다음 a 의 오른쪽 앵커를 b 의 왼쪽 앵커에 고정하고, b 항목의 상단을 a 의 하단에 고정합니다.
    layout->addAnchor(b, Qt::AnchorLeft, a, Qt::AnchorRight);
    layout->addAnchor(b, Qt::AnchorTop, a, Qt::AnchorBottom);
위젯 b 아래에 세 번째 위젯 c 을 배치합니다:
b 와 c 항목은 수평 방향으로 서로 고정되어 있습니다:
layout->addAnchors(b, c, Qt::Horizontal);항목 c는 layout
마지막으로, QGraphicsWidget w 는 QGraphicsView view 에 표시됩니다.
    auto w = new QGraphicsWidget(nullptr, Qt::Window | Qt::CustomizeWindowHint | Qt::WindowTitleHint);
    w->setPos(20, 20);
    w->setMinimumSize(100, 100);
    w->setPreferredSize(320, 240);
    w->setLayout(layout);
    w->setWindowTitle(QApplication::translate("simpleanchorlayout", "QGraphicsAnchorLayout in use"));
    scene.addItem(w);

    QGraphicsView view;
    view.setScene(&scene);
    view.setWindowTitle(QApplication::translate("simpleanchorlayout", "Simple Anchor Layout"));

    view.resize(360, 320);
    view.show();

return app.exec();© 2026 The Qt Company Ltd. Documentation contributions included herein are the copyrights of their respective owners. The documentation provided herein is licensed under the terms of the GNU Free Documentation License version 1.3 as published by the Free Software Foundation. Qt and respective logos are trademarks of The Qt Company Ltd. in Finland and/or other countries worldwide. All other trademarks are property of their respective owners.
