위젯 튜토리얼 - 중첩 레이아웃
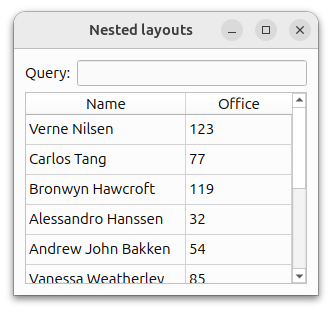
위젯이 다른 위젯을 포함할 수 있는 것처럼 레이아웃을 사용하여 위젯을 다양한 수준으로 그룹화할 수 있습니다. 여기서는 쿼리 결과를 보여주는 표 보기 위에 창 상단에 줄 편집과 함께 레이블을 표시하고 싶습니다.
queryLayout QLabel 및 위젯을 나란히 배치한 , 및 을 세로로 배열한 , 두 가지 레이아웃을 만들어 이를 달성할 수 있습니다. QLineEdit QHBoxLayout queryLayout QTableView QVBoxLayout mainLayout
#include <QtWidgets> int main(int argc, char *argv[]) { QApplication app(argc, argv); QWidget window; QLabel *queryLabel = new QLabel( QApplication::translate("nestedlayouts", "Query:")); QLineEdit *queryEdit = new QLineEdit(); QTableView *resultView = new QTableView(); QHBoxLayout *queryLayout = new QHBoxLayout(); queryLayout->addWidget(queryLabel); queryLayout->addWidget(queryEdit); QVBoxLayout *mainLayout = new QVBoxLayout(); mainLayout->addLayout(queryLayout); mainLayout->addWidget(resultView); window.setLayout(mainLayout); // Set up the model and configure the view... window.setWindowTitle( QApplication::translate("nestedlayouts", "Nested layouts")); window.show(); return app.exec(); } |  |
mainLayout 의 addLayout() 함수를 호출하여 resultView 테이블 위에 queryLayout 를 삽입합니다.
QTableView 위젯에 표시되는 데이터를 포함하는 모델인 resultView 을 설정하는 코드는 생략했습니다. 완전성을 위해 아래에 이를 표시합니다.
Qt는 QHBoxLayout 와 QVBoxLayout 뿐만 아니라 보다 복잡한 사용자 인터페이스를 지원하기 위해 QGridLayout 와 QFormLayout 클래스도 제공합니다. Qt Widgets Designer 을 실행하면 이 클래스들을 볼 수 있습니다.
모델 설정하기
위의 코드에서는 레이아웃 사용에 집중하고 싶었기 때문에 테이블의 데이터의 출처를 표시하지 않았습니다. 여기에서는 모델에 행에 해당하는 여러 항목이 있으며, 각 항목은 두 개의 열에 대한 데이터를 포함하도록 설정되어 있음을 알 수 있습니다.
    QStandardItemModel model;
    model.setHorizontalHeaderLabels({ QApplication::translate("nestedlayouts", "Name"),
                                      QApplication::translate("nestedlayouts", "Office") });

    const QStringList rows[] = {
        QStringList{ QStringLiteral("Verne Nilsen"), QStringLiteral("123") },
        QStringList{ QStringLiteral("Carlos Tang"), QStringLiteral("77") },
        QStringList{ QStringLiteral("Bronwyn Hawcroft"), QStringLiteral("119") },
        QStringList{ QStringLiteral("Alessandro Hanssen"), QStringLiteral("32") },
        QStringList{ QStringLiteral("Andrew John Bakken"), QStringLiteral("54") },
        QStringList{ QStringLiteral("Vanessa Weatherley"), QStringLiteral("85") },
        QStringList{ QStringLiteral("Rebecca Dickens"), QStringLiteral("17") },
        QStringList{ QStringLiteral("David Bradley"), QStringLiteral("42") },
        QStringList{ QStringLiteral("Knut Walters"), QStringLiteral("25") },
        QStringList{ QStringLiteral("Andrea Jones"), QStringLiteral("34") }
    };

    QList<QStandardItem *> items;
    for (const QStringList &row : rows) {
        items.clear();
        for (const QString &text : row)
            items.append(new QStandardItem(text));
        model.appendRow(items);
    }

    resultView->setModel(&model);
    resultView->verticalHeader()->hide();
    resultView->horizontalHeader()->setStretchLastSection(true);
모델 및 뷰의 사용은 항목 뷰 예제와 모델/뷰 프로그래밍 개요에서 다룹니다.
© 2025 The Qt Company Ltd. Documentation contributions included herein are the copyrights of their respective owners. The documentation provided herein is licensed under the terms of the GNU Free Documentation License version 1.3 as published by the Free Software Foundation. Qt and respective logos are trademarks of The Qt Company Ltd. in Finland and/or other countries worldwide. All other trademarks are property of their respective owners.

