
예제 1: 정적 소스를 사용한 직접 연결
- 소스 객체 생성
이 소스 객체를 생성하려면 먼저 정의 파일인 `
simpleswitch.rep`을 만듭니다. 이 파일은 객체의 속성과 메서드를 기술하며, ` Qt Remote Objects ` 컴파일러( repc)에 입력됩니다. 이 파일은 리플리카에 노출해야 하는 인터페이스만 정의합니다.simpleswitch.repclass SimpleSwitch { PROP(bool currState=false); SLOT(server_slot(bool clientState)); };simpleswitch.rep파일에서,currState스위치의 현재 상태를 저장합니다.server_slot()이를 통해 소스와 상호작용할 수 있으며, 이 소스는echoSwitchState(bool newstate)신호에 연결됩니다.
repc가 이 파일을 처리할 수 있도록 하려면,
cmake파일에 다음 줄을 추가하십시오:qt6_add_repc_sources(directconnectserver simpleswitch.rep )qmake를 사용하는 경우:REPC_SOURCE = simpleswitch.rep이 지침은 Qt Remote Objects 모듈에만 해당되므로, 프로젝트에 해당 모듈도 추가해야 합니다. CMake를 사용하는 경우 다음을 추가하십시오:
find_package(Qt6 REQUIRED COMPONENTS RemoteObjects) target_link_libraries(directconnectserver PRIVATE Qt6::RemoteObjects)qmake를 사용하는 경우:QT += remoteobjectsrepc는 지정한 빌드 디렉터리에
rep_SimpleSwitch_source.h헤더를 생성합니다. 자세한 내용은 ‘소스’를 참조하십시오.repc는 QtRO와 함께 사용할 수 있는 세 가지 헬퍼 클래스를 생성합니다. 이 예제에서는 기본 클래스인 `
SimpleSwitchSimpleSource`를 사용합니다. 이 클래스는 `rep_SimpleSwitch_source.h`에 정의된 추상 클래스입니다. 아래와 같이 이 클래스를 상속받아 `SimpleSwitch` 구현 클래스를 정의합니다:simpleswitch.h#ifndef SIMPLESWITCH_H #define SIMPLESWITCH_H #include "rep_simpleswitch_source.h" class SimpleSwitch : public SimpleSwitchSimpleSource { Q_OBJECT public: SimpleSwitch(QObject *parent = nullptr); ~SimpleSwitch(); void server_slot(bool clientState) override; public Q_SLOTS: void timeout_slot(); private: QTimer *stateChangeTimer; }; #endifsimpleswitch.h에서,stateChangeTimerQTimer 는 SimpleSwitch의 상태를 전환하는 데 사용됩니다.timeout_slot()는stateChangeTimer의 timeout() 신호에 연결되어 있습니다.server_slot()– 이는 어떤 레플리카가 해당 슬롯의 버전을 호출할 때마다 소스에서 자동으로 호출되며 – 수신된 값을 출력합니다.currStateChanged(bool)repc가 생성한`rep_SimpleSwitch_source.h`에 정의된 이 신호는 `currState`의 상태가 전환될 때마다 발생합니다. 이 예제에서는 소스 측에서 이 신호를 무시하고, 나중에 복제본 측에서 처리합니다.
SimpleSwitch클래스의 정의는 다음과 같습니다:simpleswitch.cpp#include "simpleswitch.h" // 생성자 SimpleSwitch::SimpleSwitch(QObject*parent) : SimpleSwitchSimpleSource(parent) { stateChangeTimer = new QTimer(this); // 타이머 초기화 QObject::connect(stateChangeTimer, &QTimer::timeout, this, &SimpleSwitch::timeout_slot); // stateChangeTimer의 timeout() 신호를 simpleSwitch의 timeout_slot()에 연결 stateChangeTimer->start(2000); // 타이머 시작 및 타임아웃을 2초로 설정 qDebug() << "Source Node Started"; } // 소멸자 SimpleSwitch::~SimpleSwitch() { stateChangeTimer->stop(); } void SimpleSwitch::server_slot(bool clientState) { qDebug() << "Replica state is " << clientState; // print switch state echoed back by client } void SimpleSwitch::timeout_slot() { // 타이머 타임아웃 시 호출되는 슬롯 if (currState()) // 현재 상태가 true인지 확인, currState()는 repc에서 생성한 rep_simpleswitch_source.h에 정의되어 있음 setCurrState(false); // 상태를 false로 설정 else setCurrState(true); // 상태를 true로 설정 qDebug() << "Source State is "<<currState(); } 레지스트리
생성: 이 예제에서는 노드 간 직접 연결을 사용하므로 이 단계를 생략할 수 있습니다.
- 호스트
노드 생성호스트 노드는 아래와 같이 생성됩니다:
QRemoteObjectHost srcNode(QUrl(QStringLiteral("local:replica"))); - 호스트 소스 객체 및
리모팅다음 문장은 Source 객체를 인스턴스화하고 이를 호스트로 전달하여, 객체를 QtRO 네트워크에서 인식할 수 있게 하는 “리모팅”을 활성화합니다:
SimpleSwitch srcSwitch; // create simple switch
srcNode.enableRemoting(&srcSwitch); // enable remoting
위에서 설명한 단계를 구현하는
main.cpp파일의 내용은 다음과 같습니다:main.cpp#include <QCoreApplication> #include "simpleswitch.h" int main(int argc, char *argv[]) { QCoreApplication a(argc, argv); SimpleSwitch srcSwitch; // create simple switch // Create host node without Registry: QRemoteObjectHost srcNode(QUrl(QStringLiteral("local:replica"))); srcNode.enableRemoting(&srcSwitch); // enable remoting/sharing return a.exec(); }이 소스 측 프로젝트를 컴파일하고 실행합니다. 리플리카가 생성되지 않은 상태에서의 출력은 아래와 같으며, 스위치 상태가 2초마다
true와false사이를 번갈아 가며 전환됩니다.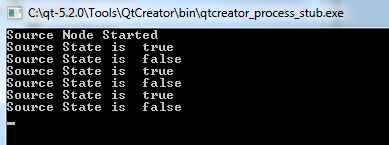
다음 단계에서는 네트워크의 레플리카 측을 생성하는 데, 이 예제에서는 레플리카 측이 소스 측으로부터 스위치 상태를 받아 이를 그대로 반환합니다.
리플리카 코드
- repc를
사용하여 프로젝트에
리플리카 추가하기소스 측에서 사용했던 것과 동일한 API 정의 파일(
SimpleSwitch.rep)을 사용하여 repc로 리플리카 헤더 파일을 생성합니다.cmake를 사용하는 경우, 클라이언트 측cmake파일에 다음 줄을 포함하여.rep파일을 입력으로 지정하십시오:qt6_add_repc_replicas(directconnectclient simpleswitch.rep )qmake를 사용하는 경우, 클라이언트 측.pro파일에 다음 줄을 추가하십시오:REPC_REPLICA = simpleswitch.reprepc 도구는 빌드 디렉터리에
rep_SimpleSwitch_replica.h파일을 생성합니다. 자세한 내용은 Replica를 참조하십시오. - 소스
호스트 노드와
연결할 노드를 생성합니다. 다음 코드는 네트워크에서 두 번째 노드를 인스턴스화하고 이를 소스 호스트 노드에 연결합니다:
QRemoteObjectNode repNode; // create remote object node repNode.connectToNode(QUrl(QStringLiteral("local:replica"))); // connect with remote host node - 노드의 acquire() 메서드를 호출하여 레플리카에 대한 포인터를 생성합니다
먼저, 복제본을 생성합니다:
QSharedPointer<SimpleSwitchReplica> ptr;
ptr.reset(repNode.acquire<SimpleSwitchReplica>()); // acquire replica of source from host node
참고: ` acquire()`는 복제본에 대한 포인터를 반환하지만, 그 수명을 관리하지는 않습니다. 이 예제는 반환된 포인터가 항상 올바르게 삭제되도록 보장하기 위해, 해당 포인터를 ` QSharedPointer ` 또는 ` QScopedPointer `로 감싸는 권장 절차를 보여줍니다.
main.cpp는 위에서 설명한 단계를 구현하고 객체를 인스턴스화합니다:main.cpp#include <QCoreApplication> #include "client.h" int main(int argc, char *argv[]) { QCoreApplication a(argc, argv); QSharedPointer<SimpleSwitchReplica> ptr; // shared pointer to hold source replica QRemoteObjectNode repNode; // create remote object node repNode.connectToNode(QUrl(QStringLiteral("local:replica"))); // connect with remote host node ptr.reset(repNode.acquire<SimpleSwitchReplica>()); // acquire replica of source from host node Client rswitch(ptr); // create client switch object and pass reference of replica to it return a.exec(); }Client클래스의 전체 선언 및 정의는 다음과 같습니다:client.h#ifndef _CLIENT_H #define _CLIENT_H #include <QObject> #include <QSharedPointer> #include "rep_simpleswitch_replica.h" class Client : public QObject { Q_OBJECT public: Client(QSharedPointer<SimpleSwitchReplica> ptr); ~Client() override = default; void initConnections();// Function to connect signals and slots of source and client Q_SIGNALS: void echoSwitchState(bool switchState);// this signal is connected with server_slot(..) on the source object and echoes back switch state received from source public Q_SLOTS: void recSwitchState_slot(bool); // slot to receive source state private: bool clientSwitchState; // holds received server switch state QSharedPointer<SimpleSwitchReplica> reptr;// holds reference to replica }; #endifclient.cpp#include "client.h" // 생성자 Client::Client(QSharedPointer<SimpleSwitchReplica> ptr) : QObject(nullptr),reptr(ptr) { // 초기화 슬롯으로 초기화된 리플리카의 신호를 연결합니다. initConnections(); // 리플리카가 repc에 의해 생성되었으므로 // SimpleSwitchReplica의 신호/슬롯에 직접 연결할 수 있습니다 . } void Client::initConnections() { // 신호와 슬롯 간의 연결을 초기화합니다. // 소스 레플리카의 currStateChanged() 신호를 클라이언트의 recSwitchState() 슬롯에 연결하여 소스의 현재 상태를 수신합니다. QObject::connect(reptr.data(), &SimpleSwitchReplica::currStateChanged, this, &Client::recSwitchState_slot); // 수신한 상태를 반환하기 위해 클라이언트의 echoSwitchState(..) 신호를 리플리카의 server_slot(..)에 연결 QObject::connect(this, &Client::echoSwitchState, reptr.data(), &SimpleSwitchReplica::server_slot); } void Client::recSwitchState_slot(bool value) { qDebug() << "Received source state "<< value << reptr.data()->currState(); clientSwitchState = reptr.data()->currState(); Q_EMIT echoSwitchState(clientSwitchState); // 수신된 상태를 서버로 다시 반환하는 신호를 전송 }이 예제와 소스 측 예제를 함께 컴파일하고 실행하면 다음과 같은 출력이 생성됩니다:
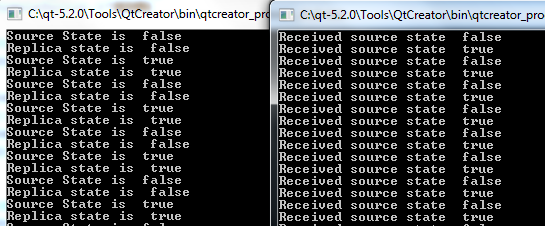
© 2026 The Qt Company Ltd. Documentation contributions included herein are the copyrights of their respective owners. The documentation provided herein is licensed under the terms of the GNU Free Documentation License version 1.3 as published by the Free Software Foundation. Qt and respective logos are trademarks of The Qt Company Ltd. in Finland and/or other countries worldwide. All other trademarks are property of their respective owners.
