
QQuickRenderControl RHI 示例
演示如何将Qt Quick 场景渲染为QRhiTexture 文件。
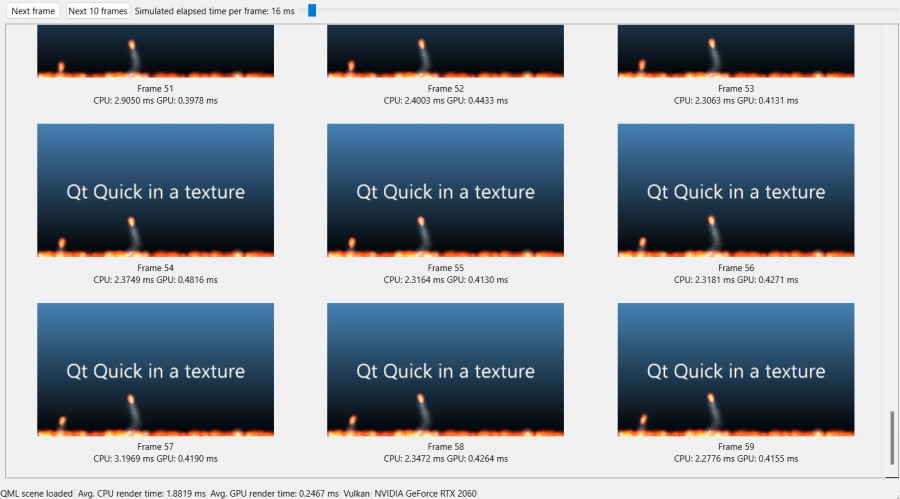
本示例演示了如何设置一个Qt Quick 场景,将其渲染结果重定向至QRhiTexture 。随后,应用程序可以自由地对每帧生成的纹理进行任意处理。本示例是一个基于QWidget 的应用程序,它会回读图像数据,并显示收集到的每帧渲染结果,同时为每帧提供基于CPU和GPU的计时信息。
通过使用 Qt 3D 图形 API 抽象层,本示例不依赖于任何特定的图形 API。启动时,将显示一个对话框,列出该平台可能支持的 3D API。
    QDialog apiSelect;
    QVBoxLayout *selLayout = new QVBoxLayout;
    selLayout->addWidget(new QLabel(QObject::tr("Select graphics API to use")));
    QListWidget *apiList = new QListWidget;
    QVarLengthArray<QSGRendererInterface::GraphicsApi, 5> apiValues;
#ifdef Q_OS_WIN
    apiList->addItem("Direct3D 11");
    apiValues.append(QSGRendererInterface::Direct3D11);
    apiList->addItem("Direct3D 12");
    apiValues.append(QSGRendererInterface::Direct3D12);
#endif
#if QT_CONFIG(metal)
    apiList->addItem("Metal");
    apiValues.append(QSGRendererInterface::Metal);
#endif
#if QT_CONFIG(vulkan)
    apiList->addItem("Vulkan");
    apiValues.append(QSGRendererInterface::Vulkan);
#endif
#if QT_CONFIG(opengl)
    apiList->addItem("OpenGL / OpenGL ES");
    apiValues.append(QSGRendererInterface::OpenGL);
#endif
    if (apiValues.isEmpty()) {
        QMessageBox::critical(nullptr, QObject::tr("No 3D graphics API"), QObject::tr("No 3D graphics APIs are supported in this Qt build"));
        return 1;
    }
注意: 无法保证在特定平台上所有选项均可正常工作。
一旦完成选择,系统将加载一个 QML 文件。不过,我们不会简单地创建一个 `QQuickView ` 实例并调用 `show()`。实际上,管理 `Qt Quick ` 场景的 `QQuickWindow ` 对象永远不会显示在屏幕上。相反,应用程序会通过 `QQuickRenderControl` 来控制渲染的时间和位置。
voidMainWindow::load(constQString&filename)
{
    reset();

    m_renderControl.reset(newQQuickRenderControl);
    m_scene.reset(newQQuickWindow(m_renderControl.get()));

    // 如果底层 3D API 支持,则在 QRhiCommandBuffer 上启用 lastCompletedGpuTime()
    QQuickGraphicsConfiguration config;
    config.setTimestamps(true);
    m_scene->setGraphicsConfiguration(config);

#if QT_CONFIG(vulkan)
    if(m_scene->graphicsApi()==QSGRendererInterface::Vulkan)
        m_scene->setVulkanInstance(m_vulkanInstance);
#endif

    m_qmlEngine.reset(newQQmlEngine);
    m_qmlComponent.reset(newQQmlComponent(m_qmlEngine.get(),QUrl::fromLocalFile(filename)));
    if(m_qmlComponent->isError()) {
        for(constQQmlError&error: m_qmlComponent->errors())
            qWarning() << error.url() << error.line() << error;
        QMessageBox::critical(this,tr("无法加载 QML 场景"),tr("加载 %1 失败").arg(filename));
        reset();
        return;
}一旦对象树实例化完成,便会查询根项(一个Rectangle ),确保其大小有效,然后将其传播下去。
注意: 不支持在对象树中使用Window 元素的场景 。
    QObject*rootObject = m_qmlComponent->create();
    if(m_qmlComponent->isError()) {
        for(constQQmlError&error: m_qmlComponent->errors())
            qWarning() << error.url() << error.line() << error;
        QMessageBox::critical(this,tr("无法加载 QML 场景"),tr("创建组件失败"));
        reset();
        return;
    }

    QQuickItem*rootItem =qobject_cast<QQuickItem*>(rootObject);
    if(!rootItem) {
        // 如果根对象是 Window,则清除屏幕上的窗口
        if(QQuickWindow*w =qobject_cast<QQuickWindow*>(rootObject))
            deletew;
        QMessageBox::critical(this,
                              tr("QML 场景中的根项无效"),
                              tr("根对象不是 QQuickItem。如果这是一个包含 Window 的场景,请注意此类场景不受支持。"));
        reset();
        return;
    }

    if(rootItem->size().width()< 16)
        rootItem->setSize(QSizeF(640, 360));

    m_scene->contentItem()->setSize(rootItem->size());
    m_scene->setGeometry(0, 0, rootItem->width(), rootItem->height());

    rootItem->setParentItem(m_scene->contentItem());

    m_statusMsg->setText(tr("QML 场景已加载"));
此时尚未初始化任何渲染资源,即尚未通过原生 3D 图形 API 进行任何操作。只有在下一步中才会实例化一个QRhi ,这才会触发后台对 Vulkan、Metal、Direct 3D 等渲染系统的配置。
    const bool initSuccess = m_renderControl->initialize();
    if (!initSuccess) {
        QMessageBox::critical(this, tr("Cannot initialize renderer"), tr("QQuickRenderControl::initialize() failed"));
        reset();
        return;
    }

    const QSGRendererInterface::GraphicsApi api = m_scene->rendererInterface()->graphicsApi();
    switch (api) {
    case QSGRendererInterface::OpenGL:
        m_apiMsg->setText(tr("OpenGL"));
        break;
    case QSGRendererInterface::Direct3D11:
        m_apiMsg->setText(tr("D3D11"));
        break;
    case QSGRendererInterface::Direct3D12:
        m_apiMsg->setText(tr("D3D12"));
        break;
    case QSGRendererInterface::Vulkan:
        m_apiMsg->setText(tr("Vulkan"));
        break;
    case QSGRendererInterface::Metal:
        m_apiMsg->setText(tr("Metal"));
        break;
    default:
        m_apiMsg->setText(tr("Unknown 3D API"));
        break;
    }

    QRhi *rhi = m_renderControl->rhi();
    if (!rhi) {
        QMessageBox::critical(this, tr("Cannot render"), tr("No QRhi from QQuickRenderControl"));
        reset();
        return;
    }

    m_driverInfoMsg->setText(QString::fromUtf8(rhi->driverInfo().deviceName));
注意:本 应用程序采用 Qt 创建 `QRhi` 实例的模式。但这并非唯一可行的方法:如果应用程序维护自己的 `QRhi `(以及相应的 OpenGL 上下文、Vulkan 设备等),则可请求 `Qt Quick ` 采用并使用该现有的 `QRhi`。 具体实现方式是将由QQuickGraphicsDevice::fromRhi() 创建的QQuickGraphicsDevice 传递给QQuickWindow ,这与上文代码片段中设置QQuickGraphicsConfiguration 的方式类似。例如,假设希望在QRhiWidget 中使用Qt Quick 渲染的纹理:此时,QRhiWidget 的QRhi 需要传递给Qt Quick ,而不是让Qt Quick 自行创建。
一旦QQuickRenderControl::initialize() 执行成功,渲染器即处于活动状态并准备就绪。为此,我们需要一个颜色缓冲区用于渲染。
QQuickRenderTarget 是一个轻量级的隐式共享类,它承载(但不拥有)各种描述纹理、渲染目标或类似对象的原生或QRhi 对象集合。在QQuickWindow 上调用setRenderTarget()(请记住,我们有一个QQuickWindow ,它在屏幕上不可见)将触发将Qt Quick 场景图的渲染重定向到应用程序提供的纹理中。 在使用QRhi 时(而非使用原生3D API对象,如OpenGL纹理ID或VkImage对象),应用程序应先创建一个QRhiTextureRenderTarget ,然后通过QQuickRenderTarget::fromRhiRenderTarget()将其传递给Qt Quick 。
    const QSize pixelSize = rootItem->size().toSize(); // no scaling, i.e. the item size is in pixels

    m_texture.reset(rhi->newTexture(QRhiTexture::RGBA8, pixelSize, 1,
                                    QRhiTexture::RenderTarget | QRhiTexture::UsedAsTransferSource));
    if (!m_texture->create()) {
        QMessageBox::critical(this, tr("Cannot render"), tr("Cannot create texture object"));
        reset();
        return;
    }

    m_ds.reset(rhi->newRenderBuffer(QRhiRenderBuffer::DepthStencil, pixelSize, 1));
    if (!m_ds->create()) {
        QMessageBox::critical(this, tr("Cannot render"), tr("Cannot create depth-stencil buffer"));
        reset();
        return;
    }

    QRhiTextureRenderTargetDescription rtDesc(QRhiColorAttachment(m_texture.get()));
    rtDesc.setDepthStencilBuffer(m_ds.get());
    m_rt.reset(rhi->newTextureRenderTarget(rtDesc));
    m_rpDesc.reset(m_rt->newCompatibleRenderPassDescriptor());
    m_rt->setRenderPassDescriptor(m_rpDesc.get());
    if (!m_rt->create()) {
        QMessageBox::critical(this, tr("Cannot render"), tr("Cannot create render target"));
        reset();
        return;
    }

    m_scene->setRenderTarget(QQuickRenderTarget::fromRhiRenderTarget(m_rt.get()));
注意:请务必 为Qt Quick 提供深度-模板缓冲区,因为在渲染时,Qt Quick 场景图可能会同时使用这两个缓冲区以及深度和模板测试。
主要渲染循环如下所示。此处还展示了如何将图像从GPU读回至CPU。一旦QImage 可用,基于QWidget 的用户界面便会相应更新。此处我们将省略对此的详细说明。
该示例还演示了一种测量 CPU 和 GPU 上渲染一帧所需开销的简单方法。 由于QRhi 的某些内部行为,离屏渲染的帧非常适合用于此目的。这意味着那些原本是异步的操作(即只有在渲染后续帧时才会完成),在QRhi::endOffscreenFrame()(即QQuickRenderControl::endFrame())返回时,已保证准备就绪。 我们在读取纹理时利用了这一特性,该特性同样适用于 GPU 时间戳。正因如此,应用程序才能显示每帧的 GPU 时间,同时确保该时间确实对应于该特定帧(而非更早的一帧)。有关 GPU 计时的详细信息,请参阅lastCompletedGpuTime()。CPU 侧的计时则通过QElapsedTimer 获取。
    QElapsedTimer cpuTimer;
    cpuTimer.start();

    m_renderControl->polishItems();

    m_renderControl->beginFrame();

    m_renderControl->sync();
    m_renderControl->render();

    QRhi *rhi = m_renderControl->rhi();
    QRhiReadbackResult readResult;
    QRhiResourceUpdateBatch *readbackBatch = rhi->nextResourceUpdateBatch();
    readbackBatch->readBackTexture(m_texture.get(), &readResult);
    m_renderControl->commandBuffer()->resourceUpdate(readbackBatch);

    m_renderControl->endFrame();

    const double gpuRenderTimeMs = m_renderControl->commandBuffer()->lastCompletedGpuTime() * 1000.0;
    const double cpuRenderTimeMs = cpuTimer.nsecsElapsed() / 1000000.0;

    // m_renderControl->begin/endFrame() is based on QRhi's
    // begin/endOffscreenFrame() under the hood, meaning it does not do
    // pipelining, unlike swapchain-based frames, and therefore the readback is
    // guaranteed to complete once endFrame() returns.
    QImage wrapperImage(reinterpret_cast<const uchar *>(readResult.data.constData()),
                    readResult.pixelSize.width(), readResult.pixelSize.height(),
                    QImage::Format_RGBA8888_Premultiplied);
    QImage result;
    if (rhi->isYUpInFramebuffer())
        result = wrapperImage.flipped();
    else
result = wrapperImage.copy();其中一个关键点是Qt Quick 动画的步进机制。由于我们没有可通过测量经过时间、普通计时器或基于呈现速率的节流来驱动动画系统的屏幕窗口,因此将Qt Quick 渲染重定向后,通常意味着动画的驱动需要由应用程序接管。 否则,动画将基于普通的系统计时器运行,但实际经过的时间往往与离屏渲染场景中预期呈现的效果毫无关联。试想在紧凑的循环中连续渲染 5 帧的情况。 这 5 帧中动画的运动效果取决于 CPU 执行循环迭代的速度。这种情况几乎从来都不是理想的。为了确保动画效果的一致性,请安装一个自定义的 QAnimationDriver。虽然这是一个未记录(但公开)的 API,主要面向高级用户,但此处的示例提供了一个简单的用法示例。
class AnimationDriver : public QAnimationDriver
{
public:
    AnimationDriver(QObject *parent = nullptr)
        : QAnimationDriver(parent),
          m_step(16)
    {
    }

    void setStep(int milliseconds)
    {
        m_step = milliseconds;
    }

    void advance() override
    {
        m_elapsed += m_step;
        advanceAnimation();
    }

    qint64 elapsed() const override
    {
        return m_elapsed;
    }

private:
    int m_step;
    qint64 m_elapsed = 0;
};该应用程序有一个QSlider ,可用于将动画步长值从默认的16毫秒更改为其他数值。请注意对我们的QAnimationDriver子类中setStep()函数的调用。
    QSlider *animSlider = new QSlider;
    animSlider->setOrientation(Qt::Horizontal);
    animSlider->setMinimum(1);
    animSlider->setMaximum(1000);
    QLabel *animLabel = new QLabel;
    QObject::connect(animSlider, &QSlider::valueChanged, animSlider, [this, animLabel, animSlider] {
        if (m_animationDriver)
            m_animationDriver->setStep(animSlider->value());
        animLabel->setText(tr("Simulated elapsed time per frame: %1 ms").arg(animSlider->value()));
    });
    animSlider->setValue(16);
    QCheckBox *animCheckBox = new QCheckBox(tr("Custom animation driver"));
    animCheckBox->setToolTip(tr("Note: Installing the custom animation driver makes widget drawing unreliable, depending on the platform.\n"
                                "This is due to widgets themselves relying on QPropertyAnimation and similar, which are driven by the same QAnimationDriver.\n"
                                "In any case, the functionality of the widgets are not affected, just the rendering may lag behind.\n"
                                "When not checked, Qt Quick animations advance based on the system time, i.e. the time elapsed since the last press of the Next button."));
    QObject::connect(animCheckBox, &QCheckBox::checkStateChanged, animCheckBox, [this, animCheckBox, animSlider, animLabel] {
        if (animCheckBox->isChecked()) {
            animSlider->setEnabled(true);
            animLabel->setEnabled(true);
            m_animationDriver = new AnimationDriver(this);
            m_animationDriver->install();
            m_animationDriver->setStep(animSlider->value());
        } else {
            animSlider->setEnabled(false);
            animLabel->setEnabled(false);
            delete m_animationDriver;
            m_animationDriver = nullptr;
        }
    });
    animSlider->setEnabled(false);
    animLabel->setEnabled(false);
    controlLayout->addWidget(animCheckBox);
    controlLayout->addWidget(animLabel);
    controlLayout->addWidget(animSlider);
注意: 通过“animCheckBox ”复选框,安装 自定义动画驱动程序被设为可选操作。这允许比较安装与未安装自定义动画驱动程序时的效果。此外,在某些平台上(可能还取决于主题),启用自定义驱动程序可能会导致控件绘制出现卡顿。 这是意料之中的,因为如果某些小部件动画(例如QPushButton 或QCheckBox 的高亮效果)是通过QPropertyAnimation 等方法管理的,那么这些动画将由同一个QAnimationDriver驱动,而该驱动器不会前进,直到通过点击按钮请求新帧为止。
动画的推进应在每个帧之前(即在调用QQuickRenderControl::beginFrame() 之前)通过简单地调用 advance() 来完成:
void MainWindow::stepAnimations()
{
    if (m_animationDriver) {
        // Now the Qt Quick scene will think that <slider value> milliseconds have
        // elapsed and update animations accordingly when doing the next frame.
        m_animationDriver->advance();
    }
}另请参阅 QRhi 、QQuickRenderControl 以及QQuickWindow 。
© 2026 The Qt Company Ltd. Documentation contributions included herein are the copyrights of their respective owners. The documentation provided herein is licensed under the terms of the GNU Free Documentation License version 1.3 as published by the Free Software Foundation. Qt and respective logos are trademarks of The Qt Company Ltd. in Finland and/or other countries worldwide. All other trademarks are property of their respective owners.
