场景图 - QML 下的 OpenGL
展示如何在Qt Quick 场景下渲染 OpenGL。
QML 下的 OpenGL 示例展示了应用程序如何利用QQuickWindow::beforeRendering() 信号在Qt Quick 场景下绘制自定义 OpenGL 内容。该信号在场景图开始渲染前的每一帧开始时发出,因此响应该信号的任何 OpenGL 绘制调用都会堆叠到Qt Quick 项下。
作为替代方案,希望在Qt Quick 场景之上渲染 OpenGL 内容的应用程序可以通过连接QQuickWindow::afterRendering() 信号来实现。
在此示例中,我们还将看到如何让 QML 暴露的值影响 OpenGL 渲染。我们使用 QML 文件中的NumberAnimation 来动画阈值,绘制松鼠的 OpenGL 着色程序会使用该值。
该示例在大多数方面与Direct3D 11 Under QML、Metal Under QML 和Vulkan Under QML示例相同,它们都是通过不同的本地 API 渲染相同的自定义内容。
class Squircle : public QQuickItem
{
    Q_OBJECT
    Q_PROPERTY(qreal t READ t WRITE setT NOTIFY tChanged)
    QML_ELEMENT

public:
    Squircle();

    qreal t() const { return m_t; }
    void setT(qreal t);

signals:
    void tChanged();

public slots:
    void sync();
    void cleanup();

private slots:
    void handleWindowChanged(QQuickWindow *win);

private:
    void releaseResources() override;

    qreal m_t;
    SquircleRenderer *m_renderer;
};
首先,我们需要一个可以暴露给 QML 的对象。这是QQuickItem 的子类,因此我们可以轻松访问QQuickItem::window() 。我们使用QML_ELEMENT 宏将其公开给 QML。
class SquircleRenderer : public QObject, protected QOpenGLFunctions
{
    Q_OBJECT
public:
    ~SquircleRenderer();

    void setT(qreal t) { m_t = t; }
    void setViewportSize(const QSize &size) { m_viewportSize = size; }
    void setWindow(QQuickWindow *window) { m_window = window; }

public slots:
    void init();
    void paint();

private:
    QSize m_viewportSize;
    qreal m_t = 0.0;
    QOpenGLShaderProgram *m_program = nullptr;
    QQuickWindow *m_window = nullptr;
    QOpenGLBuffer m_vbo;
};
然后,我们需要一个负责渲染的对象。这个实例需要与QQuickItem 分离,因为项目位于 GUI 线程中,而渲染可能发生在渲染线程中。由于我们希望连接到QQuickWindow::beforeRendering() ,因此我们将呈现器设置为QObject 。呈现器包含它所需的所有状态的副本,与 GUI 线程无关。
注意: 不要轻易将两个对象合二为一。当渲染线程正在渲染时,QQuickItems 可能会在图形用户界面线程上被删除。
让我们继续实现。
Squircle::Squircle()
    : m_t(0)
    , m_renderer(nullptr)
{
    connect(this, &QQuickItem::windowChanged, this, &Squircle::handleWindowChanged);
}
Squircle 类的构造函数简单地初始化了值,并连接到窗口更改信号,我们将使用该信号准备渲染器。
void Squircle::handleWindowChanged(QQuickWindow *win)
{
    if (win) {
        connect(win, &QQuickWindow::beforeSynchronizing, this, &Squircle::sync, Qt::DirectConnection);
        connect(win, &QQuickWindow::sceneGraphInvalidated, this, &Squircle::cleanup, Qt::DirectConnection);
一旦有了窗口,我们就会连接到QQuickWindow::beforeSynchronizing() 信号,用它来创建呈现器并安全地将状态复制到呈现器中。我们还将连接到QQuickWindow::sceneGraphInvalidated() 信号,以处理呈现器的清理工作。
注意: 由于 Squircle 对象与 GUI 线程有亲缘关系,而信号是从呈现线程发出的,因此连接Qt::DirectConnection 至关重要。否则,将导致在错误的线程上调用插槽,并且没有 OpenGL 上下文。
        // Ensure we start with cleared to black. The squircle's blend mode relies on this.
        win->setColor(Qt::black);
    }
}
场景图的默认行为是在渲染前清除帧缓冲区。这没有问题,因为我们会在清空后插入自己的渲染代码。不过请确保我们清除的是所需的颜色(黑色)。
void Squircle::sync()
{
    if (!m_renderer) {
        m_renderer = new SquircleRenderer();
        connect(window(), &QQuickWindow::beforeRendering, m_renderer, &SquircleRenderer::init, Qt::DirectConnection);
        connect(window(), &QQuickWindow::beforeRenderPassRecording, m_renderer, &SquircleRenderer::paint, Qt::DirectConnection);
    }
    m_renderer->setViewportSize(window()->size() * window()->devicePixelRatio());
    m_renderer->setT(m_t);
    m_renderer->setWindow(window());
}
我们使用sync() 函数初始化呈现器,并将项目中的状态复制到呈现器中。创建呈现器时,我们还将QQuickWindow::beforeRendering() 和QQuickWindow::beforeRenderPassRecording() 连接到呈现器的init() 和paint() 插槽。
注意: QQuickWindow::beforeSynchronizing() 信号是在 GUI 线程阻塞时在呈现线程上发出的,因此只需复制值即可,无需任何额外保护。
void Squircle::cleanup()
{
    delete m_renderer;
    m_renderer = nullptr;
}

class CleanupJob : public QRunnable
{
public:
    CleanupJob(SquircleRenderer *renderer) : m_renderer(renderer) { }
    void run() override { delete m_renderer; }
private:
    SquircleRenderer *m_renderer;
};

void Squircle::releaseResources()
{
    window()->scheduleRenderJob(new CleanupJob(m_renderer), QQuickWindow::BeforeSynchronizingStage);
    m_renderer = nullptr;
}

SquircleRenderer::~SquircleRenderer()
{
    delete m_program;
}
在cleanup() 函数中,我们删除了渲染器,而渲染器也会清理自己的资源。由于仅仅连接到 sceneGraphInvalidated() 信号本身不足以处理所有情况,因此还需要重新实现QQuickWindow::releaseResources() 作为补充。
void Squircle::setT(qreal t)
{
    if (t == m_t)
        return;
    m_t = t;
    emit tChanged();
    if (window())
        window()->update();
}
当t 的值发生变化时,我们会调用QQuickWindow::update() 而不是QQuickItem::update() ,因为前者会强制重新绘制整个窗口,即使场景图自上一帧以来没有发生变化。
void SquircleRenderer::init()
{
    if (!m_program) {
        QSGRendererInterface *rif = m_window->rendererInterface();
        Q_ASSERT(rif->graphicsApi() == QSGRendererInterface::OpenGL);

        initializeOpenGLFunctions();

        const float values[] = { -1, -1, 1, -1, -1, 1, 1, 1 };

        m_vbo.create();
        m_vbo.bind();
        m_vbo.allocate(values, sizeof(values));

        glEnableVertexAttribArray(0);
        glVertexAttribPointer(0, 2, GL_FLOAT, GL_FALSE, 2 * sizeof(GLfloat), nullptr);

        m_program = new QOpenGLShaderProgram();
        m_program->addCacheableShaderFromSourceCode(QOpenGLShader::Vertex,
                                                    "attribute highp vec4 vertices;"
                                                    "varying highp vec2 coords;"
                                                    "void main() {"
                                                    "    gl_Position = vertices;"
                                                    "    coords = vertices.xy;"
                                                    "}");
        m_program->addCacheableShaderFromSourceCode(QOpenGLShader::Fragment,
                                                    "uniform lowp float t;"
                                                    "varying highp vec2 coords;"
                                                    "void main() {"
                                                    "    lowp float i = 1. - (pow(abs(coords.x), 4.) + pow(abs(coords.y), 4.));"
                                                    "    i = smoothstep(t - 0.8, t + 0.8, i);"
                                                    "    i = floor(i * 20.) / 20.;"
                                                    "    gl_FragColor = vec4(coords * .5 + .5, i, i);"
                                                    "}");

        m_program->bindAttributeLocation("vertices", 0);
        m_program->link();

    }
}
在 SquircleRenderer 的init() 函数中,如果尚未初始化着色器程序,我们将首先初始化着色器程序。调用槽时,线程上的 OpenGL 上下文是当前的。
void SquircleRenderer::paint()
{
    // Play nice with the RHI. Not strictly needed when the scenegraph uses
    // OpenGL directly.
    m_window->beginExternalCommands();

    m_vbo.bind();
    m_program->bind();
    m_program->setUniformValue("t", (float)m_t);

    glEnableVertexAttribArray(0);
    glVertexAttribPointer(0, 2, GL_FLOAT, GL_FALSE, 2 * sizeof(GLfloat), nullptr);

    glViewport(0, 0, m_viewportSize.width(), m_viewportSize.height());

    glDisable(GL_DEPTH_TEST);

    glEnable(GL_BLEND);
    glBlendFunc(GL_SRC_ALPHA, GL_ONE);

    glDrawArrays(GL_TRIANGLE_STRIP, 0, 4);

    glDisableVertexAttribArray(0);
    m_program->release();

    m_window->endExternalCommands();
}
我们使用着色器程序在paint() 中绘制松鼠。
int main(int argc, char **argv)
{
    QGuiApplication app(argc, argv);

    QQuickWindow::setGraphicsApi(QSGRendererInterface::OpenGL);

    QQuickView view;
    view.setResizeMode(QQuickView::SizeRootObjectToView);
    view.setSource(QUrl("qrc:///scenegraph/openglunderqml/main.qml"));
    view.show();

    return QGuiApplication::exec();
}
应用程序的main() 函数实例化QQuickView 并启动main.qml 文件。
import QtQuick
import OpenGLUnderQML

Item {

    width: 320
    height: 480

    Squircle {
        SequentialAnimation on t {
            NumberAnimation { to: 1; duration: 2500; easing.type: Easing.InQuad }
            NumberAnimation { to: 0; duration: 2500; easing.type: Easing.OutQuad }
            loops: Animation.Infinite
            running: true
        }
    }
我们用在main() 函数中注册的名称导入 Squircle QML 类型。然后,我们将其实例化,并在其t 属性上创建一个运行中的NumberAnimation 。
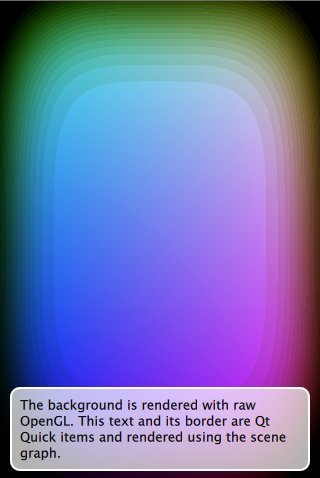
    Rectangle {
        color: Qt.rgba(1, 1, 1, 0.7)
        radius: 10
        border.width: 1
        border.color: "white"
        anchors.fill: label
        anchors.margins: -10
    }

    Text {
        id: label
        color: "black"
        wrapMode: Text.WordWrap
        text: qsTr("The background here is a squircle rendered with raw OpenGL using the 'beforeRender()' signal in QQuickWindow. This text label and its border is rendered using QML")
        anchors.right: parent.right
        anchors.left: parent.left
        anchors.bottom: parent.bottom
        anchors.margins: 20
    }
}
然后,我们叠加一段简短的描述性文字,这样就能清楚地看到我们实际上是在Qt Quick 场景下渲染 OpenGL。
© 2026 The Qt Company Ltd. Documentation contributions included herein are the copyrights of their respective owners. The documentation provided herein is licensed under the terms of the GNU Free Documentation License version 1.3 as published by the Free Software Foundation. Qt and respective logos are trademarks of The Qt Company Ltd. in Finland and/or other countries worldwide. All other trademarks are property of their respective owners.
