Qt Quick 3D - 快速项目示例
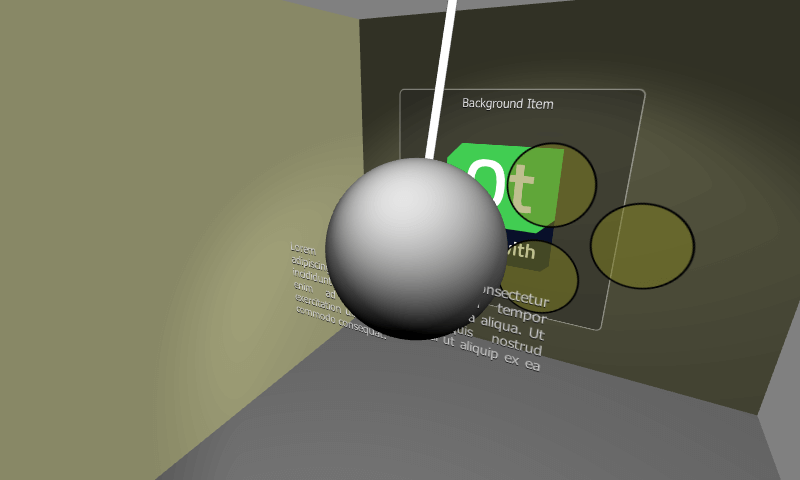
演示在快速 3D 场景中使用Qt Quick 项目。

本示例演示在快速 3D 场景中使用Qt Quick 2D 项目。
快速 3D 场景中的快速项目
Qt Quick 可将 2DItem及其所有子项目添加到快速 3D 场景中。在 3D 场景中使用Qt Quick 类型时,有几点需要注意:
- 当Item 位于Node 内时,其左上角会被置于节点的原点。这意味着该项目通常需要指定
anchors.centerIn: parent,以确保Node 的原点是Item 的中心点。 - 三维变换从父Node 继承。如果多个
Item应受同一变换的影响,则可将这些项目组合在Node 下的共同父Item 中。 - 在 Qt 6.0 中,项目不会接收触摸/鼠标事件,如
MouseArea,因此它们应该是非交互式的。 - 快速项目不受灯光和阴影的影响。
- Clipping 在 Qt 6.0 中,应避免使用快速项目,也不应依赖快速项目。
与早期的 Qt 3D 版本和其他 2D-in-3D 嵌入方法不同,将Qt Quick 项目育成Qt Quick 3D 节点并不意味着要创建纹理,将 2D 内容渲染到纹理上,然后绘制纹理四边形。相反,Qt 6.0 支持在与 3D 场景相同的渲染传递中渲染 2D 内容。这在实际应用中可能会带来巨大的性能提升。如果 Item 是通过设计使用额外的渲染目标进行渲染,例如因为layer.enabled 设置为 true,或者因为它是ShaderEffectSource ,那么这并不适用。
测试场景
本示例的重要部分是View3D 元素的场景内容。
我们首先添加离摄像机最远的图层。该层包含Rectangle 、Text 和Image 元素。为确保该图层中的元素定位正确,我们将它们组合在一个共同的父图层Item 下。需要注意的是,所有内容都会被剪切到这个根项内,因此需要适当调整大小。
Node {
    position: Qt.vector3d(0, 100, -120)
    Item {
        width: 400
        height: 400
        anchors.centerIn: parent
        Rectangle {
            anchors.fill: parent
            opacity: 0.4
            color: "#202020"
            radius: 10
            border.width: 2
            border.color: "#f0f0f0"
        }
        Text {
            anchors.top: parent.top
            anchors.topMargin: 10
            anchors.horizontalCenter: parent.horizontalCenter
            font.pixelSize: 20
            color: "#e0e0e0"
            style: Text.Raised
            text: qsTr("Background Item")
        }
        Image {
            anchors.centerIn: parent
            source: "Built_with_Qt_RGB_logo_vertical"
        }
    }
}
接下来,Node 及其项目的位置更靠近摄像机。它包含三个Rectangle 项目,X 位置和旋转都会产生动画。请注意,动画是在父Node 上完成的,而快速Item 的内容保持静态。从性能的角度来看,对于更复杂的项目,这是一种很好的方法。
Node {
    position: Qt.vector3d(0, 150, 100)
    SequentialAnimation on x {
        loops: Animation.Infinite
        NumberAnimation {
            to: -200
            duration: 1500
            easing.type: Easing.InOutQuad
        }
        NumberAnimation {
            to: 200
            duration: 1500
            easing.type: Easing.InOutQuad
        }
    }
    NumberAnimation on eulerRotation.z {
        loops: Animation.Infinite
        from: 0
        to: 360
        duration: 4000
        easing.type: Easing.InOutBack
    }
    Item {
        width: 400
        height: 400
        anchors.centerIn: parent
        // This allows rendering into offscreen surface and caching it.
        layer.enabled: true
        Rectangle {
            x: 150
            y: 100
            width: 100
            height: 100
            radius: 50
            color: "#80808020"
            border.color: "black"
            border.width: 2
        }
        Rectangle {
            x: 90
            y: 200
            width: 100
            height: 100
            radius: 50
            color: "#80808020"
            border.color: "black"
            border.width: 2
        }
        Rectangle {
            x: 210
            y: 200
            width: 100
            height: 100
            radius: 50
            color: "#80808020"
            border.color: "black"
            border.width: 2
        }
    }
}
本示例的第三个项目层包含一个具有不透明度动画的Text 项目。文本项目自动居中插入父Node 。
Node {
    position: Qt.vector3d(0, 80, 250)
    Text {
        anchors.centerIn: parent
        width: 300
        wrapMode: Text.WordWrap
        horizontalAlignment: Text.AlignJustify
        font.pixelSize: 14
        color: "#e0e0e0"
        style: Text.Raised
        text: "Lorem ipsum dolor sit amet, consectetur adipiscing elit, sed do eiusmod " +
              "tempor incididunt ut labore et dolore magna aliqua. Ut enim ad minim " +
              "veniam, quis nostrud exercitation ullamco laboris nisi ut aliquip ex ea " +
              "commodo consequat."
        SequentialAnimation on opacity {
            loops: Animation.Infinite
            NumberAnimation {
                to: 0
                duration: 1500
                easing.type: Easing.InOutQuad
            }
            NumberAnimation {
                to: 1
                duration: 1500
                easing.type: Easing.InOutQuad
            }
        }
    }
}
为了使上述快速项目层的 Z 排序可视化,我们还将为 3D 破坏球设置一个模型。它围绕顶部Node 进行旋转动画,从而使球体在其他图层中移动。
Node {
    position: Qt.vector3d(0, 800, 0)
    SequentialAnimation on eulerRotation.x {
        loops: Animation.Infinite
        NumberAnimation {
            to: 20
            duration: 3500
            easing.type: Easing.InOutQuad
        }
        NumberAnimation {
            to: -20
            duration: 3500
            easing.type: Easing.InOutQuad
        }
    }
    Model {
        source: "#Cylinder"
        y: -300
        scale: Qt.vector3d(0.1, 6.1, 0.1)
        materials: PrincipledMaterial {
            baseColor: Qt.rgba(0.9, 0.9, 0.9, 1.0)
        }
    }
    Model {
        source: "#Sphere"
        y: -700
        scale: Qt.vector3d(2, 2, 2)
        materials: PrincipledMaterial {
            baseColor: Qt.rgba(0.4, 0.4, 0.4, 1.0)
        }
    }
}
另请参阅 Qt Quick 3D 带有 2D 内容的场景。
© 2025 The Qt Company Ltd. Documentation contributions included herein are the copyrights of their respective owners. The documentation provided herein is licensed under the terms of the GNU Free Documentation License version 1.3 as published by the Free Software Foundation. Qt and respective logos are trademarks of The Qt Company Ltd. in Finland and/or other countries worldwide. All other trademarks are property of their respective owners.

