C
Exporting from Blender
It is possible to export meshes, lights, cameras, transform animations (scale/rotation/location), UV layouts, pivot points, object hierarchy and material slots from Blender to Qt 3D Studio.
Exporting Models
Create Material Slots
Material slots needs to be created and assigned in Blender before the export. If this is not done, one default material slot will be used for the object in Qt 3D Studio.
Note: Only material slots that has a material and that are assign to a mesh on the exported object, will be imported in Qt 3D Studio.
To create material slots, follow the steps below.
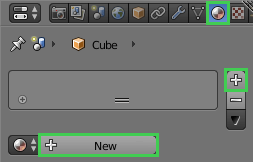
- In the properties panel, select the material tab.
- Press the + to add a new material slots.
- Press the New button.
- Repeat steps 2 to 4 for each material slot to create.
By default, the first material slot will be assigned to the object
To assign a different material slot to the object, or to assign several material slots to the same object, follow the steps below.
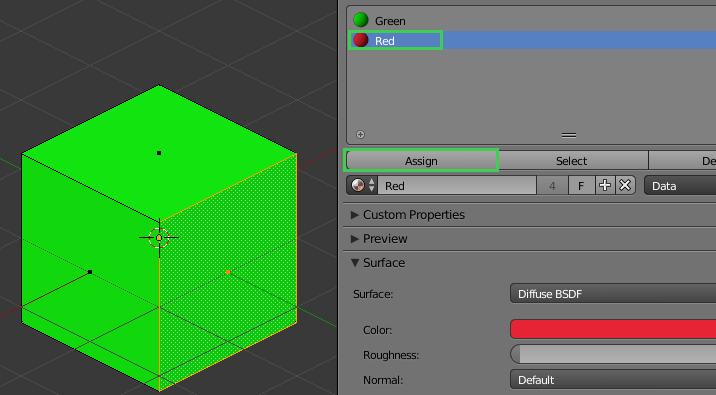
- In edit mode, select the desired faces. (Shift + Right Mouse Click to multi select, A to select all faces).
- In the properties panel, select the material tab.
- In the material slots list, select the desired material slot.
- Press the Assign button to assign the selected material slot to selected faces.
In Studio, you will see all materials in the scene graph.

UV Unwrap Models
UV unwrapping your model will create a UV layout. Without a UV layout you will not be able to render any textures on your model in Qt 3D Studio.
There are many different ways and techniques to unwrap 3D meshes. The most basic way to do it in Blender is described below.
- In edit mode, press A to select the whole mesh.
- Press U, then select Unwrap from the context menu.

Triangulate
- In object mode, select the object.
- In the properties panel, select the modifiers tab.
- In the drop down list, select Triangulate.
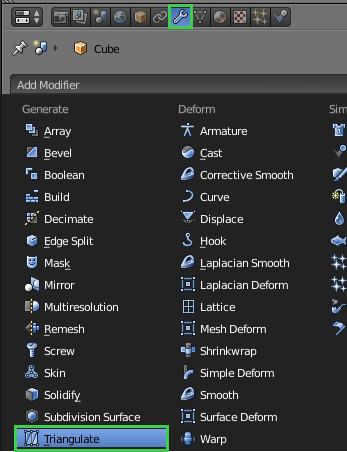
- Press Apply.
Note: When exporting as COLLADA, it is possible to do the triangulation in the actual export step.
Bake Actions for Animations
Note: This step is necessary only if you are exporting animations that are using custom curves or object constraints to control the animation.
Actions are data-blocks containing animation data. If you are exporting animations you need to bake actions.
- Press space bar.
- Type bake actions.
- Press Enter.
Apply Location, Rotation and Scale
Note: This should not be done when exporting animations.
Applying transform values will reset the object's location, rotation and scale values. Location and rotation values will change to 0 while scale values will change to 1. The object itself will not visually change.
- In object mode, select the object.
- Press Ctrl + A.
- Select Location.
- From the check box in the panel, check also Rotation and Scale.

Note: Applying Location will also reset the object's origin (pivot point).
Exporting Lights
You can export lights of any light type from Blender to use in Qt 3D Studio.
The following properties will be imported into Qt 3D Studio:
- Position, rotation, scale
- Brightness
- Light color
- Cast shadows
Light type will be imported (and converted if needed).
| Light type in Blender | Will import to Qt 3D Studio as... |
|---|---|
| Point | Point |
| Area | Area |
| Sun | Directional |
| Spot | Directional |
| Hemi | Directional |
Exporting Cameras
You can export perspective and orthographic cameras from Blender to use in Qt 3D Studio.
The following properties will be imported into Qt 3D Studio:
- Position, rotation, scale
- Clipping start/end
- Focal Length (perspective camera only).
Exporting COLLADA from Blender
- From the file menu, select File > Export > Collada (.dae).
- Ensure that Triangulation is checked on, unless you already have triangulated all meshes.
- Press the Export COLLADA button.
Exporting FBX from Blender
In order to export as FBX, you will need to have an FBX export add-on installed and enabled in Blender. With the default installation of Blender, the Import-Export: FBX format should be installed. If you do not have the option to export as FBX avaialble, ensure that the add-on is enabled by following the steps below:
- From the file menu, select File > User Preferences.
- Select Add-ons from the top menu bar.
- Search for fbx.
- The add-on should now be visible, enable it by clicking the check box next to its name.

Next, to export as FBX, follow the steps below:
- From the file menu, select File > Export > FBX (.fbx).
- Under the Main tab, set Forward to
Y Forwardand Up toZ Up.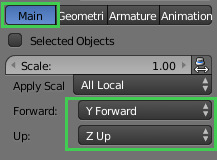
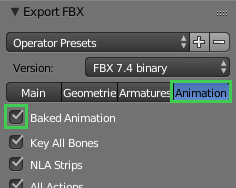
- For animations, ensure that Baked Animation under the Animation tab is checked on.
- Press the Export FBX button.
Available under certain Qt licenses.
Find out more.