Qt Quick 3D - View3Dの例
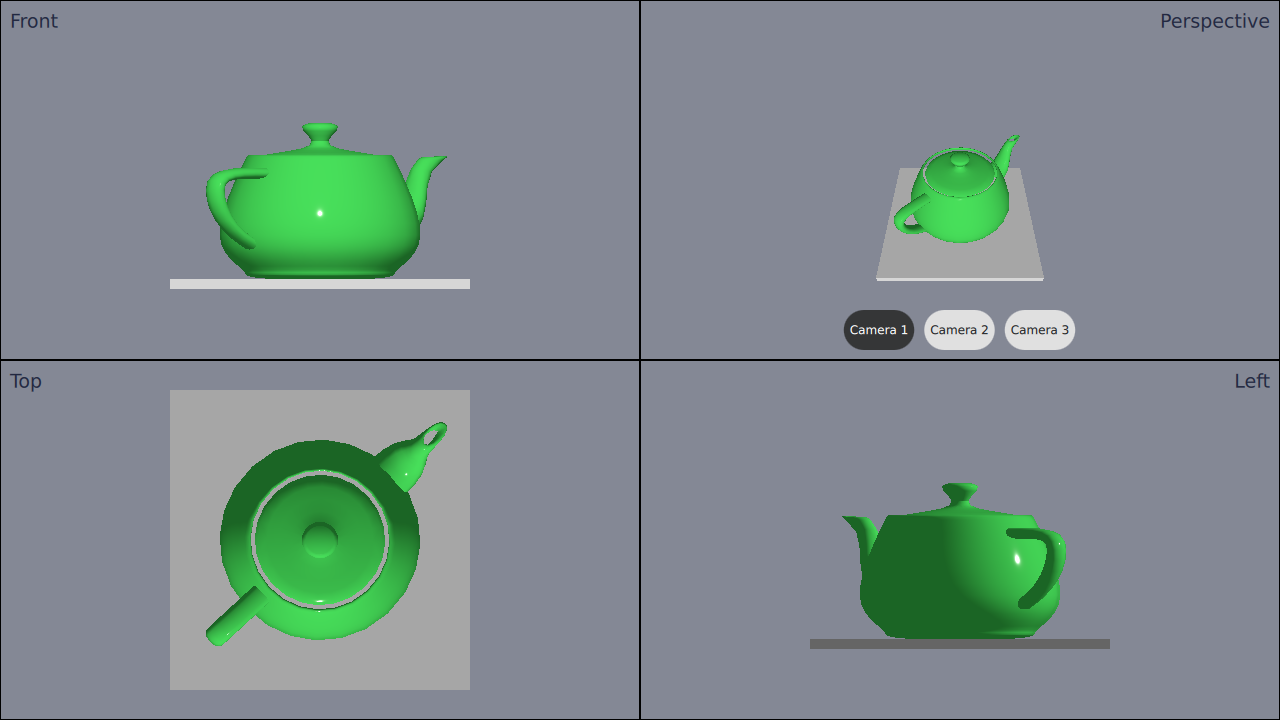
複数のカメラからシーンを表示するためにView3D を使用する例を示します。

この例では、アプリケーションで異なるカメラで 4 つの別々のView3Dを使用することを示します。
カメラの定義
最初にcameras を定義します。4 つのビューを追加するだけですが、複数の異なるカメラを定義します。これは、1 つのビューでカメラを切り替えられるようにするためです。
カメラは、ルートNode 内で定義する必要があります。これがカメラの定義方法です:
Node {
    id: standAloneScene
    ...
// The predefined cameras. They have to be part of the scene, i.e. inside the root node.
// Animated perspective camera
Node {
    PerspectiveCamera {
        id: cameraPerspectiveOne
        z: 600
    }

    PropertyAnimation on eulerRotation.x {
        loops: Animation.Infinite
        duration: 5000
        to: -360
        from: 0
    }
}

// Stationary perspective camera
PerspectiveCamera {
    id: cameraPerspectiveTwo
    z: 600
}
    ...
    // Stationary orthographic camera viewing from left
    OrthographicCamera {
        id: cameraOrthographicLeft
        x: -600
        eulerRotation.y: -90
    }
}
ビューの追加
カメラを定義した後、views 。画面を4つの部分に分け、このように1つずつビューを追加していきます:
// The views
Rectangle {
    id: topLeft
    anchors.top: parent.top
    anchors.left: parent.left
    width: parent.width * 0.5
    height: parent.height * 0.5
    color: "#848895"
    border.color: "black"

    View3D {
        id: topLeftView
        anchors.fill: parent
        importScene: standAloneScene
        camera: cameraOrthographicFront
    }

    Label {
        text: "Front"
        anchors.top: parent.top
        anchors.left: parent.left
        anchors.margins: 10
        color: "#222840"
        font.pointSize: 14
    }
}
    ...
右上のビューには3つのボタンがあります。右上のビューには3つのボタンがあり、このボタンを使ってビューで使用するカメラをその場で切り替えることができます。切り替えはcameraプロパティを設定するだけで行えます:
RoundButton {
    text: "Camera 1"
    highlighted: topRightView.camera == cameraPerspectiveOne
    implicitWidth: controlsContainer.buttonWidth
    onClicked: {
        topRightView.camera = cameraPerspectiveOne
    }
}
    ...
© 2025 The Qt Company Ltd. Documentation contributions included herein are the copyrights of their respective owners. The documentation provided herein is licensed under the terms of the GNU Free Documentation License version 1.3 as published by the Free Software Foundation. Qt and respective logos are trademarks of The Qt Company Ltd. in Finland and/or other countries worldwide. All other trademarks are property of their respective owners.

