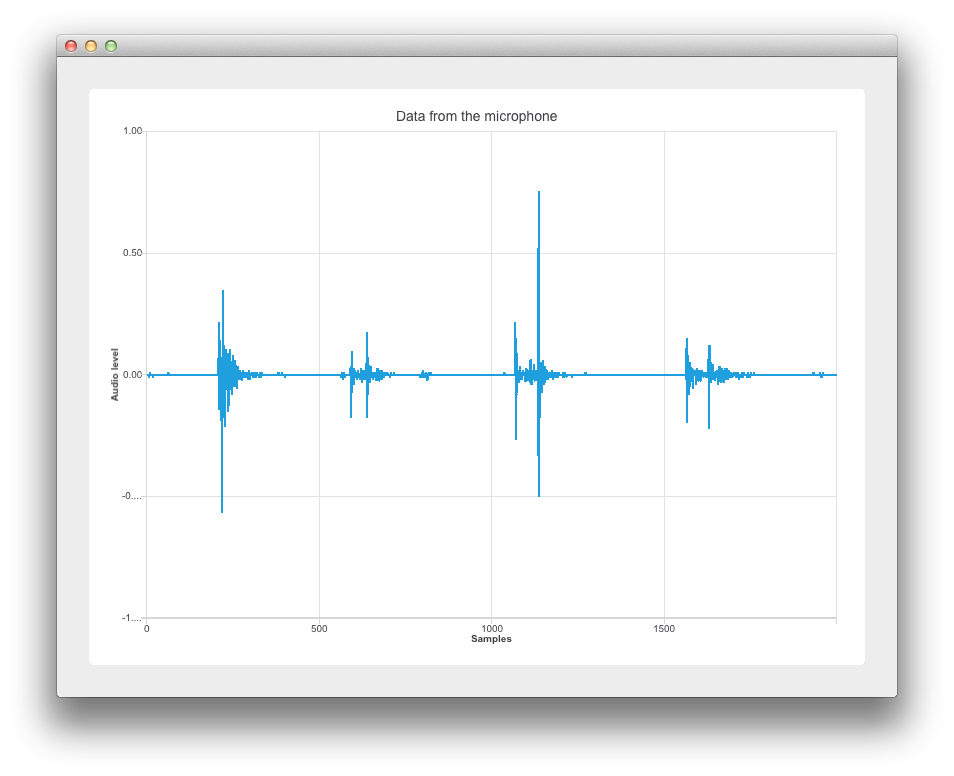
오디오 샘플과 사운드 레벨 비교
이 예는 마이크 샘플과 오디오 레벨을 비교한 그림입니다.

이 예제의 구현은 위젯을 기반으로 합니다. 이에 대한 구체적인 정보는 Qt Widgets 프로그래밍 시작하기를 참조하세요. 다음 섹션에서는 Qt Charts API를 사용하여 샘플 대 사운드 레벨 그래프에 동적 데이터를 표시하는 방법에 대해 설명합니다. 샘플링에 대한 자세한 내용은 샘플링_(signal_processing)을 참조하세요.
예제 실행하기
에서 예제를 실행하려면 Qt Creator에서 Welcome 모드를 열고 Examples 에서 예제를 선택합니다. 자세한 내용은 Qt Creator: 튜토리얼을 참조하세요 : 빌드 및 실행을 참조하세요.
오디오 데이터 검색하기
main.cpp 에 Qt Multimedia 모듈이 포함되어 있으므로 대상 플랫폼의 기본 오디오 장치를 나타내는 QAudioDevice 를 새로 만듭니다. 또한 오디오 입력 장치가 있는지 확인하고 사용 가능한 입력 오디오 장치가 없는 경우 사용자에게 알립니다.
    if (inputDevice.isNull()) {
        QMessageBox::warning(nullptr, "audio",
                             "There is no audio input device available.");
        return -1;
    }
그런 다음 생성자 인수 w 를 사용하여 오디오 장치를 위젯 w 에 전달합니다. 그런 다음 w.show() 을 호출하여 위젯을 표시합니다.
    Widget w(inputDevice);
    w.resize(800, 600);
    w.show();
차트 설정하기
이 섹션에서는 차트와 축을 설정하는 방법을 다룹니다.
widget.cpp 에서 다시 구현된 위젯 생성자는 애플리케이션의 로직과 관련하여 무거운 작업을 수행합니다. QChart , QLineSeries, QChartView 객체는 다음과 같이 선언됩니다:
    : QWidget(parent)
    , m_chart(new QChart)
    , m_series(new QLineSeries)
{
    auto chartView = new QChartView(m_chart);
    m_chart->addSeries(m_series);
m_series는 오디오 입력 데이터를 사용하기 위한 것입니다.
x축 "샘플"
x축의 최소에서 최대 범위를 0에서 XYSeriesIODevice::sampleCount로 설정합니다. (xyseriesiodevice.h에서 2000으로 선언됨). 그런 다음 제목 텍스트를 설정합니다.
    auto axisX = new QValueAxis;
    axisX->setRange(0, XYSeriesIODevice::sampleCount);
    axisX->setLabelFormat("%g");
    axisX->setTitleText("Samples");
Y축 "오디오 레벨"
QValueAxis axisY 을 생성하고 범위와 제목 텍스트를 설정합니다.
    auto axisY = new QValueAxis;
    axisY->setRange(-1, 1);
    axisY->setTitleText("Audio level");
축을 연결하고 차트 제목 설정하기
축을 연결하고 범례를 숨긴 다음 오디오 입력으로 사용 중인 마이크의 이름을 포함하도록 차트 제목을 설정합니다.
    m_chart->addAxis(axisX, Qt::AlignBottom);
    m_series->attachAxis(axisX);
    m_chart->addAxis(axisY, Qt::AlignLeft);
    m_series->attachAxis(axisY);
    m_chart->legend()->hide();
차트 레이아웃
여기서는 QVBoxLayout mainLayout 을 사용하고 세로 레이아웃에 QChartview chartView 를 추가합니다.
    m_chart->setTitle("Data from the microphone (" + deviceInfo.description() + ')');

    auto mainLayout = new QVBoxLayout(this);
오디오 입력 데이터 사용하기
이 섹션에서는 마이크 데이터가 QLineSeries m_series 으로 전달되는 방법을 보여줍니다. 이전과 마찬가지로 Qt Multimedia 모듈에 의존합니다.
먼저 QAudioInput 생성자에 deviceInfo를 전달합니다.
    mainLayout->addWidget(chartView);

    m_audioInput = new QAudioInput(deviceInfo, this);

    QAudioFormat formatAudio;
그런 다음 QAudioFormat formatAudio , 채널 수, 샘플 속도 및 샘플 형식을 설정합니다.
    formatAudio.setSampleRate(8000);
    formatAudio.setChannelCount(1);
이제 QAudioSource 을 생성하고 버퍼 크기를 설정할 수 있습니다.
    formatAudio.setSampleFormat(QAudioFormat::UInt8);

    m_audioSource = new QAudioSource(deviceInfo, formatAudio);
이제 데이터를 차트에 첨부할 차례입니다. 이를 위해 XYSeriesIODevice 클래스를 생성했습니다. 구현 방법은 XYSeriesIODevice를 참조하세요.
    m_audioSource->setBufferSize(200);

    m_device = new XYSeriesIODevice(m_series, this);
    m_device->open(QIODevice::WriteOnly);
XYSeriesIODevice
xyseriesiodevice.cpp 에서 구현된 XYSeriesIODevice는 신호 샘플링을 처리합니다. 해상도가 4로 고정된 writeData 함수는 샘플 수에 따라 QList m_buffer 크기를 설정하고, x 값을 증분하고 y 값을 0으로 설정한 QPointF로 채웁니다.
{
    static const int resolution = 4;

    if (m_buffer.isEmpty()) {
        m_buffer.reserve(sampleCount);
        for (int i = 0; i < sampleCount; ++i)
            m_buffer.append(QPointF(i, 0));
    }

    int start = 0;
그런 다음 샘플링을 수행합니다.
    const int availableSamples = int(maxSize) / resolution;
    if (availableSamples < sampleCount) {
        start = sampleCount - availableSamples;
        for (int s = 0; s < start; ++s)
            m_buffer[s].setY(m_buffer.at(s + availableSamples).y());
    }

    for (int s = start; s < sampleCount; ++s, data += resolution)
        m_buffer[s].setY(qreal(uchar(*data) -128) / qreal(128));

    m_series->replace(m_buffer);
    return (sampleCount - start) * resolution;
© 2025 The Qt Company Ltd. Documentation contributions included herein are the copyrights of their respective owners. The documentation provided herein is licensed under the terms of the GNU Free Documentation License version 1.3 as published by the Free Software Foundation. Qt and respective logos are trademarks of The Qt Company Ltd. in Finland and/or other countries worldwide. All other trademarks are property of their respective owners.

