QML 비디오 예제
비디오 및 카메라 뷰파인더 콘텐츠 변환하기.
QML 비디오는 QML VideoOutput 및 Camera 유형에 적용할 수 있는 다양한 변환(이동, 크기 조정, 회전, 화면 비율 변경)을 보여줍니다.
또한 네이티브 코드를 QML과 결합하여 고급 기능을 구현하는 방법(이 예에서는 C++ 코드를 사용하여 QML 프레임 속도를 계산하는 방법)도 보여줍니다. 이 값은 비디오 콘텐츠에 오버레이된 반투명 항목으로 QML에서 렌더링됩니다.
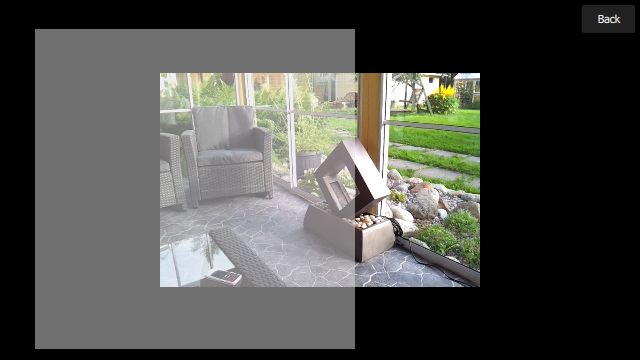
다음 이미지는 더미 오버레이 항목(반투명 Rectangle)을 생성하는 비디오 오버레이 장면을 실행하는 애플리케이션을 보여 주며, VideoOutput 항목을 가로질러 이동합니다.

예제 실행하기
에서 예제를 실행하려면 Qt Creator에서 예제를 실행하려면 Welcome 모드를 열고 Examples 에서 예제를 선택합니다. 자세한 내용은 Qt Creator: 튜토리얼을 참조하세요 : 빌드 및 실행을 참조하세요.
애플리케이션 구조
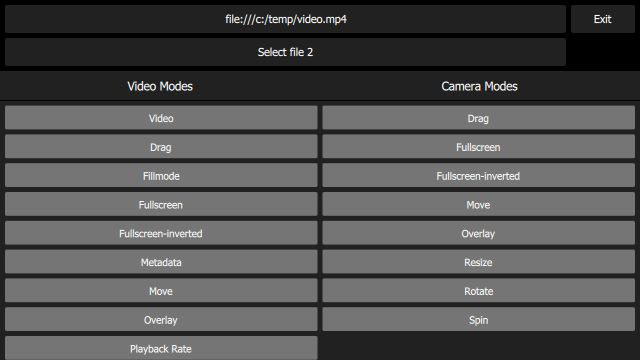
Main.qml 파일은 다음 항목을 포함하는 UI를 만듭니다:
- 파일 이름을 표시하는 두 개의
Button인스턴스, 각각FileDialog을 시작하는 데 사용할 수 있습니다. Button.- 사용 가능한 장면을 표시하는 플릭 가능한 목록인
SceneSelectionPanel. - 왼쪽 아래에는 QML 리페인팅 속도를 표시하는 항목이 있는데, 위쪽 숫자는 순간 프레임 속도이고 아래쪽 숫자는 지난 1초 동안의 평균입니다.

플릭 가능한 목록의 각 장면은 자체 QML 파일로 구현됩니다. 예를 들어 화면 중앙에 정적 VideoOutput 을 표시하는 비디오 기본 장면은 VideoBasic.qml 파일로 구현됩니다. 코드에서 볼 수 있듯이 이것은 일종의 상속을 사용합니다. VideoBasic 항목 ...
SceneBasic {
    contentType: "video"
}
...는 SceneBasic...
import QtQuick
import QtQuick.Controls

Scene {
    id: root
    property string contentType
    ...
    Content {
        id: content
    ...
    }

    Label {
        anchors {
            horizontalCenter: parent.horizontalCenter
            bottom: parent.bottom
            margins: 20
        }
        text: content.started ? qsTr("Tap the screen to stop content")
                              : qsTr("Tap the screen to start content")
        z: 2.0
    }

    MouseArea {
        anchors.fill: parent
        onClicked: {
            if (content.started)
                content.stop()
            else
                content.start()
        }
    }

    Component.onCompleted: root.content = content
}
... 그 자체는 Scene:
import QtQuick
import QtQuick.Controls

Rectangle {
    id: root
    ...
    property QtObject content
    ...
    Button {
        id: closeButton
        anchors {
            top: parent.top
            right: parent.right
            margins: root.margins
        }
        z: 2.0
        text: qsTr("Back")
        onClicked: root.close()
    }
}
SceneBasic 는 장면의 구조와 동작을 설명하지만 표시될 콘텐츠의 유형에 대해서는 무관하며, 이는 Content 에 의해 추상화됩니다.
이 패턴을 사용하면 특정 사용 사례(이 경우 단순히 정적 콘텐츠 표시)를 정의한 다음 비디오 콘텐츠(VideoBasic)와 카메라 콘텐츠( ({CameraBasic})) 모두에 대해 해당 사용 사례를 인스턴스화할 수 있습니다. 이 접근 방식은 다른 많은 장면을 구현하는 데 사용됩니다. 예를 들어 "콘텐츠를 왼쪽에서 오른쪽으로 반복적으로 밀었다가 다시 뒤로 밀기" 는 VideoMove 및 CameraMove 의 기반이 되는 SceneMove 에서 구현됩니다.
최상위 장면 인스턴스의 contentType 속성 값에 따라 임베드된 Content 항목은 MediaPlayer 또는 Camera 항목을 생성합니다.
QML 페인팅 비율 계산 및 표시
QML 페인팅 속도는 notify() 슬롯을 통해 수신된 이벤트 스트림을 순간 및 평균 주파수로 변환하는 FrequencyMonitor 클래스에 의해 계산됩니다:
class FrequencyMonitor : public QObject
{
    Q_OBJECT
    QML_ELEMENT
    Q_PROPERTY(qreal instantaneousFrequency READ instantaneousFrequency NOTIFY
                       instantaneousFrequencyChanged)
    Q_PROPERTY(qreal averageFrequency READ averageFrequency NOTIFY averageFrequencyChanged)
    ...
public slots:
    Q_INVOKABLE void notify();
};
위와 같이 클래스 선언에 QML_ELEMENT 매크로를 추가하여 FrequencyMonitor 클래스를 QML에 노출하고, 다음과 같이 FrequencyItem이라는 QML 항목을 정의하여 해당 데이터를 표시합니다:
import frequencymonitor

Rectangle {
    id: root
    ...
    function notify() {
        monitor.notify()
    }

    FrequencyMonitor {
        id: monitor
        onAverageFrequencyChanged: {
            averageFrequencyText.text = monitor.averageFrequency.toFixed(2)
        }
    }

    Text {
        id: labelText
        anchors {
            left: parent.left
            top: parent.top
            margins: 10
        }
        color: root.textColor
        font.pixelSize: 0.6 * root.textSize
        text: root.label
        width: root.width - 2*anchors.margins
        elide: Text.ElideRight
    }

    Text {
        id: averageFrequencyText
        anchors {
            right: parent.right
            bottom: parent.bottom
            margins: 10
        }
        color: root.textColor
        font.pixelSize: root.textSize
    }
}
결과는 다음과 같습니다:

이제 남은 것은 QQuickView 객체의 afterRendering() 신호를 자바스크립트 함수에 연결하여 frequencyItem.notify() 을 호출하는 것뿐입니다:
int main(int argc, char *argv[])
{
    QGuiApplication app(argc, argv);
    ...
    QQuickView viewer;
    ...
    QQuickItem *rootObject = viewer.rootObject();
    ...
    QObject::connect(&viewer, SIGNAL(afterRendering()), rootObject, SLOT(qmlFramePainted()));
© 2025 The Qt Company Ltd. Documentation contributions included herein are the copyrights of their respective owners. The documentation provided herein is licensed under the terms of the GNU Free Documentation License version 1.3 as published by the Free Software Foundation. Qt and respective logos are trademarks of The Qt Company Ltd. in Finland and/or other countries worldwide. All other trademarks are property of their respective owners.

