씬 그래프 - 칠한 항목
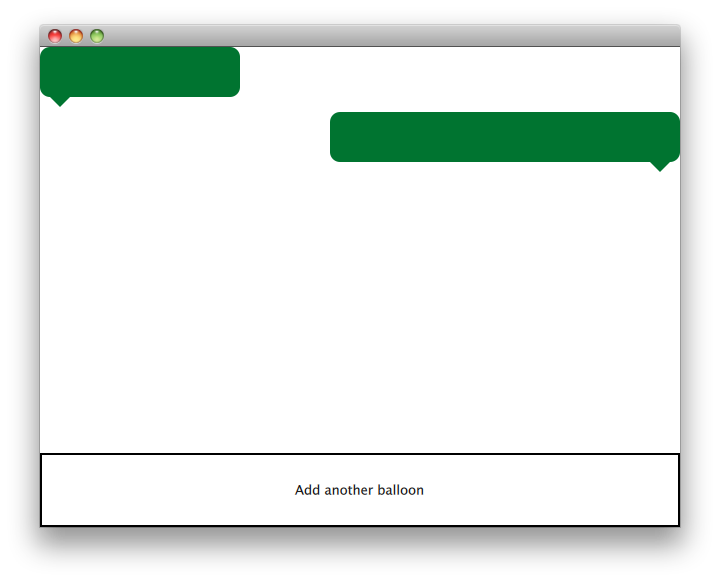
QPainter-기반 커스텀 시나리오 그래프 항목을 구현하는 방법을 보여줍니다.
Painted Item 예제에서는 QML 씬 그래프 프레임워크를 사용하여 QPainter 을 사용하여 사용자 지정 시나리오 그래프 항목을 구현하는 방법을 보여줍니다.

QQuickPaintedItem 클래스는 QQuickItem 에서 파생된 클래스로 QPainter 인터페이스를 사용하여 커스텀 QML 씬 그래프 항목을 구현합니다.
이 예제는 아이템 클래스와 해당 아이템을 사용하기 위한 QML 파일로 구성됩니다. TextBalloon 클래스는 QQuickPaintedItem 을 확장하는 개별 텍스트 풍선을 나타내며, textballoons.qml 파일은 TextBalloon QML 유형이 포함된 모듈을 로드하고 텍스트 풍선을 표시하는 데 사용됩니다.
TextBalloon 클래스에 먼저 집중하고 textballoons.qml 파일에 대해 계속 설명하겠습니다. QML 모듈용 플러그인을 구현하는 방법에 대한 예시는 확장 플러그인 작성하기를 참조하세요.
TextBalloon 클래스 선언
TextBalloon 클래스는 QQuickPaintedItem 에서 상속합니다. QQuickPaintedItem 는 QML 씬 그래프 프레임워크의 모든 QPainter 기반 항목의 기본 클래스입니다.
class TextBalloon : public QQuickPaintedItem
{
    Q_OBJECT
    Q_PROPERTY(bool rightAligned READ isRightAligned WRITE setRightAligned NOTIFY rightAlignedChanged)
    QML_ELEMENT

    public:
        TextBalloon(QQuickItem *parent = nullptr);
        void paint(QPainter *painter) override;

        bool isRightAligned() const;
        void setRightAligned(bool rightAligned);

    private:
        bool rightAligned;

    signals:
        void rightAlignedChanged();
};
QQuickPaintedItem 을 구현하려면 해당 유형의 페인팅을 구현하는 QQuickPaintedIem의 순수 가상 함수 paint()를 구현해야 합니다.
TextBalloon 클래스 정의
TextBalloon 항목의 오른쪽 정렬 속성을 초기화해야 합니다.
TextBalloon::TextBalloon(QQuickItem *parent)
    : QQuickPaintedItem(parent)
    , rightAligned(false)
{
}
그런 다음 Scene Graph 프레임워크에서 자동으로 호출되는 paint() 함수를 구현하여 항목의 내용을 채색합니다. 이 함수는 로컬 좌표로 항목을 그립니다.
void TextBalloon::paint(QPainter *painter)
{
    QBrush brush(QColor("#007430"));

    painter->setBrush(brush);
    painter->setPen(Qt::NoPen);
    painter->setRenderHint(QPainter::Antialiasing);

    QSizeF itemSize = size();
    painter->drawRoundedRect(0, 0, itemSize.width(), itemSize.height() - 10, 10, 10);

    if (rightAligned)
    {
        const QPointF points[3] = {
            QPointF(itemSize.width() - 10.0, itemSize.height() - 10.0),
            QPointF(itemSize.width() - 20.0, itemSize.height()),
            QPointF(itemSize.width() - 30.0, itemSize.height() - 10.0),
        };
        painter->drawConvexPolygon(points, 3);
    }
    else
    {
        const QPointF points[3] = {
            QPointF(10.0, itemSize.height() - 10.0),
            QPointF(20.0, itemSize.height()),
            QPointF(30.0, itemSize.height() - 10.0),
        };
        painter->drawConvexPolygon(points, 3);
    }
}
먼저 항목에 펜과 브러시를 설정하여 항목의 모양을 정의합니다. 그런 다음 그리기를 시작합니다. contentsBoundingRect () 항목은 항목의 크기에 따라 그리기 위해 호출됩니다. contentsBoundingRect () 함수가 반환하는 사각형은 QML 파일에 정의된 항목의 크기입니다.
textballoons.qml 파일
인터페이스는 크게 두 부분으로 구성됩니다. 텍스트 풍선이 있는 스크롤 가능한 영역과 새 풍선을 추가하는 컨트롤 버튼입니다.
풍선 보기
ListModel {
    id: balloonModel
    ListElement {
        balloonWidth: 200
    }
    ListElement {
        balloonWidth: 120
    }
}

ListView {
    id: balloonView
    anchors.bottom: controls.top
    anchors.bottomMargin: 2
    anchors.top: parent.top
    delegate: TextBalloon {
        anchors.right: index % 2 !== 0 ? parent?.right : undefined
        height: 60
        rightAligned: index % 2 !== 0
        width: balloonWidth
    }
    model: balloonModel
    spacing: 5
    width: parent.width
}
애플리케이션 시작 시 풍선모델에는 두 가지 유형이 포함되며, 이는 풍선뷰에 표시됩니다. 풍선 보기는 텍스트 풍선 델리게이트 항목을 왼쪽 정렬과 오른쪽 정렬 사이에서 알려줍니다.
컨트롤
Rectangle {
    id: controls

    anchors.bottom: parent.bottom
    anchors.left: parent.left
    anchors.margins: 1
    anchors.right: parent.right
    border.width: 2
    color: "white"
    height: parent.height * 0.15

    Text {
        anchors.centerIn: parent
        text: qsTr("Add another balloon")
    }

    MouseArea {
        anchors.fill: parent
        hoverEnabled: true
        onClicked: {
            balloonModel.append({"balloonWidth": Math.floor(Math.random() * 200 + 100)})
            balloonView.positionViewAtIndex(balloonView.count -1, ListView.End)
        }
        onEntered: {
            parent.color = "#8ac953"
        }
        onExited: {
            parent.color = "white"
        }
    }
}
UI의 컨트롤 부분에는 마우스를 가져가면 색이 바뀌는 MouseArea 사각형이 있습니다. 이 컨트롤 '버튼'은 모델 끝에 임의의 너비로 새 개체를 추가합니다.
© 2025 The Qt Company Ltd. Documentation contributions included herein are the copyrights of their respective owners. The documentation provided herein is licensed under the terms of the GNU Free Documentation License version 1.3 as published by the Free Software Foundation. Qt and respective logos are trademarks of The Qt Company Ltd. in Finland and/or other countries worldwide. All other trademarks are property of their respective owners.

