씬 그래프 - QML에서 OpenGL
Qt Quick 씬에서 OpenGL을 렌더링하는 방법을 보여줍니다.
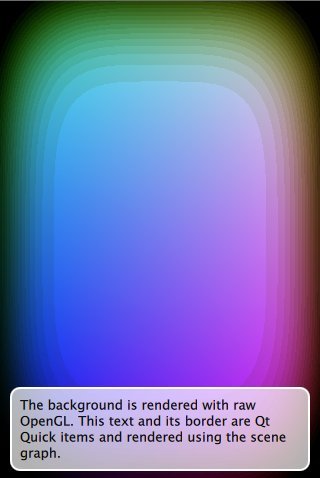
OpenGL under QML 예제는 애플리케이션이 QQuickWindow::beforeRendering() 신호를 사용하여 Qt Quick 장면 아래에서 사용자 지정 OpenGL 콘텐츠를 그리는 방법을 보여줍니다. 이 신호는 씬 그래프가 렌더링을 시작하기 전에 모든 프레임이 시작될 때 방출되므로 이 신호에 대한 응답으로 수행되는 모든 OpenGL 그리기 호출은 Qt Quick 항목 아래에 스택됩니다.
또는 Qt Quick 씬 위에 OpenGL 콘텐츠를 렌더링하려는 애플리케이션은 QQuickWindow::afterRendering() 신호에 연결하여 렌더링할 수 있습니다.
이 예제에서는 OpenGL 렌더링에 영향을 주는 값을 QML에 노출하는 방법도 살펴봅니다. QML 파일에서 NumberAnimation 을 사용하여 임계값에 애니메이션을 적용하고 이 값은 동그라미를 그리는 OpenGL 셰이더 프로그램에서 사용됩니다.
이 예제는 대부분의 면에서 Direct3D 11 Under QML, Metal Under QML, Vulkan Under QML 예제와 동일하며, 네이티브 API만 다를 뿐 모두 동일한 커스텀 콘텐츠를 렌더링합니다.
class Squircle : public QQuickItem
{
    Q_OBJECT
    Q_PROPERTY(qreal t READ t WRITE setT NOTIFY tChanged)
    QML_ELEMENT

public:
    Squircle();

    qreal t() const { return m_t; }
    void setT(qreal t);

signals:
    void tChanged();

public slots:
    void sync();
    void cleanup();

private slots:
    void handleWindowChanged(QQuickWindow *win);

private:
    void releaseResources() override;

    qreal m_t;
    SquircleRenderer *m_renderer;
};
우선 QML에 노출할 수 있는 오브젝트가 필요합니다. 이것은 QQuickItem 의 서브클래스이므로 QQuickItem::window()에 쉽게 액세스할 수 있습니다. QML_ELEMENT 매크로를 사용하여 QML에 노출합니다.
class SquircleRenderer : public QObject, protected QOpenGLFunctions
{
    Q_OBJECT
public:
    ~SquircleRenderer();

    void setT(qreal t) { m_t = t; }
    void setViewportSize(const QSize &size) { m_viewportSize = size; }
    void setWindow(QQuickWindow *window) { m_window = window; }

public slots:
    void init();
    void paint();

private:
    QSize m_viewportSize;
    qreal m_t = 0.0;
    QOpenGLShaderProgram *m_program = nullptr;
    QQuickWindow *m_window = nullptr;
    QOpenGLBuffer m_vbo;
};
그런 다음 렌더링을 처리할 객체가 필요합니다. 이 인스턴스는 아이템이 GUI 스레드에 있고 렌더링은 렌더 스레드에서 발생할 가능성이 있으므로 QQuickItem 와 분리해야 합니다. QQuickWindow::beforeRendering ()에 연결하고 싶으므로 렌더러를 QObject 로 만듭니다. 렌더러에는 필요한 모든 상태의 복사본이 GUI 스레드와 독립적으로 포함되어 있습니다.
참고: 두 개체를 하나로 병합하고 싶은 유혹에 빠지지 마세요. 렌더 스레드가 렌더링하는 동안 GUI 스레드에서 QQuickItems가 삭제될 수 있습니다.
구현으로 넘어가 보겠습니다.
Squircle::Squircle()
    : m_t(0)
    , m_renderer(nullptr)
{
    connect(this, &QQuickItem::windowChanged, this, &Squircle::handleWindowChanged);
}
Squircle 클래스의 생성자는 단순히 값을 초기화하고 렌더러를 준비하는 데 사용할 창 변경 신호에 연결합니다.
void Squircle::handleWindowChanged(QQuickWindow *win)
{
    if (win) {
        connect(win, &QQuickWindow::beforeSynchronizing, this, &Squircle::sync, Qt::DirectConnection);
        connect(win, &QQuickWindow::sceneGraphInvalidated, this, &Squircle::cleanup, Qt::DirectConnection);
창이 생성되면 렌더러를 생성하고 상태를 안전하게 복사하는 데 사용할 QQuickWindow::beforeSynchronizing() 신호에 연결합니다. 또한 QQuickWindow::sceneGraphInvalidated() 신호에 연결하여 렌더러의 정리를 처리합니다.
참고: Squircle 객체는 GUI 스레드와 친화성이 있고 신호가 렌더링 스레드에서 방출되므로 Qt::DirectConnection 로 연결하는 것이 중요합니다. 그렇게 하지 않으면 OpenGL 컨텍스트가 없는 잘못된 스레드에서 슬롯이 호출됩니다.
        // Ensure we start with cleared to black. The squircle's blend mode relies on this.
        win->setColor(Qt::black);
    }
}
씬 그래프의 기본 동작은 렌더링하기 전에 프레임버퍼를 지우는 것입니다. 이 지우기가 큐에 대기열에 추가된 후에 자체 렌더링 코드를 삽입하므로 괜찮습니다. 하지만 원하는 색상(검정색)으로 지워야 합니다.
void Squircle::sync()
{
    if (!m_renderer) {
        m_renderer = new SquircleRenderer();
        connect(window(), &QQuickWindow::beforeRendering, m_renderer, &SquircleRenderer::init, Qt::DirectConnection);
        connect(window(), &QQuickWindow::beforeRenderPassRecording, m_renderer, &SquircleRenderer::paint, Qt::DirectConnection);
    }
    m_renderer->setViewportSize(window()->size() * window()->devicePixelRatio());
    m_renderer->setT(m_t);
    m_renderer->setWindow(window());
}
sync() 함수를 사용하여 렌더러를 초기화하고 항목의 상태를 렌더러에 복사합니다. 렌더러가 생성되면 QQuickWindow::beforeRendering() 및 QQuickWindow::beforeRenderPassRecording()도 렌더러의 init() 및 paint() 슬롯에 연결합니다.
참고: QQuickWindow::beforeSynchronizing() 신호는 GUI 스레드가 차단된 상태에서 렌더링 스레드에서 발생하므로 별도의 보호 조치 없이 값을 복사해도 안전합니다.
void Squircle::cleanup()
{
    delete m_renderer;
    m_renderer = nullptr;
}

class CleanupJob : public QRunnable
{
public:
    CleanupJob(SquircleRenderer *renderer) : m_renderer(renderer) { }
    void run() override { delete m_renderer; }
private:
    SquircleRenderer *m_renderer;
};

void Squircle::releaseResources()
{
    window()->scheduleRenderJob(new CleanupJob(m_renderer), QQuickWindow::BeforeSynchronizingStage);
    m_renderer = nullptr;
}

SquircleRenderer::~SquircleRenderer()
{
    delete m_program;
}
cleanup() 함수에서는 렌더러를 삭제하여 자체 리소스를 정리합니다. 장면 그래프 무효화() 신호에 연결하는 것만으로는 모든 경우를 처리하기에 충분하지 않으므로 QQuickWindow::releaseResources()를 다시 구현하여 이를 보완합니다.
void Squircle::setT(qreal t)
{
    if (t == m_t)
        return;
    m_t = t;
    emit tChanged();
    if (window())
        window()->update();
}
t 값이 변경되면 QQuickItem::update() 대신 QQuickWindow::update()을 호출하는데, 이는 전자가 마지막 프레임 이후 씬 그래프가 변경되지 않은 경우에도 전체 창을 강제로 다시 그리기 때문입니다.
void SquircleRenderer::init()
{
    if (!m_program) {
        QSGRendererInterface *rif = m_window->rendererInterface();
        Q_ASSERT(rif->graphicsApi() == QSGRendererInterface::OpenGL);

        initializeOpenGLFunctions();

        const float values[] = { -1, -1, 1, -1, -1, 1, 1, 1 };

        m_vbo.create();
        m_vbo.bind();
        m_vbo.allocate(values, sizeof(values));

        glEnableVertexAttribArray(0);
        glVertexAttribPointer(0, 2, GL_FLOAT, GL_FALSE, 2 * sizeof(GLfloat), nullptr);

        m_program = new QOpenGLShaderProgram();
        m_program->addCacheableShaderFromSourceCode(QOpenGLShader::Vertex,
                                                    "attribute highp vec4 vertices;"
                                                    "varying highp vec2 coords;"
                                                    "void main() {"
                                                    "    gl_Position = vertices;"
                                                    "    coords = vertices.xy;"
                                                    "}");
        m_program->addCacheableShaderFromSourceCode(QOpenGLShader::Fragment,
                                                    "uniform lowp float t;"
                                                    "varying highp vec2 coords;"
                                                    "void main() {"
                                                    "    lowp float i = 1. - (pow(abs(coords.x), 4.) + pow(abs(coords.y), 4.));"
                                                    "    i = smoothstep(t - 0.8, t + 0.8, i);"
                                                    "    i = floor(i * 20.) / 20.;"
                                                    "    gl_FragColor = vec4(coords * .5 + .5, i, i);"
                                                    "}");

        m_program->bindAttributeLocation("vertices", 0);
        m_program->link();

    }
}
SquircleRenderer의 init() 함수에서는 셰이더 프로그램을 아직 초기화하지 않은 경우 초기화부터 시작합니다. 슬롯이 호출될 때 스레드에서 OpenGL 컨텍스트가 현재 상태입니다.
void SquircleRenderer::paint()
{
    // Play nice with the RHI. Not strictly needed when the scenegraph uses
    // OpenGL directly.
    m_window->beginExternalCommands();

    m_vbo.bind();
    m_program->bind();
    m_program->setUniformValue("t", (float)m_t);

    glEnableVertexAttribArray(0);
    glVertexAttribPointer(0, 2, GL_FLOAT, GL_FALSE, 2 * sizeof(GLfloat), nullptr);

    glViewport(0, 0, m_viewportSize.width(), m_viewportSize.height());

    glDisable(GL_DEPTH_TEST);

    glEnable(GL_BLEND);
    glBlendFunc(GL_SRC_ALPHA, GL_ONE);

    glDrawArrays(GL_TRIANGLE_STRIP, 0, 4);

    glDisableVertexAttribArray(0);
    m_program->release();

    m_window->endExternalCommands();
}
셰이더 프로그램을 사용하여 paint() 에서 다람쥐를 그립니다.
int main(int argc, char **argv)
{
    QGuiApplication app(argc, argv);

    QQuickWindow::setGraphicsApi(QSGRendererInterface::OpenGL);

    QQuickView view;
    view.setResizeMode(QQuickView::SizeRootObjectToView);
    view.setSource(QUrl("qrc:///scenegraph/openglunderqml/main.qml"));
    view.show();

    return QGuiApplication::exec();
}
애플리케이션의 main() 함수는 QQuickView 을 인스턴스화하고 main.qml 파일을 실행합니다.
import QtQuick
import OpenGLUnderQML

Item {

    width: 320
    height: 480

    Squircle {
        SequentialAnimation on t {
            NumberAnimation { to: 1; duration: 2500; easing.type: Easing.InQuad }
            NumberAnimation { to: 0; duration: 2500; easing.type: Easing.OutQuad }
            loops: Animation.Infinite
            running: true
        }
    }
main() 함수에 등록한 이름으로 Squircle QML 유형을 가져옵니다. 그런 다음 이를 인스턴스화하고 t 프로퍼티에 실행 중인 NumberAnimation 을 만듭니다.
    Rectangle {
        color: Qt.rgba(1, 1, 1, 0.7)
        radius: 10
        border.width: 1
        border.color: "white"
        anchors.fill: label
        anchors.margins: -10
    }

    Text {
        id: label
        color: "black"
        wrapMode: Text.WordWrap
        text: qsTr("The background here is a squircle rendered with raw OpenGL using the 'beforeRender()' signal in QQuickWindow. This text label and its border is rendered using QML")
        anchors.right: parent.right
        anchors.left: parent.left
        anchors.bottom: parent.bottom
        anchors.margins: 20
    }
}
그런 다음 짧은 설명 텍스트를 오버레이하여 Qt Quick 장면에서 실제로 OpenGL을 렌더링하고 있음을 명확하게 알 수 있도록 합니다.
© 2026 The Qt Company Ltd. Documentation contributions included herein are the copyrights of their respective owners. The documentation provided herein is licensed under the terms of the GNU Free Documentation License version 1.3 as published by the Free Software Foundation. Qt and respective logos are trademarks of The Qt Company Ltd. in Finland and/or other countries worldwide. All other trademarks are property of their respective owners.
