CAN 버스 관리자
이 예제는 CAN 버스 프레임을 송수신합니다.
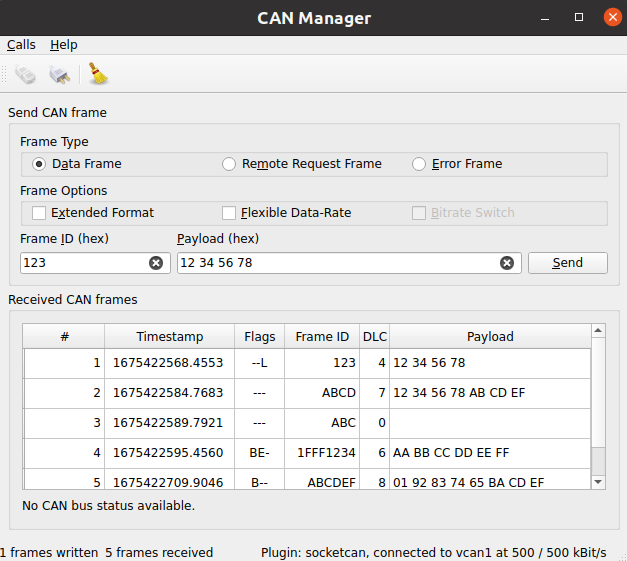
이 예제는 CAN 버스 프레임을 송수신합니다. 수신 프레임은 유형에 따라 정렬됩니다. CAN 버스 연결 파라미터를 조정할 수 있는 연결 대화 상자가 제공됩니다.
Key Qt Serial Bus 클래스는 이 예제에서 사용되었습니다:
QCanBusDevice 생성하기
모든 CAN 통신을 수행하려면 QCanBusDevice 인스턴스가 필요합니다.
ConnectDialog 에서 필요한 모든 파라미터를 지정할 수 있습니다. 그 후 제공된 플러그인과 인터페이스 이름을 사용하여 장치가 생성됩니다:
    QString errorString;
    m_canDevice.reset(QCanBus::instance()->createDevice(p.pluginName, p.deviceInterfaceName,
                                                        &errorString));
    connect(m_canDevice.get(), &QCanBusDevice::errorOccurred,
            this, &MainWindow::processErrors);
    connect(m_canDevice.get(), &QCanBusDevice::framesReceived,
            this, &MainWindow::processReceivedFrames);
    connect(m_canDevice.get(), &QCanBusDevice::framesWritten,
            this, &MainWindow::processFramesWritten);
설정된 연결을 통해 들어오는 프레임을 처리하고, 전송된 프레임을 제어하고, 오류를 처리할 수 있습니다.
장치가 생성되면 QCanBusDevice::connectDevice()를 사용하여 통신을 시작합니다.
수신 프레임 처리
QCanBusDevice 은 새 프레임을 사용할 수 있을 때 framesReceived() 신호를 보냅니다. readFrame () 메서드는 available frames 이 있는 동안 단일 QCanBusFrame 을 읽는 데 사용할 수 있습니다. 프레임이 수신되면 frameId, timeStamp, payload 와 같은 개별 파라미터를 추출할 수 있습니다:
    while (m_canDevice->framesAvailable()) {
        m_numberFramesReceived++;
        const QCanBusFrame frame = m_canDevice->readFrame();

        QString data;
        if (frame.frameType() == QCanBusFrame::ErrorFrame)
            data = m_canDevice->interpretErrorFrame(frame);
        else
            data = QString::fromLatin1(frame.payload().toHex(' ').toUpper());

        const QString time = QString::fromLatin1("%1.%2  ")
                .arg(frame.timeStamp().seconds(), 10, 10, ' '_L1)
                .arg(frame.timeStamp().microSeconds() / 100, 4, 10, '0'_L1);

        const QString flags = frameFlags(frame);

        const QString id = QString::number(frame.frameId(), 16).toUpper();
        const QString dlc = QString::number(frame.payload().size());

        m_model->appendFrame(QStringList({QString::number(m_numberFramesReceived),
                                          time, flags, id, dlc, data}));
    }
프레임 보내기
CAN 버스를 통해 사용자 지정 데이터를 전송하려면 사용자는 최소한 frameId 과 payload 을 제공해야 합니다. 선택적으로 다른 QCanBusFrame 파라미터를 구성할 수 있습니다:
    const uint frameId = m_ui->frameIdEdit->text().toUInt(nullptr, 16);
    QString data = m_ui->payloadEdit->text();
    m_ui->payloadEdit->setText(formatHexData(data));
    const QByteArray payload = QByteArray::fromHex(data.remove(u' ').toLatin1());

    QCanBusFrame frame = QCanBusFrame(frameId, payload);
    frame.setExtendedFrameFormat(m_ui->extendedFormatBox->isChecked());
    frame.setFlexibleDataRateFormat(m_ui->flexibleDataRateBox->isChecked());
    frame.setBitrateSwitch(m_ui->bitrateSwitchBox->isChecked());

    if (m_ui->errorFrame->isChecked())
        frame.setFrameType(QCanBusFrame::ErrorFrame);
    else if (m_ui->remoteFrame->isChecked())
        frame.setFrameType(QCanBusFrame::RemoteRequestFrame);
프레임이 준비되면 QCanBusDevice::writeFrame() 메서드를 사용하여 프레임을 전송할 수 있습니다:
m_canDevice->writeFrame(frame);
예제 실행하기
에서 예제를 실행하려면 Qt Creator에서 예제를 실행하려면 Welcome 모드를 열고 Examples 에서 예제를 선택합니다. 자세한 내용은 Qt Creator: 튜토리얼을 참조하세요 : 빌드 및 실행을 참조하세요.
© 2026 The Qt Company Ltd. Documentation contributions included herein are the copyrights of their respective owners. The documentation provided herein is licensed under the terms of the GNU Free Documentation License version 1.3 as published by the Free Software Foundation. Qt and respective logos are trademarks of The Qt Company Ltd. in Finland and/or other countries worldwide. All other trademarks are property of their respective owners.
