신호등
신호등 예제는 Qt State Machine 개요를 사용하여 신호등의 제어 흐름을 구현하는 방법을 보여줍니다.

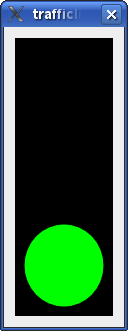
이 예제에서는 TrafficLightWidget 클래스를 작성합니다. 신호등에는 세 개의 표시등이 있습니다: 빨간색, 노란색, 녹색입니다. 신호등은 일정 간격으로 한 불빛에서 다른 불빛으로(빨간색에서 노란색, 녹색, 노란색에서 다시 빨간색으로) 전환됩니다.
class LightWidget : public QWidget
{
    Q_OBJECT
    Q_PROPERTY(bool on READ isOn WRITE setOn)
public:
    explicit LightWidget(const QColor &color, QWidget *parent = nullptr)
        : QWidget(parent), m_color(color)
    {
    }

    bool isOn() const { return m_on; }

    void setOn(bool on)
    {
        if (on == m_on)
            return;
        m_on = on;
        update();
    }

public slots:
    void turnOff() { setOn(false); }
    void turnOn() { setOn(true); }

protected:
    void paintEvent(QPaintEvent *) override
    {
        if (!m_on)
            return;
        QPainter painter(this);
        painter.setRenderHint(QPainter::Antialiasing);
        painter.setBrush(m_color);
        painter.drawEllipse(rect());
    }

private:
    QColor m_color;
    bool m_on = false;
};
LightWidget 클래스는 신호등의 단일 불빛을 나타냅니다. 이 클래스는 on 프로퍼티와 조명을 켜고 끄는 턴온() 및 턴오프() 두 개의 슬롯을 각각 제공합니다. 위젯은 생성자에 전달된 색으로 스스로를 칠합니다.
class TrafficLightWidget : public QWidget
{
    Q_OBJECT
public:
    explicit TrafficLightWidget(QWidget *parent = nullptr) : QWidget(parent)
    {
        auto vbox = new QVBoxLayout(this);
        m_red = new LightWidget(Qt::red);
        vbox->addWidget(m_red);
        m_yellow = new LightWidget(Qt::yellow);
        vbox->addWidget(m_yellow);
        m_green = new LightWidget(Qt::green);
        vbox->addWidget(m_green);
        auto pal = palette();
        pal.setColor(QPalette::Window, Qt::black);
        setPalette(pal);
        setAutoFillBackground(true);
    }

    LightWidget *redLight() const { return m_red; }
    LightWidget *yellowLight() const { return m_yellow; }
    LightWidget *greenLight() const { return m_green; }

private:
    LightWidget *m_red;
    LightWidget *m_yellow;
    LightWidget *m_green;
};
TrafficLightWidget 클래스는 신호등의 시각적 부분을 나타내는 위젯으로, 세로로 배열된 세 개의 조명을 포함하며 이에 대한 접근자 함수를 제공합니다.
QState *createLightState(LightWidget *light, int duration, QState *parent = nullptr)
{
    auto lightState = new QState(parent);
    auto timer = new QTimer(lightState);
    timer->setInterval(duration);
    timer->setSingleShot(true);
    auto timing = new QState(lightState);
    QObject::connect(timing, &QAbstractState::entered, light, &LightWidget::turnOn);
    QObject::connect(timing, &QAbstractState::entered, timer, QOverload<>::of(&QTimer::start));
    QObject::connect(timing, &QAbstractState::exited, light, &LightWidget::turnOff);
    auto done = new QFinalState(lightState);
    timing->addTransition(timer, &QTimer::timeout, done);
    lightState->setInitialState(timing);
    return lightState;
}
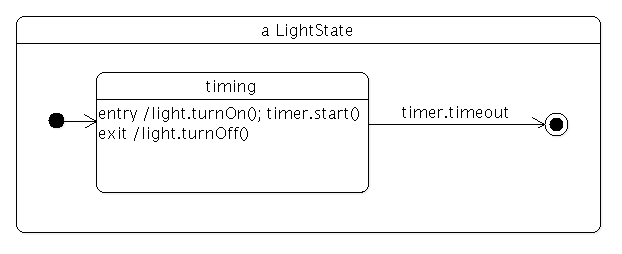
createLightState() 함수는 상태가 입력되면 조명을 켜고 상태가 종료되면 꺼지는 상태를 생성합니다. 이 스테이트는 타이머를 사용하며, 곧 보게 되겠지만 타임아웃은 한 라이트 스테이트에서 다른 라이트 스테이트로 전환하는 데 사용됩니다. 다음은 라이트 상태의 상태 차트입니다:

class TrafficLight : public QWidget
{
    Q_OBJECT
public:
    explicit TrafficLight(QWidget *parent = nullptr) : QWidget(parent)
    {
        auto vbox = new QVBoxLayout(this);
        auto widget = new TrafficLightWidget;
        vbox->addWidget(widget);
        vbox->setContentsMargins(QMargins());

        auto machine = new QStateMachine(this);
        auto redGoingYellow = createLightState(widget->redLight(), 3000);
        redGoingYellow->setObjectName("redGoingYellow");
        auto yellowGoingGreen = createLightState(widget->yellowLight(), 1000);
        yellowGoingGreen->setObjectName("yellowGoingGreen");
        redGoingYellow->addTransition(redGoingYellow, &QState::finished, yellowGoingGreen);
        auto greenGoingYellow = createLightState(widget->greenLight(), 3000);
        greenGoingYellow->setObjectName("greenGoingYellow");
        yellowGoingGreen->addTransition(yellowGoingGreen, &QState::finished, greenGoingYellow);
        auto yellowGoingRed = createLightState(widget->yellowLight(), 1000);
        yellowGoingRed->setObjectName("yellowGoingRed");
        greenGoingYellow->addTransition(greenGoingYellow, &QState::finished, yellowGoingRed);
        yellowGoingRed->addTransition(yellowGoingRed, &QState::finished, redGoingYellow);

        machine->addState(redGoingYellow);
        machine->addState(yellowGoingGreen);
        machine->addState(greenGoingYellow);
        machine->addState(yellowGoingRed);
        machine->setInitialState(redGoingYellow);
        machine->start();
    }
};
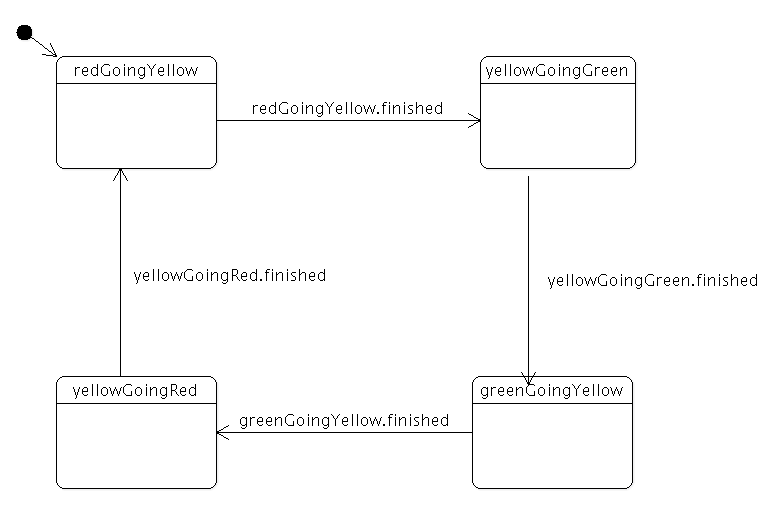
TrafficLight 클래스는 TrafficLightWidget과 상태 머신을 결합합니다. 상태 그래프에는 빨간색에서 노란색, 노란색에서 녹색, 녹색에서 노란색, 노란색에서 빨간색의 네 가지 상태가 있습니다. 초기 상태는 빨간색에서 노란색이며, 상태 타이머가 만료되면 상태 머신은 노란색에서 녹색으로 전환됩니다. 다른 상태에서도 동일한 프로세스가 반복됩니다. 이것이 상태 차트의 모습입니다:

int main(int argc, char **argv)
{
    QApplication app(argc, argv);

    TrafficLight widget;
    widget.resize(110, 300);
    widget.show();

    return app.exec();
}
main() 함수는 TrafficLight를 생성하고 이를 표시합니다.
© 2025 The Qt Company Ltd. Documentation contributions included herein are the copyrights of their respective owners. The documentation provided herein is licensed under the terms of the GNU Free Documentation License version 1.3 as published by the Free Software Foundation. Qt and respective logos are trademarks of The Qt Company Ltd. in Finland and/or other countries worldwide. All other trademarks are property of their respective owners.

