웹엔진 푸시 알림 예시
푸시 알림을 구독하고 구독을 취소하는 방법을 보여줍니다.
이 예에서는 웹 푸시 서비스에서 사용자에게 푸시 알림을 보내려고 합니다. 이는 애플리케이션 서버, 즉 웹사이트 백엔드에서 타사 푸시 서비스를 통해 메시지가 전송되어 최종적으로 사용자의 브라우저에 알림 형태로 도착하는 일반적인 시나리오입니다. 이 흐름을 보여주기 위해 사용자가 핑 메시지를 수신하도록 구독할 수 있는 간단한 푸시 서비스 서버 애플리케이션을 구현해 보겠습니다.
이미 언급했듯이 이러한 워크플로에는 세 가지 당사자가 관여합니다:
- 푸시 알림을 수신하는 사용자의 웹 브라우저
- 구독 엔드포인트에 의해 정의되며 브라우저의 푸시 서비스 구현의 일부인 타사 푸시 서비스
- 사용자의 구독을 저장하고 구독 엔드포인트를 사용하여 푸시 메시지를 시작하는 애플리케이션 서버
사용자가 웹사이트를 방문하면 자바스크립트 웹 애플리케이션이 자바스크립트 푸시 API를 사용하여 푸시 알림 구독을 생성합니다. 그런 다음 사용자에게 푸시 알림을 수신하고 표시할 수 있는 권한을 부여하라는 메시지가 표시됩니다. 수락되면 푸시 API는 타사 푸시 서비스( QtWebEngine 의 경우 Firebase 클라우드 메시징(FCM)인)와 푸시 채널을 설정합니다. 구독 엔드포인트 URL이 포함된 고유한 푸시 구독이 생성됩니다. 그런 다음 브라우저는 엔드포인트 설정을 전달하는 애플리케이션 서버로 구독 메시지를 보냅니다. 이제 애플리케이션 서버는 구독 엔드포인트를 사용하여 브라우저에 알림을 보낼 수 있습니다. 브라우저 푸시 서비스 구현은 푸시 메시지를 전달합니다. 그러나 이를 표시하려면 서비스 워커가 등록되어 있어야 합니다. 서비스 워커는 백그라운드에서 실행되므로 서비스 워커를 설치한 웹사이트가 더 이상 열리지 않더라도 알림을 표시할 수 있습니다.

구현에 대해 자세히 알아보겠습니다. 먼저 두 개의 모듈로 NodeJS를 사용하여 사용자 지정 푸시 서비스를 구현합니다:
새 프로젝트를 초기화하고 이 예제의 루트 디렉토리에 필요한 모듈을 설치해 보겠습니다:
npm init -y
npm install web-push express
이 명령은 start 명령을 정의하는 package.js를 생성해야 합니다:
"start": "node server.js"
이제 server.js에서 푸시 서비스 백엔드 구현으로 넘어가 보겠습니다.
먼저 필요한 모듈을 포함하고 사용자 지정 푸시 서버를 만드는 데 사용하는 기본 익스프레스 프레임워크 설정을 수행합니다. 간단하게 하기 위해 한 번에 하나의 구독만 처리하겠습니다. 그러기 위해서는 웹 푸시 라이브러리로 생성할 VAPID 키를 만들어야 합니다. 공개 키는 프런트엔드에서 사용되며 서비스 인증에 사용됩니다.
const express = require('express');
const webpush = require('web-push');

// setup server
const port = 5000;
const server = express();
server.use(express.json());
server.use(express.static('content'));

// we support only one subscription at the time
var subscription = null;

// setup vapid keys
const vapidKeys = {
    publicKey :
            "BNO4fIv439RpvbReeABNlDNiiBD2Maykn7EVnwsPseH7-P5hjnzZLEfnejXVP7Zt6MFoKqKeHm4nV9BHvbgoRPg",
    privateKey : "HqhrzsRfG5-SB3j45lyUmV7cYZuy-71r2Bb0tgaOefk"
};

// set vapid keys for webpush libs
webpush.setVapidDetails('mailto:push@qt.io', vapidKeys.publicKey, vapidKeys.privateKey);
참고: 이 예제에서는 메시지 암호화를 다루지 않습니다.
키를 생성하려면 웹 푸시 라이브러리와 함께 제공되는 도구를 사용하여 예제의 루트 디렉터리에 npm 에 설치하면 됩니다.
./node_modules/.bin/web-push generate-vapid-keys
이제 푸시 서버에 routes 를 두 개 추가합니다. 하나는 subscribe, 하나는 unsubscribe 에 추가하여 프런트엔드에서 푸시 구독을 처리하기 위한 HTTP POST 요청을 보낼 수 있도록 합니다. 구독 요청에서는 요청 본문에서 subscription 을 가져오고 사용자에게 푸시 메시지를 보내는 빈도를 정의하는 사용자 지정 헤더 ping-time 도 가져옵니다. 나중에 푸시 알림을 보낼 수 있도록 subscription 을 유지합니다. 확인을 위해 201 상태 코드를 전송하고 ping-time 값을 기반으로 첫 번째 푸시 알림을 예약합니다. unsubscribe 요청은 단순히 구독을 제거합니다.
// add subscribe route
server.post('/subscribe', (req, res) => {

    // subscription request
    subscription = req.body;
    const delay = req.headers['ping-time'];
    console.log('Got subscription with endpoint: ' + subscription.endpoint);
    console.log('Ping delay is at: ' + delay);

    // confirm resource created
    res.status(201).json({});

    // schedule notification
    setTimeout(() => { sendNotification(delay) }, delay * 1000);
});

// add unsubscribe route
server.post('/unsubscribe', (req, res) => {
    console.log('Got unsubscribe with endpoint: ' + req.body.endpoint);
    subscription = null;
    res.status(201).json({});
});
sendNotication() 함수는 웹 푸시 라이브러리를 사용하여 푸시 메시지를 보냅니다. 사용자에게 표시할 메시지로 페이로드를 생성하고 다음 푸시 메시지를 예약합니다.
function sendNotification(delay)
{
    if (!subscription)
        return;

    // create payload text
    const payload = JSON.stringify({ title : 'Ping !', text : 'Visit qt.io', url : 'www.qt.io' });

    // send notification
    console.log('Sending notification !');
    webpush.sendNotification(subscription, payload).catch(err => console.error(err));

    // schedule next notification
    setTimeout(() => { sendNotification(delay) }, delay * 1000);
}
마지막으로 주어진 포트에서 수신 대기하도록 서버를 시작합니다.
server.listen(port, () => console.log(`Push server started at port ${port}`));이제 프론트엔드로 이동해 보겠습니다. 사용자가 핑 알림 메시지를 얼마나 자주 수신할지 입력할 수 있는 간단한 페이지 index.html을 만듭니다. 두 개의 버튼이 있습니다: 푸시 알림을 구독하려면 Ping Me를, 구독을 취소하려면 Clear를 클릭합니다. 마지막으로 다음에 다룰 ping.js를 로드합니다.
<body>
  <h1>Push Notification Using NodeJS and QtWebEngine</h1>
  <div id="app">
    <div id="ping-setup">
      <form>
        <div>
          Ping Me Every [sec]:
        </div>
        <div class="ping-input">
          <input type="number" name="seconds" min="0" max="3600" required="">
        </div><button>Ping Me</button>
      </form>
    </div>
    <div id="ping-clear">
      <div id="ping-text"></div><button id="ping-clear-button">Clear</button>
    </div>
  </div>
  <script src="ping.js"></script>
</body>
마지막 부분은 프런트엔드 내에서 푸시 구독을 위한 로직을 만드는 것입니다. 여기에는 구독을 처리하는 setup 과 clear 이라는 두 개의 함수가 있습니다. 사용자가 Ping Me 버튼을 클릭하면 setup 이 호출됩니다. 알림을 받으려면 서비스 워커가 필요합니다. 이렇게 하면 서비스 워커가 백그라운드에서 작업하고 수신 메시지를 처리하기 때문에 사용자가 웹사이트를 나가도 알림을 받을 수 있습니다. 이를 위해서는 먼저 서비스 워커를 등록해야 합니다:
const register = await navigator.serviceWorker.register('/worker.js', { scope : '/' });cpushManager.subscribe() 으로 호출하면 사용자에게 표시되는 권한 프롬프트가 트리거됩니다. 권한이 부여되면 푸시 구독이 반환됩니다. 여기에는 등록된 서비스 작업자가 푸시 메시지를 기다리는 브라우저로 알림을 보낼 수 있는 URL 엔드포인트가 포함되어 있습니다.
    var subscription = await register.pushManager.subscribe(
            { userVisibleOnly : true, applicationServerKey : publicVapidKey });
앞서 언급했듯이 구독은 FCM용으로 생성되며 이제 HTTP POST 요청과 함께 사용자 지정 서버로 전송되어야 합니다. 또한 사용자가 웹사이트에 입력한 ping-time 주소가 포함된 HTTP 헤더를 포스트 요청에 추가합니다.
    await fetch('/subscribe', {
        method : 'POST',
        body : JSON.stringify(subscription),
        headers : { 'content-type' : 'application/json', 'ping-time' : delay }
    });
clear 함수는 먼저 푸시 서버에서 HTTP POST 요청을 전송하여 구독을 취소하고 나중에 타사 푸시 서비스(FCM)에서 구독을 취소합니다.
    const register = await navigator.serviceWorker.getRegistration();
    var subscription = await register.pushManager.getSubscription();
    ...
    await fetch('/unsubscribe', {
        method : 'POST',
        body : JSON.stringify(subscription),
        headers : { 'content-type' : 'application/json' }
    });
    ...
    await subscription.unsubscribe();
ping.js의 나머지 코드는 사용자가 제공한 값을 읽고 setup() 또는 clear() 을 호출하는 상용구 코드일 뿐입니다.
프런트엔드의 마지막 부분으로 푸시 이벤트에 대한 이벤트 리스너를 등록하는 서비스 워커 스크립트 내부를 살펴봅시다.
self.addEventListener('push', event => {
    const data = event.data.json();
    self.registration.showNotification(data.title, { body : data.text });
});
푸시 이벤트가 오면 알림 자바스크립트 API를 사용하여 알림을 표시하기만 하면 됩니다.
참고: QtWebEngine 알림 예시에서는 자체 핸들러를 제공하고 알림 메시지의 모양과 느낌을 사용자 지정하는 방법을 보여줍니다.
구현이 완료되면 포트 5000에서 로컬 호스트에서 서버를 시작할 수 있습니다. 이를 위해 프로젝트의 루트 디렉토리에 있는 콘솔에 간단히 입력하면 됩니다:
npm start
이제 웹엔진 알림 예제를 기반으로 하는 푸시 알림 브라우저 애플리케이션을 살펴볼 수 있습니다:
int main(int argc, char *argv[])
{
    QCoreApplication::setOrganizationName("QtExamples");
    QApplication app(argc, argv);

    const QString name =
            QString::fromLatin1("push-notifications.%1").arg(qWebEngineChromiumVersion());

    QWebEngineProfileBuilder profileBuilder;
    QScopedPointer<QWebEngineProfile> profile(profileBuilder.createProfile(name));
    QWebEngineView view(profile.data());
    auto popup = new NotificationPopup(&view);

    QObject::connect(view.page(), &QWebEnginePage::permissionRequested,
                     [&](QWebEnginePermission permission) {
                         if (permission.permissionType() != QWebEnginePermission::PermissionType::Notifications)
                             return;

                         permission.grant();
                     });

    profile->setPushServiceEnabled(true);
    profile->setNotificationPresenter([&](std::unique_ptr<QWebEngineNotification> notification) {
        popup->present(notification);
    });

    view.resize(640, 480);
    view.setUrl(QUrl("http://localhost:5000"));
    view.show();
    return app.exec();
}
이 애플리케이션은 http:\\localhost:5000 에서 페이지를 열기만 하면 됩니다. 여기에 문서화되어 있으므로 알림을 여는 방법에 대해서는 자세히 설명하지 않겠습니다. 하지만 두 가지 방법으로 애플리케이션을 수정해야 합니다. 첫째, QWebEngineProfile 은 푸시 메시징이 비활성화되므로 오프더레코드로 설정할 수 없습니다. 따라서 위에서 볼 수 있듯이 QWebEngineProfile 이 이름으로 초기화됩니다. 둘째, 생성된 profile 에 대해 QWebEngineProfile::setPushServiceEnabled 호출로 푸시 메시징을 활성화해야 합니다.
애플리케이션이 실행되면 이 메시지가 표시됩니다:

권한을 부여한 후 핑 요청을 보낼 수 있습니다:

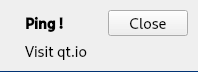
푸시 알림을 받을 수 있습니다:
© 2026 The Qt Company Ltd. Documentation contributions included herein are the copyrights of their respective owners. The documentation provided herein is licensed under the terms of the GNU Free Documentation License version 1.3 as published by the Free Software Foundation. Qt and respective logos are trademarks of The Qt Company Ltd. in Finland and/or other countries worldwide. All other trademarks are property of their respective owners.
