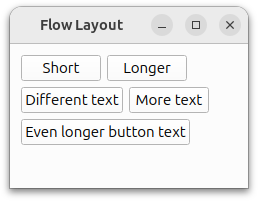
흐름 레이아웃 예시
다양한 창 크기에 맞게 위젯을 배열하는 방법을 보여줍니다.
플로우 레이아웃 은 다양한 창 크기를 처리하는 레이아웃을 구현합니다. 위젯 배치는 애플리케이션 창의 너비에 따라 달라집니다.

Flowlayout 클래스는 주로 QLayout 및 QWidgetItem 을 사용하며, Window는 QWidget 및 QLabel 을 사용합니다.
자세한 내용은 레이아웃 관리 페이지를 참조하세요.
예제 실행하기
에서 예제를 실행하려면 Qt Creator에서 예제를 실행하려면 Welcome 모드를 열고 Examples 에서 예제를 선택합니다. 자세한 내용은 Qt Creator: 튜토리얼을 참조하세요 : 빌드 및 실행을 참조하십시오.
플로우 레이아웃 클래스 정의
FlowLayout 클래스는 QLayout 을 상속합니다. 자식 위젯을 가로 및 세로로 정렬하는 사용자 정의 레이아웃 클래스입니다.
class FlowLayout : public QLayout
{
public:
    explicit FlowLayout(QWidget *parent, int margin = -1, int hSpacing = -1, int vSpacing = -1);
    explicit FlowLayout(int margin = -1, int hSpacing = -1, int vSpacing = -1);
    ~FlowLayout();

    void addItem(QLayoutItem *item) override;
    int horizontalSpacing() const;
    int verticalSpacing() const;
    Qt::Orientations expandingDirections() const override;
    bool hasHeightForWidth() const override;
    int heightForWidth(int) const override;
    int count() const override;
    QLayoutItem *itemAt(int index) const override;
    QSize minimumSize() const override;
    void setGeometry(const QRect &rect) override;
    QSize sizeHint() const override;
    QLayoutItem *takeAt(int index) override;

private:
    int doLayout(const QRect &rect, bool testOnly) const;
    int smartSpacing(QStyle::PixelMetric pm) const;

    QList<QLayoutItem *> itemList;
    int m_hSpace;
    int m_vSpace;
};
QLayout 에서 상속된 함수를 재구현합니다. 이 함수는 레이아웃에 항목을 추가하고 방향과 지오메트리를 처리합니다.
또한 doLayout() 와 smartSpacing() 라는 두 개의 비공개 메서드를 선언합니다. doLayout() 는 레이아웃 항목을 배치하고 smartSpacing() 함수는 항목 사이의 간격을 계산합니다.
FlowLayout 클래스 구현
생성자부터 살펴봅시다:
FlowLayout::FlowLayout(QWidget *parent, int margin, int hSpacing, int vSpacing)
    : QLayout(parent), m_hSpace(hSpacing), m_vSpace(vSpacing)
{
    setContentsMargins(margin, margin, margin, margin);
}

FlowLayout::FlowLayout(int margin, int hSpacing, int vSpacing)
    : m_hSpace(hSpacing), m_vSpace(vSpacing)
{
    setContentsMargins(margin, margin, margin, margin);
}
생성자에서는 setContentsMargins() 를 호출하여 왼쪽, 위쪽, 오른쪽, 아래쪽 여백을 설정합니다. 기본적으로 QLayout 은 현재 스타일에서 제공하는 값을 사용합니다( QStyle::PixelMetric 참조 ).
FlowLayout::~FlowLayout()
{
    QLayoutItem *item;
    while ((item = takeAt(0)))
        delete item;
}
이 예제에서는 순수 가상 함수인 addItem() 을 다시 구현합니다. addItem() 을 사용하면 레이아웃 항목의 소유권이 레이아웃으로 이전되므로 삭제는 레이아웃의 책임입니다.
void FlowLayout::addItem(QLayoutItem *item)
{
    itemList.append(item);
}
addItem() 는 레이아웃에 항목을 추가하기 위해 구현됩니다.
int FlowLayout::horizontalSpacing() const
{
    if (m_hSpace >= 0) {
        return m_hSpace;
    } else {
        return smartSpacing(QStyle::PM_LayoutHorizontalSpacing);
    }
}

int FlowLayout::verticalSpacing() const
{
    if (m_vSpace >= 0) {
        return m_vSpace;
    } else {
        return smartSpacing(QStyle::PM_LayoutVerticalSpacing);
    }
}
horizontalSpacing() 및 verticalSpacing() 을 구현하여 레이아웃 내부의 위젯 간 간격을 파악합니다. 값이 0보다 작거나 같으면 이 값이 사용됩니다. 그렇지 않으면 smartSpacing() 을 호출하여 간격을 계산합니다.
int FlowLayout::count() const
{
    return itemList.size();
}

QLayoutItem *FlowLayout::itemAt(int index) const
{
    return itemList.value(index);
}

QLayoutItem *FlowLayout::takeAt(int index)
{
    if (index >= 0 && index < itemList.size())
        return itemList.takeAt(index);
    return nullptr;
}
그런 다음 count() 을 구현하여 레이아웃의 항목 수를 반환합니다. 항목 목록을 탐색하려면 itemAt() 및 takeAt()을 사용하여 목록에서 항목을 제거하고 반환합니다. 항목이 제거되면 나머지 항목의 번호가 다시 지정됩니다. 세 함수 모두 QLayout 의 순수 가상 함수입니다.
Qt::Orientations FlowLayout::expandingDirections() const
{
    return { };
}
expandingDirections() 는 레이아웃이 sizeHint() 보다 더 많은 공간을 사용할 수 있는 Qt::Orientation를 반환합니다.
bool FlowLayout::hasHeightForWidth() const
{
    return true;
}

int FlowLayout::heightForWidth(int width) const
{
    int height = doLayout(QRect(0, 0, width, 0), true);
    return height;
}
너비에 따라 높이가 달라지는 위젯에 맞게 조정하려면 heightForWidth() 을 구현합니다. hasHeightForWidth() 함수는 이 종속성을 테스트하는 데 사용되며, heightForWidth() 은 너비를 doLayout() 에 전달하고, 는 너비를 레이아웃 렉트의 인수, 즉 항목이 배치되는 경계로 사용합니다. 이 rect에는 레이아웃 여백()이 포함되지 않습니다.
void FlowLayout::setGeometry(const QRect &rect)
{
    QLayout::setGeometry(rect);
    doLayout(rect, false);
}

QSize FlowLayout::sizeHint() const
{
    return minimumSize();
}

QSize FlowLayout::minimumSize() const
{
    QSize size;
    for (const QLayoutItem *item : std::as_const(itemList))
        size = size.expandedTo(item->minimumSize());

    const QMargins margins = contentsMargins();
    size += QSize(margins.left() + margins.right(), margins.top() + margins.bottom());
    return size;
}
setGeometry() 는 일반적으로 실제 레이아웃, 즉 레이아웃 항목의 지오메트리를 계산하는 데 사용됩니다. 이 예제에서는 doLayout() 를 호출하고 레이아웃 rect를 전달합니다.
sizeHint() 는 레이아웃의 기본 크기를 반환하고 minimumSize() 는 레이아웃의 최소 크기를 반환합니다.
int FlowLayout::doLayout(const QRect &rect, bool testOnly) const
{
    int left, top, right, bottom;
    getContentsMargins(&left, &top, &right, &bottom);
    QRect effectiveRect = rect.adjusted(+left, +top, -right, -bottom);
    int x = effectiveRect.x();
    int y = effectiveRect.y();
    int lineHeight = 0;
doLayout() horizontalSpacing() 또는 verticalSpacing() 이 기본값을 반환하지 않는 경우 레이아웃을 처리합니다. getContentsMargins() 을 사용하여 레이아웃 항목에 사용할 수 있는 면적을 계산합니다.
    for (QLayoutItem *item : std::as_const(itemList)) {
        const QWidget *wid = item->widget();
        int spaceX = horizontalSpacing();
        if (spaceX == -1)
            spaceX = wid->style()->layoutSpacing(
                QSizePolicy::PushButton, QSizePolicy::PushButton, Qt::Horizontal);
        int spaceY = verticalSpacing();
        if (spaceY == -1)
            spaceY = wid->style()->layoutSpacing(
                QSizePolicy::PushButton, QSizePolicy::PushButton, Qt::Vertical);
그런 다음 현재 스타일에 따라 레이아웃의 각 위젯에 적절한 간격을 설정합니다.
        int nextX = x + item->sizeHint().width() + spaceX;
        if (nextX - spaceX > effectiveRect.right() && lineHeight > 0) {
            x = effectiveRect.x();
            y = y + lineHeight + spaceY;
            nextX = x + item->sizeHint().width() + spaceX;
            lineHeight = 0;
        }

        if (!testOnly)
            item->setGeometry(QRect(QPoint(x, y), item->sizeHint()));

        x = nextX;
        lineHeight = qMax(lineHeight, item->sizeHint().height());
    }
    return y + lineHeight - rect.y() + bottom;
}
그런 다음 레이아웃에서 각 항목의 위치는 초기 x 및 y 좌표에 항목 너비와 선 높이를 더하여 계산됩니다. 이를 통해 다음 항목이 현재 줄에 맞는지 또는 다음 줄로 이동해야 하는지 여부를 알 수 있습니다. 또한 위젯 높이를 기준으로 현재 줄의 높이를 찾습니다.
int FlowLayout::smartSpacing(QStyle::PixelMetric pm) const
{
    QObject *parent = this->parent();
    if (!parent) {
        return -1;
    } else if (parent->isWidgetType()) {
        QWidget *pw = static_cast<QWidget *>(parent);
        return pw->style()->pixelMetric(pm, nullptr, pw);
    } else {
        return static_cast<QLayout *>(parent)->spacing();
    }
}
smartSpacing() 는 최상위 레이아웃 또는 하위 레이아웃의 기본 간격을 가져오도록 설계되었습니다. 부모가 QWidget 인 경우 최상위 레이아웃의 기본 간격은 스타일을 쿼리하여 결정됩니다. 부모가 QLayout 인 경우 하위 레이아웃의 기본 간격은 부모 레이아웃의 간격을 쿼리하여 결정됩니다.
© 2025 The Qt Company Ltd. Documentation contributions included herein are the copyrights of their respective owners. The documentation provided herein is licensed under the terms of the GNU Free Documentation License version 1.3 as published by the Free Software Foundation. Qt and respective logos are trademarks of The Qt Company Ltd. in Finland and/or other countries worldwide. All other trademarks are property of their respective owners.

