定位器和布局
QML 中有几种定位项目的方法。
下面是简要概述。更多详情,请参阅 Qt Quick 中的重要概念 - 定位。
手动定位
通过设置项目的 x,y 属性,可将其放置在屏幕上特定的 x,y 坐标上。这将根据视觉坐标系规则设置其相对于父对象左上角的位置。
通过使用绑定而不是常量值来设置这些属性,还可以通过将 x 和 y 坐标设置为相应的绑定值来轻松实现相对定位。
import QtQuick

Item {
    width: 100; height: 100

    Rectangle {
        // Manually positioned at 20,20
        x: 20
        y: 20
        width: 80
        height: 80
        color: "red"
    }
}

锚点
Item 类型提供了与其他Item 类型锚定的能力。每个项目有七条锚点线:左、右、垂直中心、上、下、基线和水平中心。三条垂直锚点线可以锚定到其他项目的任意三条垂直锚点线上,四条水平锚点线可以锚定到其他项目的水平锚点线上。
有关详细信息,请参阅使用锚点定位和anchors property 文档。
import QtQuick

Item {
    width: 200; height: 200

    Rectangle {
        // Anchored to 20px off the top right corner of the parent
        anchors.right: parent.right
        anchors.top: parent.top
        anchors.margins: 20 // Sets all margins at once

        width: 80
        height: 80
        color: "orange"
    }

    Rectangle {
        // Anchored to 20px off the top center corner of the parent.
        // Notice the different group property syntax for 'anchors' compared to
        // the previous Rectangle. Both are valid.
        anchors { horizontalCenter: parent.horizontalCenter; top: parent.top; topMargin: 20 }

        width: 80
        height: 80
        color: "green"
    }
}

定位器
Qt Quick 提供了一些定位器类型,以满足以规则模式定位一组类型的常见需求。放置在定位器中的项目会以某种方式自动定位;例如,Row 会将项目定位为水平相邻(形成一行)。
有关详细信息,请参阅项目定位器。
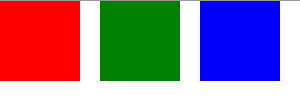
import QtQuick

Item {
    width: 300; height: 100

    Row { // The "Row" type lays out its child items in a horizontal line
        spacing: 20 // Places 20px of space between items

        Rectangle { width: 80; height: 80; color: "red" }
        Rectangle { width: 80; height: 80; color: "green" }
        Rectangle { width: 80; height: 80; color: "blue" }
    }
}
布局类型
布局类型的功能与定位器类似,但允许对布局进行进一步的细化或限制。具体来说,布局类型允许你
- 设置文本和其他项目的对齐方式
- 自动调整大小并填充分配的应用区域
- 设置尺寸限制,如最小或最大尺寸
- 设置布局内项目之间的间距
GroupBox {
    id: gridBox
    title: "Grid layout"
    Layout.fillWidth: true

    GridLayout {
        id: gridLayout
        rows: 3
        flow: GridLayout.TopToBottom
        anchors.fill: parent
        Label { text: "Line 1" }
        Label { text: "Line 2" }
        Label { text: "Line 3" }

        TextField { }
        TextField { }
        TextField { }

        TextArea {
            text: "This widget spans over three rows in the GridLayout.\n"
                  + "All items in the GridLayout are implicitly positioned from top to bottom."
            Layout.rowSpan: 3
            Layout.fillHeight: true
            Layout.fillWidth: true
        }
    }
}
上面的代码段来自基本布局示例。该代码段展示了在布局中添加各种字段和项目的简易方法。GridLayout 可以调整大小,其格式可通过各种属性自定义。
有关布局类型的更多信息,请访问
注: Qt Quick 布局是在 Qt XML 5.1 中引入的,需要 Qt Quick2.1.
© 2026 The Qt Company Ltd. Documentation contributions included herein are the copyrights of their respective owners. The documentation provided herein is licensed under the terms of the GNU Free Documentation License version 1.3 as published by the Free Software Foundation. Qt and respective logos are trademarks of The Qt Company Ltd. in Finland and/or other countries worldwide. All other trademarks are property of their respective owners.
