Qt Quick 3D - XR 空间锚点示例
演示如何在Qt Quick 3D XR 中使用空间锚点。

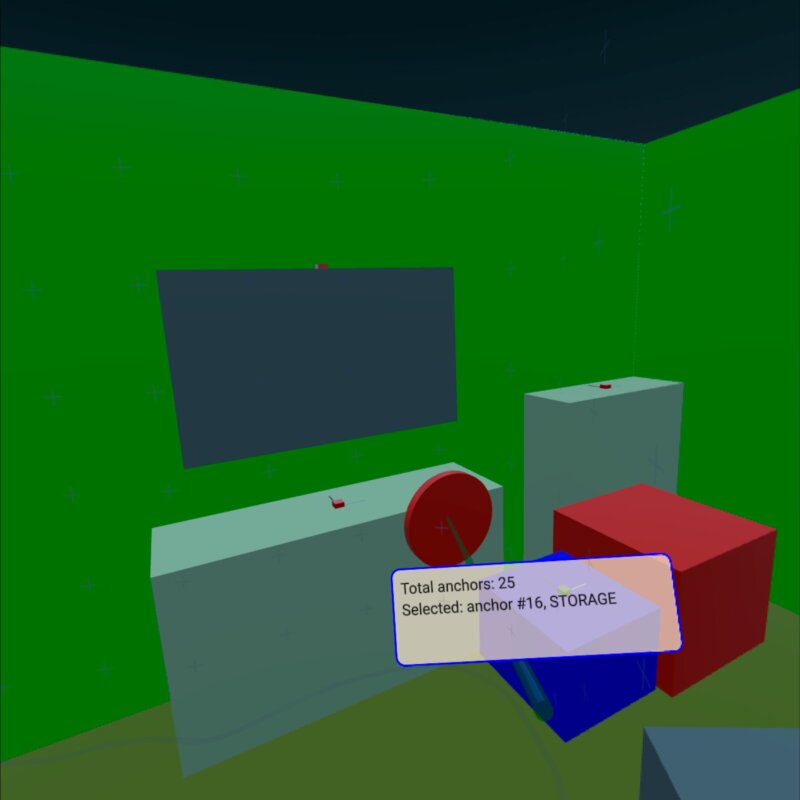
该示例演示了如何使用XrSpatialAnchorListModel 显示环境中的真实物理对象并与之交互。它支持直通模式和完全沉浸模式。基本结构遵循xr_simple示例。
示例中最相关的部分是Repeater3D 上的XrSpatialAnchorListModel 。对于每个锚点,我们都会创建一个框,用一种颜色填充锚点的体积。颜色的选择取决于锚点的分类。在直通模式下,这个框是不可见的。此外,我们还通过小方框来显示锚点的位置和方向:
Repeater3D {
    id: spatialAnchors
    model: XrSpatialAnchorListModel {

    }
    delegate: Node {
        id: anchorNode
        required property XrSpatialAnchor anchor
        required property int index
        position: anchor.position
        rotation: anchor.rotation

        Model {
            pickable: true
            z: anchorNode.anchor.has3DBounds ? anchorNode.anchor.offset3D.z / 2 * 100 : 0 // Position is center of 2D surface also for 3D anchors
            scale: anchorNode.anchor.has3DBounds ? anchorNode.anchor.extent3D : Qt.vector3d(anchorNode.anchor.extent2D.x, anchorNode.anchor.extent2D.y, 0.01)
            materials: PrincipledMaterial {
                // Make anchor objects invisible in passthrough mode
                baseColor: xrView.passthroughEnabled ? Qt.rgba(0, 0, 0, 0) : anchorColor(anchor)
                alphaMode: xrView.passthroughEnabled ? PrincipledMaterial.Blend : PrincipledMaterial.Opaque
                roughness: 0.7
            }
            source: anchorNode.anchor.has3DBounds ? "#Cube" : "#Rectangle"
            property string anchorInfo: "anchor #" + anchorNode.index + ", " + anchorNode.anchor.classificationString
        }

        Model {
            // Visualize anchor orientation
            materials: PrincipledMaterial {
                baseColor: anchorNode.anchor.has3DBounds ? anchorNode.anchor.has2DBounds ? "green" : "red" : "blue"
            }
            scale: Qt.vector3d(0.05, 0.05, 0.05)
            source: "#Cube"

            Model {
                materials: PrincipledMaterial {
                    baseColor: "black"
                }
                scale: Qt.vector3d(0.1, 3, 0.1)
                source: "#Cube"
                y: 150
            }
            Model {
                materials: PrincipledMaterial {
                    baseColor: "white"
                }
                scale: Qt.vector3d(3, 0.1, 0.1)
                source: "#Cube"
                x: 150
            }
        }
        visible: anchor.has2DBounds || anchor.has3DBounds
    }
}
锚点的方框是可拾取的,其字符串属性anchorInfo 包含锚点的classificationString 。然后,我们根据控制器的位置进行拾取。(详见xr_input 示例)如果我们击中了其中一个锚点框,就会显示一个包含锚点信息的标签:
Node {
    id: labelNode
    position: rightController.position
    rotation: rightController.rotation

    property int numAnchors: spatialAnchors.count
    property string anchorInfo: "(no anchor)"

    Node {
        y: 15
        x: -15
        scale: Qt.vector3d(0.1, 0.1, 0.1)
        Rectangle {
            width: 300
            height: 100
            color: Qt.rgba(1,0.9,0.8,0.7)
            radius: 10
            border.width: 2
            border.color: "blue"
            Text {
                anchors.fill: parent
                anchors.margins: 10
                textFormat: Text.StyledText
                text: "Total anchors: " + labelNode.numAnchors + "<br>" + "Selected: " + labelNode.anchorInfo + "<br>" + "Press A to Capture/Update anchors"
            }
        }
    }
}
© 2025 The Qt Company Ltd. Documentation contributions included herein are the copyrights of their respective owners. The documentation provided herein is licensed under the terms of the GNU Free Documentation License version 1.3 as published by the Free Software Foundation. Qt and respective logos are trademarks of The Qt Company Ltd. in Finland and/or other countries worldwide. All other trademarks are property of their respective owners.

