文件系统资源管理器
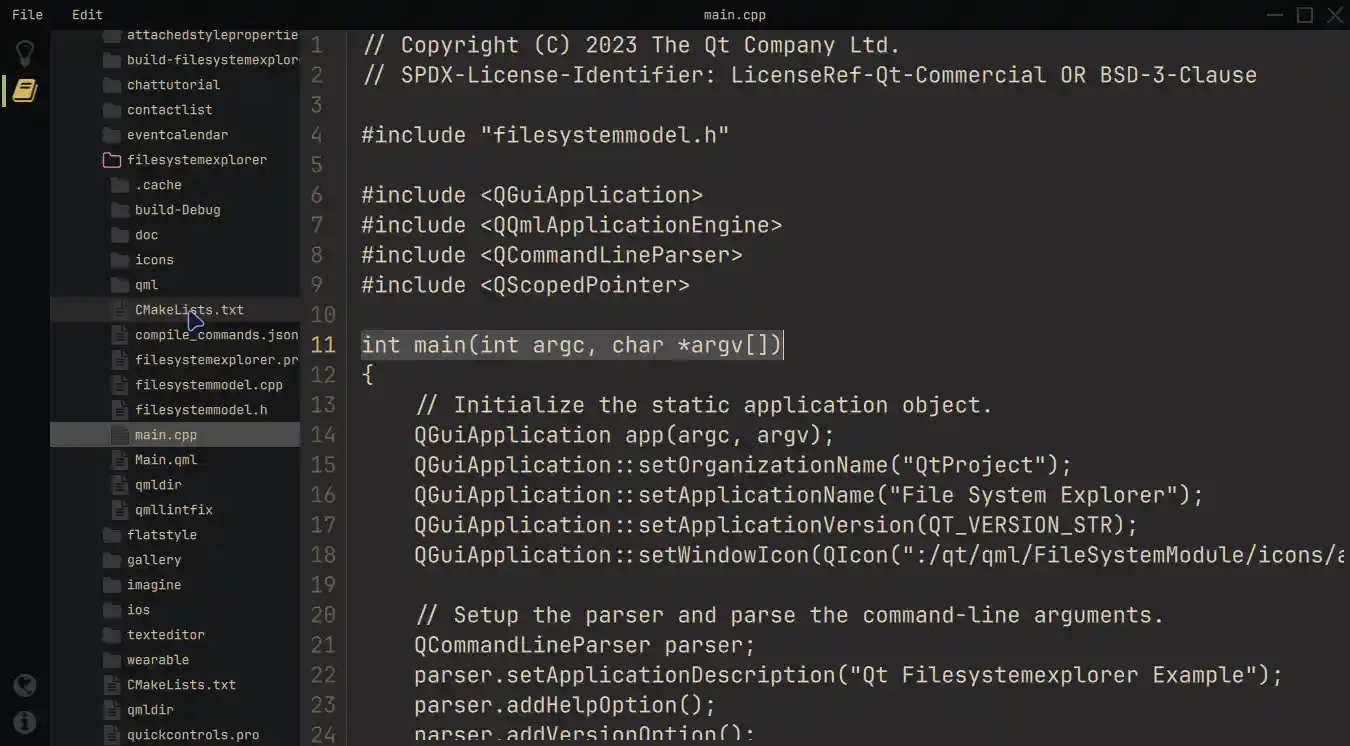
一个桌面 QML 应用程序,利用定制的Qt Quick Controls 显示文件系统中的文本文件。
本示例采用现代布局,由三个主要部分组成。左侧是基于图标的侧边栏,其次是可调整大小的TreeView ,显示来自QFileSystemModel 的文件系统,最后是TextArea ,显示选定的文本文件。所有操作系统都有一个共同的外观和感觉。我们通过使用定制的快速控件和无框架窗口以及自己的窗口装饰来实现这一点。从命令行启动该程序时,你可以选择提供一个初始目录作为参数。TreeView 将使用该初始目录设置显示目录结构的起点。

运行示例
要从 Qt Creator,打开Welcome 模式并从Examples 中选择示例。更多信息,请参阅Qt Creator: 教程:构建并运行。
现代布局和结构
首先,我们在整个单例 QML 对象中提供颜色。这样,我们就能对应用程序的外观进行更有条理的控制。
pragma Singleton

QtObject {
    readonly property color background: "#292828"
    readonly property color surface1: "#171819"
    readonly property color surface2: "#090A0C"
    readonly property color text: "#D4BE98"
    readonly property color textFile: "#E1D2B7"
    readonly property color disabledText: "#2C313A"
    readonly property color selection: "#4B4A4A"
    readonly property color active: "#292828"
    readonly property color inactive: "#383737"
    readonly property color folder: "#383737"
    readonly property color icon: "#383737"
    readonly property color iconIndicator: "#D5B35D"
    readonly property color color1: "#A7B464"
    readonly property color color2: "#D3869B"
}
由于我们不想依赖操作系统的窗口装饰,而是想提供自己的装饰,因此我们在ApplicationWindow 内使用了FramelessWindowHint 标志。为了实现与窗口的等效交互,我们覆盖了自定义MenuBar 的contentItem 属性,并显示一些信息文本以及拖动或关闭应用程序的交互可能性。内联组件(Inline Components)的使用简化了这一过程。
            component InteractionButton: Rectangle {
                id: interactionButton

                signal action()
                property alias hovered: hoverHandler.hovered

                Layout.fillHeight: true
                Layout.preferredWidth: height

                color: hovered ? Colors.background : "transparent"
                HoverHandler {
                    id: hoverHandler
                }
                TapHandler {
                    id: tapHandler
                    onTapped: interactionButton.action()
                }
            }

            InteractionButton {
                id: minimize

                onAction: root.dragWindow.showMinimized()
                Rectangle {
                    anchors.centerIn: parent
                    color: parent.hovered ? Colors.iconIndicator : Colors.icon
                    height: 2
                    width: parent.height - 14
                }
            }

            InteractionButton {
                id: maximize
    ...
左侧的侧边栏包括顶部的可选中导航按钮和底部的单击按钮。ButtonGroup 和容器用于确保在任何时候只有一个条目处于活动状态。这样就可以使用当前位置的属性别名和StackLayout 来提供不同的视图。
通过这种技术,我们只需在StackLayout 中添加另一个按钮和相应的元素,即可扩展功能。
                StackLayout {
                    anchors.fill: parent
                    currentIndex: sidebar.currentTabIndex

                    // Shows the help text.
                    Text {
                        text: qsTr("This example shows how to use and visualize the file system.\n\n"
                                 + "Customized Qt Quick Components have been used to achieve this look.\n\n"
                                 + "You can edit the files but they won't be changed on the file system.\n\n"
                                 + "Click on the folder icon to the left to get started.")
                        wrapMode: TextArea.Wrap
                        color: Colors.text
                    }

                    // Shows the files on the file system.
                    FileSystemView {
                        id: fileSystemView
                        color: Colors.surface1
                        onFileClicked: path => root.currentFilePath = path
                    }
                }
除了一些信息文本外,StackLayout 还包括FileSystemView。这个自定义组件显示文件和文件夹,并用C++ 模型中的数据填充。然后,我们可以选择文件并相应地读取它们。
QString FileSystemModel::readFile(const QString &filePath)
{
    // Don't issue errors for an empty path, as the initial binding
    // will result in an empty path, and that's OK.
    if (filePath.isEmpty())
        return {};

    QFile file(filePath);

    if (file.size() >= 2'000'000)
        return tr("File size is too big.\nYou can read files up to %1 MB.").arg(2);

    static const QMimeDatabase db;
    const QMimeType mime = db.mimeTypeForFile(QFileInfo(file));

    // Check if the mimetype is supported and return the content.
    const auto mimeTypesForFile = mime.parentMimeTypes();
    for (const auto &m : mimeTypesForFile) {
        if (m.contains("text", Qt::CaseInsensitive)
                || mime.comment().contains("text", Qt::CaseInsensitive)) {
            if (!file.open(QIODevice::ReadOnly | QIODevice::Text))
                return tr("Error opening the File!");

            QTextStream stream(&file);
            return stream.readAll();
        }
    }
    return tr("Filetype not supported!");
}
右键单击TreeView 中的文件夹,弹出菜单,可以控制TreeView 的rootIndex 属性。
            MyMenu {
                id: contextMenu
                Action {
                    text: qsTr("Set as root index")
                    onTriggered: {
                        fileSystemTreeView.rootIndex = fileSystemTreeView.index(treeDelegate.row, 0)
                    }
                }
                Action {
                    text: qsTr("Reset root index")
                    onTriggered: fileSystemTreeView.rootIndex = undefined
                }
            }
        }
通过使用SplitView ,我们可以动态共享StackLayout 和编辑器之间的空间。我们的编辑器包含TextArea ,可显示打开的文件,并为我们提供编辑文本文件所需的所有功能。此外,我们还提供了行号可视化功能,可在菜单中进行开关切换。
            Editor {
                id: editor
                showLineNumbers: root.showLineNumbers
                currentFilePath: root.currentFilePath
                SplitView.fillWidth: true
                SplitView.fillHeight: true
            }
自定义组件
要更好地了解定制过程,请先阅读本文。我们在整个示例中使用了可重复使用的自定义组件。
例如,MyMenu组件自定义了 Menu 的background 属性及其委托的contentItem 和background 属性。
// Copyright (C) 2023 The Qt Company Ltd.
// SPDX-License-Identifier: LicenseRef-Qt-Commercial OR BSD-3-Clause

import QtQuick
import QtQuick.Controls.Basic
import FileSystemModule

Menu {
    id: root

    delegate: MenuItem {
        id: menuItem
        contentItem: Item {
            Text {
                anchors.verticalCenter: parent.verticalCenter
                anchors.left: parent.left
                anchors.leftMargin: 5

                text: menuItem.text
                color: enabled ? Colors.text : Colors.disabledText
            }
            Rectangle {
                id: indicator

                anchors.verticalCenter: parent.verticalCenter
                anchors.right: parent.right
                width: 6
                height: parent.height

                visible: menuItem.highlighted
                color: Colors.color2
            }
        }
        background: Rectangle {
            implicitWidth: 210
            implicitHeight: 35
            color: menuItem.highlighted ? Colors.active : "transparent"
        }
    }
    background: Rectangle {
        implicitWidth: 210
        implicitHeight: 35
        color: Colors.surface2
    }
}
另一个例子是FileSystemView 中ScrollIndicator 的自定义,它还使用了自定义动画。这里我们也覆盖了contentItem 。
        ScrollIndicator.vertical: ScrollIndicator {
            active: true
            implicitWidth: 15

            contentItem: Rectangle {
                implicitWidth: 6
                implicitHeight: 6

                color: Colors.color1
                opacity: fileSystemTreeView.movingVertically ? 0.5 : 0.0

                Behavior on opacity {
                    OpacityAnimator {
                        duration: 500
                    }
                }
            }
        }
Python 版本
如果您对本示例的 Python 版本感兴趣,请点击此处。它展示了Qt for Python 的用法,并演示了如何使用它创建相同的应用程序。
此外,还提供了详细的教程,逐步说明如何用其他功能扩展此示例。如果你想在文件系统资源管理器现有功能的基础上进行更多探索和学习,本教程会对你有所帮助。
© 2025 The Qt Company Ltd. Documentation contributions included herein are the copyrights of their respective owners. The documentation provided herein is licensed under the terms of the GNU Free Documentation License version 1.3 as published by the Free Software Foundation. Qt and respective logos are trademarks of The Qt Company Ltd. in Finland and/or other countries worldwide. All other trademarks are property of their respective owners.

