C
Using Scale Modes
Qt 3D Studio allows you to use the same application on different resolutions and aspect ratios and control how portions of the content adjust to the new sizing. There are four related settings that control this:
- The size set for the presentation controls how large the application renders. Note that the render size might also be effected by the Application Scale Mode setting.
- The Application Scale Mode controls how much of your viewport is covered by the application.
- Layer positioning and sizing controls how layers align and the size of them.
- Camera scaling and anchoring controls how the content adjusts (panning and scaling) as the layer size changes.
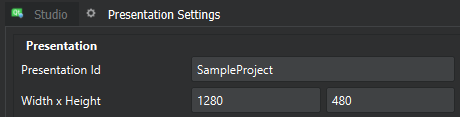
Presentation Size
You can set the presentation size by following the steps below:
- From the file menu select Edit > Presentation Settings
- Enter the desired width and height for the presentation. When editing presentation size you can retain proportions by checking the Constrain Proportions check box.
The effect of setting the size of a presentation in Studio depends on how the presentation is used within the application:
- If the presentation is the main presentation and the Application Scale Mode is set to
center(the default value), then the size of the presentation is the size of the application. No matter how big your viewport or the resolution of your screen are, the presentation size you specify will be the final size. - If the presentation is used as a sub-presentation via an image element, the size you specify is the render size for the presentation. The presentation is rendered at this size and then displayed as an image on the material.
Note: If your presentation size is larger than the final display size of your image, you will spend performance rendering results that only lightly affect the end result. You will get a form of AA on the sub-presentation via the linear interpolation of the final image, but at a non-trivial cost to the graphics performance.
- If the presentation is used as a sub-presentation via a layer, the presentation is always rendered at the size of the layer. If the layer size differs from the presentation size, the camera scaling and anchoring properties for the layers within the presentation control how the content for those layers reacts to the size changes.
Application Scale Mode
The Scale Mode attribute specifies how large the initial presentation is rendered.
Center- the presentation is rendered at the size specified in Studio. Additional content is cropped, additional space is letterboxed. This setting is the default setting.Fit- the aspect ratio of the presentation is preserved, the presentation will scale to fit the viewport, letterboxing as needed.Fill- the presentation is always rendered to fill the viewport both horizontally and vertically, adjusting ascpect ratio if needed.
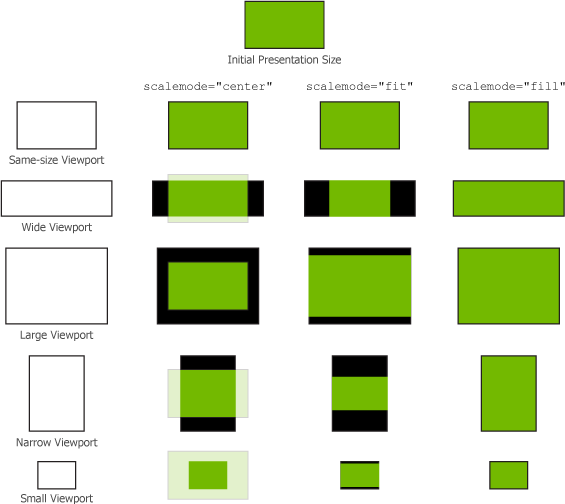
Note: This setting only describes how much space to fill, but not how the content adjusts to fill these dimensions. The results depend on how the layers of the presentation adjust with changing presentation render size, and how cameras within those layers choose which content to display. Read on for these details.
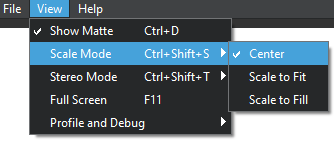
When you view your presentation in the Viewer you can change the Scale Mode either by using shortcut Ctrl + Shift + S to toggle Scale Mode or by selecting View > Scale Mode from the file menu.
Layer Position and Size
A layer on a presentation is a screen-aligned rectangle into which to draw content. By default each layer is set to fill the entire presentation. However, you can set layers to fill only a particular portion of the presentation. You may wish to do this for the visual result (for example if you want a navigation bar that is always 100 pixels high regardless of the presentation size, anchored at the bottom of the screen.). However, even if you don't need the visual effect of cropping, it's a good idea to crop your layers to only minimal content needing to be shown, so that no graphics processing power is wasted rendering empty space.
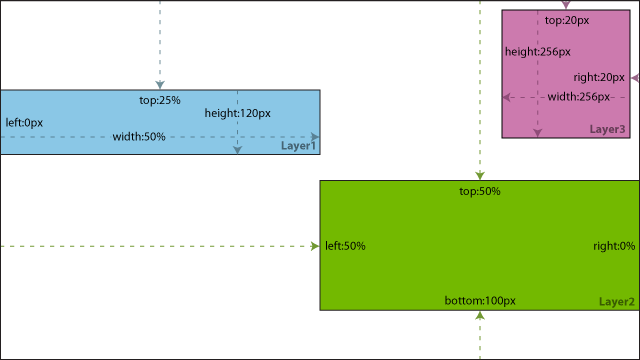
Sizing and positioning of layers is done by adjusting the Horizontal Fields and Vertical Fields properties of the layers. You adjust these properties in the inspector palette once you have selected the desired layer in the timeline palette.
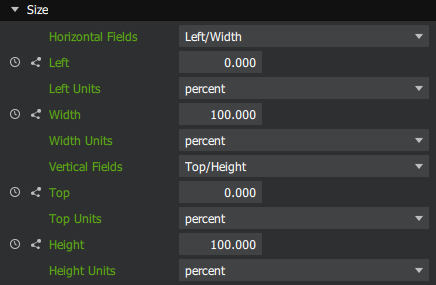
- Horizontal Fields - Choose which two fields of Left, Width, and Right are used to control the horizontal placement and sizing of the layer within the presentation. Each of these values can be set either in pixels or as a percentage of the presentation width.
- Left - The distance between the left edge of the presentation and the left edge of the layer.
- Width - The width of the layer, either in pixels or as a percentage of the presentation width.
- Right - The distance between the right edge of the presentation and the right edge of the layer.
- Vertical Fields - Choose which two fields of Top, Height, and Bottom are used to control the vertical placement and sizing of the layer within the presentation. Each of these values can be set either in pixels or as a percentage of the presentation width.
- Top - The distance between the top edge of the presentation and the top edge of the layer.
- Height - The height of the layer, either in pixels or as a percentage of the presentation height.
- Bottom - The distance between the bottom edge of the presentation and the bottom edge of the layer.
Camera Scaling and Anchoring
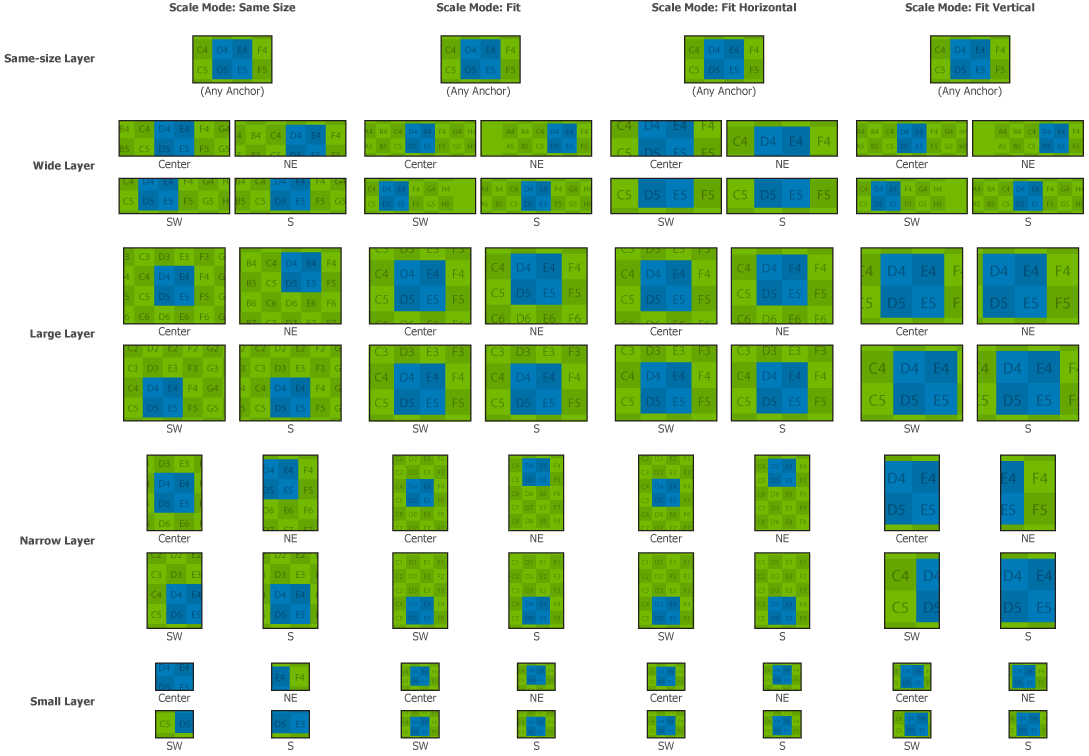
Whenever a layer is not the same size as the presentation size, and the layer is displaying its own content (rendered from a camera in the layer instead of showing a sub-presentation), two properties of its camera control how the content adjusts to fill the new size:
- Scale Mode
- Same Size - render the content seen by the camera at the same size (same number of pixels) as seen when the layer size is the same as the presentation sized authored in Studio. Layers smaller than the original presentation size will cause content to be cropped, while larger layers will cause additional content (beyond the original bounds of the camera) to be shown.
- Fit - render the content seen by the camera (based on the aspect ratio of the presentation) larger or smaller to fit within the layer. When the aspect ratio of the layer is different than the presentation, additional content will be shown either above/below or left/right; the content seen by the camera will never be cropped.
- Fit Horizontal - Same as Fit but will render the content seen by the camera larger or smaller to fit within the layer horizontally.
- Fit Vertical - Same as Fit but will render the content seen by the camera larger or smaller to fit within the layer vertically.
- Scale Anchor - When changes to the layer size cause the camera to render more or less content this property controls which part of the content stays in the same spot relative to the layer. A value of Center causes the center of the camera to always remain in the center of the layer, a value of NW causes the upper left corner of the content seen in Studio to always be at the upper left corner of the layer, a value of N causes the top middle of the content seen in Studio to always be at the top middle edge of the layer, and so forth.
You can adjust these properties in the inspector palette once you have selected the desired camera in the timeline palette.

Available under certain Qt licenses.
Find out more.