Qt State Machine QML 가이드
Qt State Machine QML API는 QML에서 상태 그래프를 생성하고 실행하기 위한 유형을 제공합니다. 이는 하렐의 스테이트차트에 기반한 C++ 스테이트 머신 프레임워크와 유사합니다: 복잡한 시스템을 위한 시각적 형식주의로, UML 상태 다이어그램의 기초이기도 합니다. C++ counterpart 과 마찬가지로 이 프레임워크는 상태 차트 XML(SCXML) 기반의 API 및 실행 모델을 제공하여 상태 차트의 요소와 의미를 QML 애플리케이션에 임베드할 수 있도록 합니다.
애플리케이션의 논리적 상태와 무관하게 여러 시각적 상태가 있는 사용자 인터페이스의 경우 QML 상태 및 전환을 사용하는 것이 좋습니다.
이벤트 기반 상태 머신을 생성하기 위해 프레임워크에서 제공하는 QML 유형 전체 목록은 다음을 참조하세요: Qt State Machine QML Types
QtQuick과 QtQml.StateMachine 임포트 모두 사용하기
경고: QtQuick 와 QtQml. StateMachine 를 하나의 QML 파일에서 모두 가져오려고 하는 경우, QtQml. StateMachine 를 마지막으로 가져와야 합니다. 이렇게 하면 상태 유형이 QtQuick 이 아닌 선언적 상태 머신 프레임워크에서 제공됩니다:
import QtQuick
import QtQml.StateMachine

StateMachine {
    State {
        // okay, is of type QtQml.StateMachine.State
    }
}
또는 QtQml. StateMachine 을 별도의 네임스페이스로 임포트하여 QtQuick 의 State 항목과 모호함을 피할 수 있습니다:
import QtQuick
import QtQml.StateMachine as DSM

DSM.StateMachine {
    DSM.State {
        // ...
    }
}
간단한 상태 머신
상태 머신 API의 핵심 기능을 설명하기 위해 예제를 살펴보겠습니다: s1 , s2, s3 의 세 가지 상태를 가진 상태 머신입니다. 상태 머신은 하나의 버튼으로 제어되며, 버튼을 클릭하면 다른 상태로 전환됩니다. 처음에 상태 머신은 s1 상태에 있습니다. 다음은 예제에서 다양한 상태를 보여주는 상태 차트입니다.
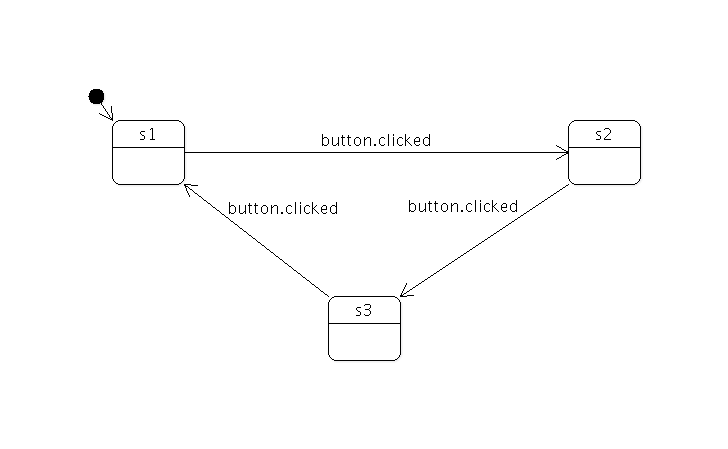
다음 스니펫은 이러한 상태 머신을 만드는 데 필요한 코드를 보여줍니다.
    Button {
        anchors.fill: parent
        id: button

        // change the button label to the active state id
        text: s1.active ? "s1" : s2.active ? "s2" : "s3"
    }

    StateMachine {
        id: stateMachine
        // set the initial state
        initialState: s1

        // start the state machine
        running: true

        State {
            id: s1
            // create a transition from s1 to s2 when the button is clicked
            SignalTransition {
                targetState: s2
                signal: button.clicked
            }
            // do something when the state enters/exits
            onEntered: console.log("s1 entered")
            onExited: console.log("s1 exited")
        }

        State {
            id: s2
            // create a transition from s2 to s3 when the button is clicked
            SignalTransition {
                targetState: s3
                signal: button.clicked
            }
            // do something when the state enters/exits
            onEntered: console.log("s2 entered")
            onExited: console.log("s2 exited")
        }
        State {
            id: s3
            // create a transition from s3 to s1 when the button is clicked
            SignalTransition {
                targetState: s1
                signal: button.clicked
            }
            // do something when the state enters/exits
            onEntered: console.log("s3 entered")
            onExited: console.log("s3 exited")
        }
    }
상태 머신은 애플리케이션의 이벤트 루프의 일부가 되기 위해 비동기적으로 실행됩니다.
완료되는 상태 머신
이전 섹션에서 정의한 상태 머신은 결코 완료되지 않습니다. 상태 머신이 완료되려면 최상위 최종 상태(FinalState 객체)가 있어야 합니다. 상태 머신이 최상위 최종 상태에 들어가면 머신은 finished 신호를 보내고 멈춥니다.
그래프에 최종 상태를 도입하려면 FinalState 객체를 만들어 하나 이상의 트랜지션의 대상으로 사용하면 됩니다.
트랜지션 공유
사용자가 종료 버튼을 클릭하여 언제든지 애플리케이션을 종료할 수 있기를 원한다고 가정해 봅시다. 이를 위해서는 최종 상태를 생성하고 이를 종료 버튼의 클릭() 신호와 연결된 트랜지션의 타깃으로 만들어야 합니다. 각 상태에 대해 트랜지션을 추가할 수도 있지만, 이는 중복되는 것처럼 보이며 향후 추가되는 모든 새 상태에서도 이러한 트랜지션을 추가해야 한다는 점을 기억해야 합니다.
상태 s1, s2 및 s3 를 그룹화하여 동일한 동작(즉, 상태 머신이 어떤 상태인지에 관계없이 종료 버튼을 클릭하면 상태 머신이 종료되는 동작)을 구현할 수 있습니다. 이는 새로운 최상위 상태를 만들고 세 개의 원래 상태를 새 상태의 자식으로 만드는 방식으로 수행됩니다. 다음 다이어그램은 새 상태 머신을 보여줍니다.
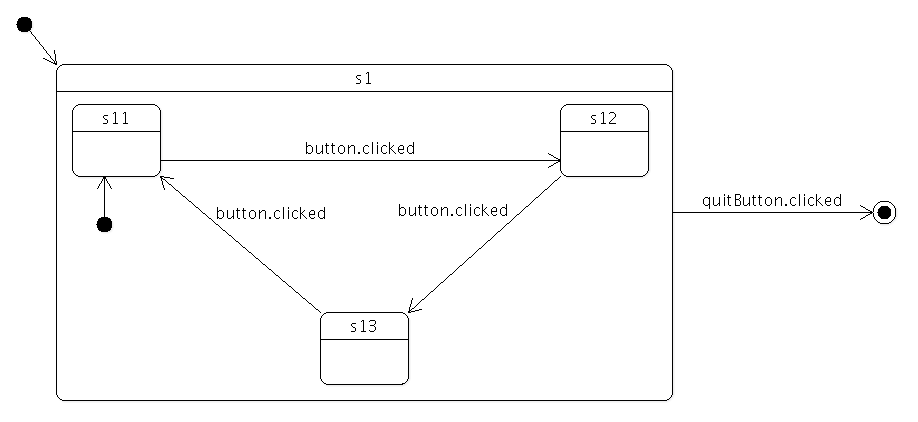
세 개의 원래 상태는 이제 새로운 최상위 상태인 s1 의 자식임을 반영하여 s11, s12 및 s13 로 이름이 변경되었습니다. 자식 상태는 부모 상태의 전환을 암시적으로 상속합니다. 즉, 이제 s1 에서 최종 상태인 s2 으로 단일 전환을 추가하는 것으로 충분합니다. s1 에 추가된 새 상태는 이 전환을 자동으로 상속합니다.
상태를 그룹화하는 데 필요한 것은 상태를 만들 때 적절한 부모를 지정하기만 하면 됩니다. 또한 어떤 자식 상태가 초기 상태(부모 상태가 전환의 대상일 때 상태 머신이 들어가야 하는 자식 상태)인지 지정해야 합니다.
    Row {
        anchors.fill: parent
        spacing: 2
        Button {
            id: button
            // change the button label to the active state id
            text: s11.active ? "s11" : s12.active ? "s12" : "s13"
        }
        Button {
            id: quitButton
            text: "quit"
        }
    }

    StateMachine {
        id: stateMachine
        // set the initial state
        initialState: s1

        // start the state machine
        running: true

        State {
            id: s1
            // set the initial state
            initialState: s11

            // create a transition from s1 to s2 when the button is clicked
            SignalTransition {
                targetState: s2
                signal: quitButton.clicked
            }
            // do something when the state enters/exits
            onEntered: console.log("s1 entered")
            onExited: console.log("s1 exited")
            State {
                id: s11
                // create a transition from s11 to s12 when the button is clicked
                SignalTransition {
                    targetState: s12
                    signal: button.clicked
                }
                // do something when the state enters/exits
                onEntered: console.log("s11 entered")
                onExited: console.log("s11 exited")
            }

            State {
                id: s12
                // create a transition from s12 to s13 when the button is clicked
                SignalTransition {
                    targetState: s13
                    signal: button.clicked
                }
                // do something when the state enters/exits
                onEntered: console.log("s12 entered")
                onExited: console.log("s12 exited")
            }
            State {
                id: s13
                // create a transition from s13 to s11 when the button is clicked
                SignalTransition {
                    targetState: s11
                    signal: button.clicked
                }
                // do something when the state enters/exits
                onEntered: console.log("s13 entered")
                onExited: console.log("s13 exited")
            }
        }
        FinalState {
            id: s2
            onEntered: console.log("s2 entered")
            onExited: console.log("s2 exited")
        }
        onFinished: Qt.quit()
    }
이 경우 상태 머신이 완료되면 애플리케이션이 종료되기를 원하므로 머신의 finished() 신호가 애플리케이션의 quit() 슬롯에 연결됩니다.
자식 상태는 상속된 트랜지션을 재정의할 수 있습니다. 예를 들어, 다음 코드는 상태 머신이 상태( s12)일 때 종료 버튼이 효과적으로 무시되도록 하는 트랜지션을 추가합니다.
            State {
                id: s12
                // create a transition from s12 to s13 when the button is clicked
                SignalTransition {
                    targetState: s13
                    signal: button.clicked
                }

                // ignore Quit button when we are in state 12
                SignalTransition {
                    targetState: s12
                    signal: quitButton.clicked
                }

                // do something when the state enters/exits
                onEntered: console.log("s12 entered")
                onExited: console.log("s12 exited")
            }
트랜지션은 대상 상태가 상태 계층 구조에서 어디에 있든 상관없이 모든 상태를 대상으로 삼을 수 있습니다.
히스토리 상태 사용
이전 섹션에서 설명한 예제에 "인터럽트" 메커니즘을 추가하여 사용자가 버튼을 클릭하여 상태 머신이 관련 없는 작업을 수행하도록 한 후 상태 머신이 이전에 수행하던 작업을 재개(즉, 이 경우 세 가지 상태 중 하나인 이전 상태로 돌아감)할 수 있어야 한다고 상상해 보겠습니다.
이러한 동작은 히스토리 상태를 사용하여 쉽게 모델링할 수 있습니다. 히스토리 상태(HistoryState 개체)는 부모 상태가 마지막으로 종료되기 전에 있었던 자식 상태를 나타내는 의사 상태입니다.
히스토리 상태는 현재 자식 상태를 기록하고자 하는 상태의 자식으로 생성되며, 런타임에 상태 머신이 이러한 상태의 존재를 감지하면 부모 상태가 종료될 때 자동으로 현재 (실제) 자식 상태를 기록합니다. 히스토리 상태로의 전환은 사실 상태 머신이 이전에 저장했던 자식 상태로의 전환이며, 상태 머신은 자동으로 실제 자식 상태로 전환을 '전달'합니다.
다음 다이어그램은 인터럽트 메커니즘이 추가된 후의 상태 머신을 보여줍니다.

다음 코드는 이를 구현하는 방법을 보여줍니다. 이 예에서는 s3 을 입력하면 메시지 상자를 표시한 다음 히스토리 상태를 통해 즉시 이전 하위 상태인 s1 으로 돌아갑니다.
    Row {
        anchors.fill: parent
        spacing: 2
        Button {
            id: button
            // change the button label to the active state id
            text: s11.active ? "s11" : s12.active ? "s12" :  s13.active ? "s13" : "s3"
        }
        Button {
            id: interruptButton
            text: s1.active ? "Interrupt" : "Resume"
        }
        Button {
            id: quitButton
            text: "quit"
        }
    }

    StateMachine {
        id: stateMachine
        // set the initial state
        initialState: s1

        // start the state machine
        running: true

        State {
            id: s1
            // set the initial state
            initialState: s11

            // create a transition from s1 to s2 when the button is clicked
            SignalTransition {
                targetState: s2
                signal: quitButton.clicked
            }
            // do something when the state enters/exits
            onEntered: console.log("s1 entered")
            onExited: console.log("s1 exited")
            State {
                id: s11
                // create a transition from s1 to s2 when the button is clicked
                SignalTransition {
                    targetState: s12
                    signal: button.clicked
                }
                // do something when the state enters/exits
                onEntered: console.log("s11 entered")
                onExited: console.log("s11 exited")
            }

            State {
                id: s12
                // create a transition from s2 to s3 when the button is clicked
                SignalTransition {
                    targetState: s13
                    signal: button.clicked
                }
                // do something when the state enters/exits
                onEntered: console.log("s12 entered")
                onExited: console.log("s12 exited")
            }
            State {
                id: s13
                // create a transition from s3 to s1 when the button is clicked
                SignalTransition {
                    targetState: s1
                    signal: button.clicked
                }
                // do something when the state enters/exits
                onEntered: console.log("s13 entered")
                onExited: console.log("s13 exited")
            }

            // create a transition from s1 to s3 when the button is clicked
            SignalTransition {
                targetState: s3
                signal: interruptButton.clicked
            }
            HistoryState {
                id: s1h
            }
        }
        FinalState {
            id: s2
            onEntered: console.log("s2 entered")
            onExited: console.log("s2 exited")
        }
        State {
            id: s3
            SignalTransition {
                targetState: s1h
                signal: interruptButton.clicked
            }
            // do something when the state enters/exits
            onEntered: console.log("s3 entered")
            onExited: console.log("s3 exited")
        }
        onFinished: Qt.quit()
    }
병렬 상태 사용
자동차의 상호 배타적인 속성 집합을 단일 상태 머신에서 모델링하고 싶다고 가정해 보겠습니다. 우리가 관심 있는 속성이 깨끗함 대 더럽음, 움직임 대 움직이지 않음이라고 가정해 봅시다. 다음 상태 차트에 표시된 것처럼 상태를 표현하고 가능한 모든 조합 사이를 자유롭게 이동하려면 4개의 상호 배타적인 상태와 8개의 전환이 필요합니다.
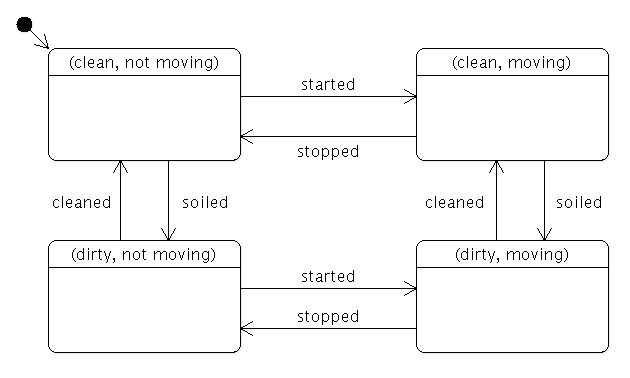
세 번째 속성(예: 빨간색 대 파란색)을 추가하면 총 상태 수가 8개로 두 배가 되고, 네 번째 속성(예: 밀폐형 대 전환형)을 추가하면 총 상태 수가 다시 두 배가 되어 16개가 됩니다.
이러한 기하급수적인 증가는 병렬 상태를 사용하여 줄일 수 있으므로 속성을 추가할 때마다 상태와 전환의 수를 선형적으로 늘릴 수 있습니다. 또한 병렬 상태는 형제 상태에 영향을 주지 않고 상태를 추가하거나 제거할 수 있습니다. 다음 상태 차트는 자동차 예제에 대한 다양한 병렬 상태를 보여줍니다.
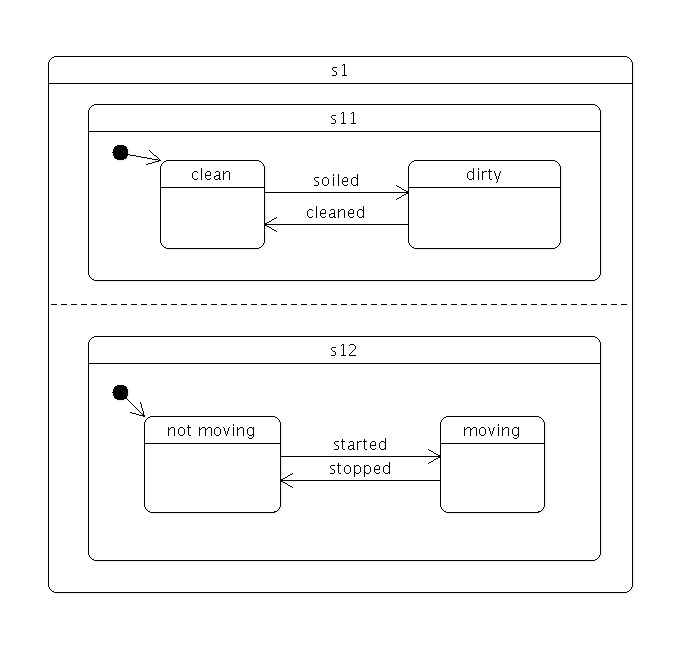
병렬 상태 그룹을 만들려면 childMode를 QState.ParallelStates로 설정합니다.
병렬 상태 그룹을 입력하면 모든 하위 상태가 동시에 입력됩니다. 개별 하위 상태 내의 전환은 정상적으로 작동합니다. 그러나 자식 상태 중 하나라도 부모 상태를 종료하는 전환을 수행할 수 있습니다. 이 경우 부모 상태와 모든 자식 상태가 종료됩니다.
스테이트 머신 프레임워크의 병렬성은 인터리브 시맨틱을 따릅니다. 모든 병렬 연산은 이벤트 처리의 단일 원자적 단계에서 실행되므로 어떤 이벤트도 병렬 연산을 중단시킬 수 없습니다. 그러나 머신 자체는 단일 스레드이므로 이벤트는 여전히 순차적으로 처리됩니다. 예를 들어, 동일한 병렬 상태 그룹을 종료하는 두 개의 트랜지션이 있고 그 조건이 동시에 참이 되는 상황을 생각해 보겠습니다. 이 경우 두 이벤트 중 마지막에 처리되는 이벤트는 아무런 영향을 미치지 않습니다.
복합 상태 종료하기
자식 상태는 최종 상태( FinalState 객체)일 수 있으며, 최종 자식 상태가 입력되면 부모 상태는 State::finished 신호를 방출합니다. 다음 다이어그램은 최종 상태로 들어가기 전에 몇 가지 처리를 수행하는 복합 상태 s1 를 보여줍니다:
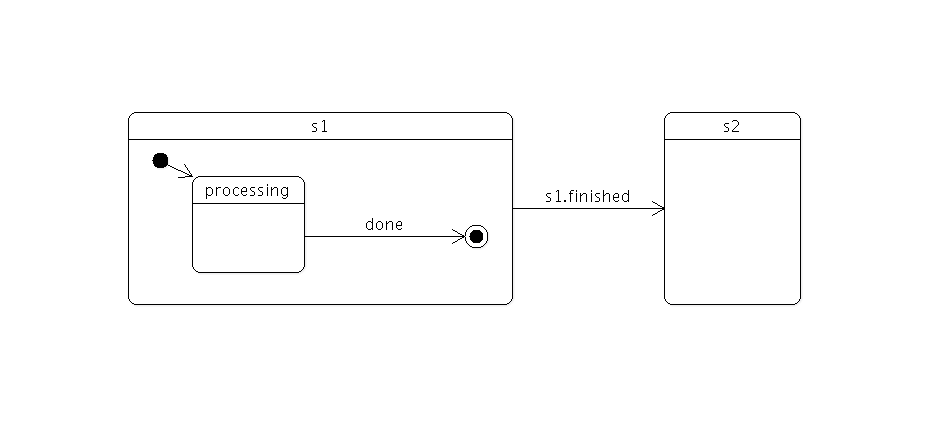
s1 의 최종 상태가 입력되면 s1 은 자동으로 finished 을 방출합니다. 이 이벤트가 상태 변경을 트리거하도록 하기 위해 신호 전환을 사용합니다:
State {
    id: s1
    SignalTransition {
        targetState: s2
        signal: s1.finished
    }
}
복합 상태에서 최종 상태를 사용하면 복합 상태의 내부 세부 정보를 숨기고 싶을 때 유용합니다. 외부에서는 내부 세부 정보를 알 필요 없이 스테이트에 들어가서 스테이트가 작업을 완료하면 알림을 받을 수 있어야 합니다. 이는 복잡한(깊게 중첩된) 상태 머신을 구축할 때 매우 강력한 추상화 및 캡슐화 메커니즘입니다. (위의 예에서는 물론 s1 의 finished() 신호에 의존하지 않고 s1 의 done 상태에서 직접 전환을 만들 수 있지만, 결과적으로 s1 의 구현 세부 사항이 노출되고 의존하게 됩니다.)
병렬 상태 그룹의 경우 모든 하위 상태가 최종 상태에 진입하면 State::finished 신호가 전송됩니다.
타깃 없는 전환
전환에는 목표 상태가 필요하지 않습니다. 타깃이 없는 전환은 다른 전환과 동일한 방식으로 트리거할 수 있지만, 다른 점은 상태 변경을 일으키지 않는다는 것입니다. 이를 통해 머신이 특정 상태에 있을 때 해당 상태를 벗어나지 않고도 신호나 이벤트에 반응할 수 있습니다. 예를 들어
Button {
    id: button
    text: "button"
    StateMachine {
        id: stateMachine
        initialState: s1
        running: true
        State {
            id: s1
            SignalTransition {
                signal: button.clicked
                onTriggered: console.log("button pressed")
            }
        }
    }
}
버튼을 클릭할 때마다 "버튼이 눌림" 메시지가 표시되지만 상태 머신은 현재 상태(s1)로 유지됩니다. 대상 상태가 명시적으로 s1로 설정되어 있으면 매번 s1이 종료되었다가 다시 입력됩니다( QAbstractState::entered 및 QAbstractState::exited 신호가 방출됨).
관련 정보
© 2025 The Qt Company Ltd. Documentation contributions included herein are the copyrights of their respective owners. The documentation provided herein is licensed under the terms of the GNU Free Documentation License version 1.3 as published by the Free Software Foundation. Qt and respective logos are trademarks of The Qt Company Ltd. in Finland and/or other countries worldwide. All other trademarks are property of their respective owners.

