그래프 인쇄
2D 또는 3D 그래프 인쇄하기.
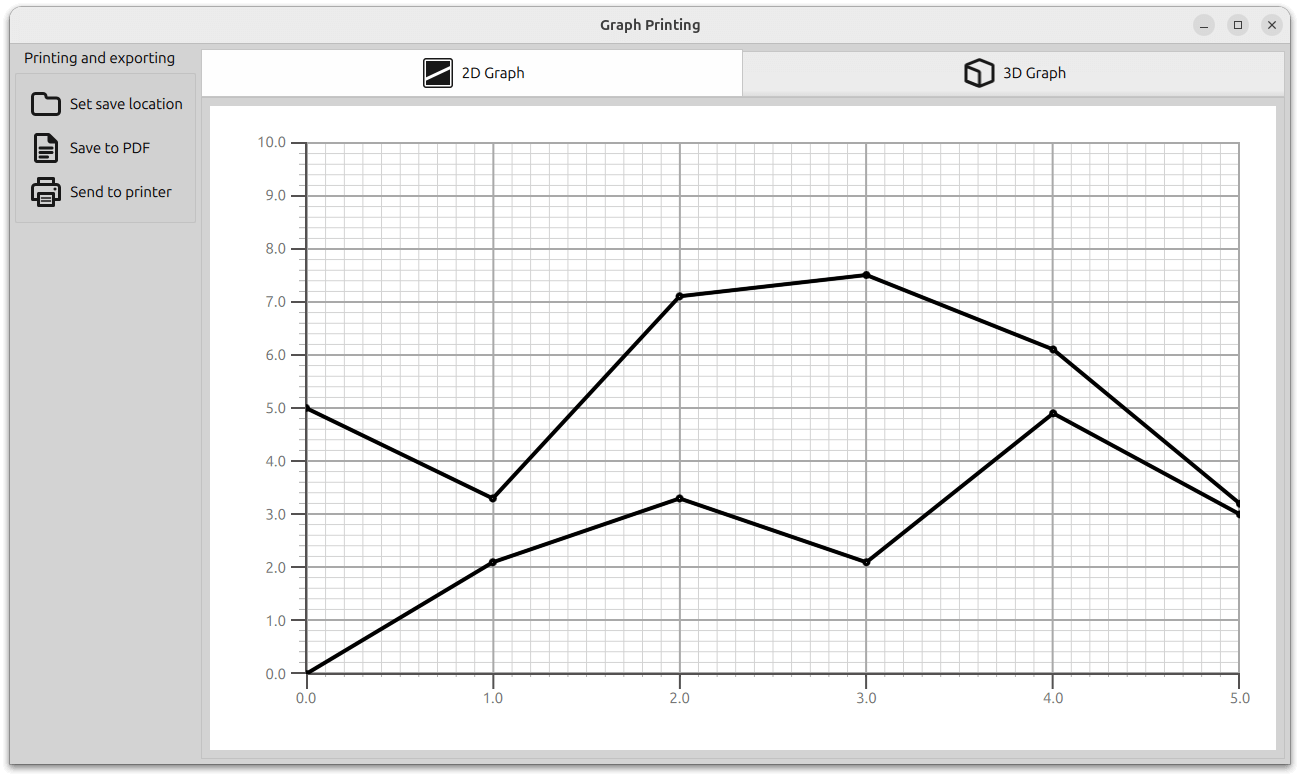
그래프 인쇄 예제에서는 2D 및 3D 그래프를 인쇄하거나 PDF로 내보내는 방법을 보여 줍니다.

예제 실행하기
에서 예제를 실행하려면 Qt Creator에서 Welcome 모드를 열고 Examples 에서 예제를 선택합니다. 자세한 내용은 Qt Creator: 자습서를 참조하세요 : 빌드 및 실행을 참조하세요.
GraphPrinter 클래스
인쇄 기능은 GraphPrinter 클래스에서 구현됩니다. 이 클래스는 이러한 함수를 노출합니다:
generatePDF함수는 다음과 같이 작동합니다.- 출력 PDF 파일을 설정합니다.
이 함수는 지정된 폴더를 가리키는 "graph.pdf" 파일로 QPdfWriter 을 인스턴스화합니다. 또한 이 함수는 내보낸 PDF 파일의 옵션( 제목, 해상도, 페이지 크기 및 여백)을 지정합니다.
const QFile file = QFile(path.toLocalFile() + QStringLiteral("/graph.pdf"));

QPdfWriter writer(file.fileName());
writer.setResolution(90);
writer.setTitle("Graph");
writer.setPageSize(QPageSize(image.size()));
writer.setPageMargins(QMarginsF(0, 0, 0, 0));
writer.newPage();
- 이미지 처리를 설정합니다.
이 함수는 이전에 만든 QPdfWriter 을 참조하는 QPainter 을 만듭니다.
그래프가 올바르게 인쇄되도록 하기 위해 원래 가로 세로 비율로 페인터의 뷰포트 크기에 맞게 스케일링됩니다.
페인터의 렌더링 힌트는 무손실 이미지 렌더링으로 설정됩니다. 그런 다음 이 함수는 이미지를 PDF 파일로 그립니다.
이 함수는 내보낸 파일의 전체 경로를 포함하여 애플리케이션의 메시지 대화 상자에 표시할 상태 메시지를 반환합니다.
- 출력 PDF 파일을 설정합니다.
getPrinters함수는 사용 가능한 프린터 목록을 반환합니다.QStringList GraphPrinter::getPrinters() { return QPrinterInfo::availablePrinterNames(); }
print함수는generatePDF함수와 비슷하게 작동하지만 Q프린터 인스턴스를 참조하는 QPainter 를 생성합니다:QString GraphPrinter::print(const QImage &image, const QString printerName) { QPrinterInfo printInfo = QPrinterInfo::printerInfo(printerName); if (printInfo.isNull()) return QLatin1String("%1 is not a valid printer").arg(printerName); QPrinter printer(printInfo, QPrinter::HighResolution); printer.setOutputFormat(QPrinter::NativeFormat); QPainter painter(&printer); const QImage finalImage = image.scaled(painter.viewport().size(), Qt::KeepAspectRatio); painter.setRenderHint(QPainter::LosslessImageRendering); painter.drawImage(finalImage.rect(), finalImage); return QLatin1String("Printed to %1").arg(printerName); }
이 함수는 애플리케이션의 메시지 대화 상자에 표시할 상태 메시지를 반환합니다.
애플리케이션 설정
애플리케이션 설정 코드 외에도 main.cpp 파일에는 GraphPrinter 클래스의 새 인스턴스를 생성하고 QML 코드에서 접근할 수 있도록 하는 코드가 포함되어 있습니다.
GraphPrinter graphPrinter;
viewer.rootContext()->setContextProperty("graphPrinter", &graphPrinter);
레이아웃 및 이미지 캡처 설정하기
2D 및 3D 그래프는 스택 레이아웃에 배치됩니다. 사용자는 탭바를 사용하여 탐색할 수 있습니다.
TabBar {
    id: tabBar
    anchors.left: parent.left
    anchors.right: parent.right

    TabButton {
        text: "2D Graph"
        implicitHeight: 48
        icon.source: checked ? "flatten_square_fill.svg" : "flatten.svg"
        icon.height: 36
        icon.width: 36
    }

    TabButton {
        text: "3D Graph"
        implicitHeight: 48
        icon.source: checked ? "box_left_fill.svg" : "box_left.svg"
        icon.height: 36
        icon.width: 36
    }
}
Frame {
    id: tabFrame
    anchors.left: parent.left
    anchors.right: parent.right
    anchors.top: tabBar.bottom
    anchors.bottom: parent.bottom

    StackLayout {
        id: stackLayout

        anchors.fill: parent
        currentIndex: tabBar.currentIndex

        Graph2D {
            id: linegraph
        }

        Graph3D {
            id: bargraph
        }
    }
}
폴더 다이얼로그 컴포넌트는 내보낸 파일을 저장할 폴더를 선택하는 데 사용됩니다. 이 컴포넌트는 애플리케이션 레이아웃에 시각적으로 표시되지 않지만 현재 QML 파일에서 해당 API에 액세스할 수 있습니다.
버튼은 폴더 대화 상자를 호출합니다.
FolderDialog {
    id: dialog
    property bool folderset: false
    onAccepted: {
        folderset = true
        message.title = "Folder Set"
        message.text = "Folder set to " + selectedFolder.toString().replace(/^(file:\/{3})/, "")
        message.open()
    }
}
...
Button {
    id: setFolderButton
    ...
    onClicked: dialog.open()
}
프린터 선택을 위한 사용자 지정 인쇄 대화 상자가 생성되며 버튼으로 트리거됩니다. 대화 상자에서 사용 가능한 프린터 목록을 검색하여 목록 보기에 표시합니다.
Dialog {
    id: printerDialog
    anchors.centerIn: parent
    contentHeight: printerListView.height
    contentWidth: printerListView.width

    title: qsTr("Available Printers")
    modal: true

    onOpened: {
        printerModel.clear()
        var printers = graphPrinter.getPrinters()
        printers.forEach((x, i) => printerModel.append({
                                                           "name": x
                                                       }))
    }
...
contentItem: Rectangle {
    id: printerItem
    height: printerListView.height
    width: printerListView.width
    color: mainView.item.theme.plotAreaBackgroundColor

    ListView {
        id: printerListView
        height: 100
        width: 200
        clip: true

        model: printerModel
        delegate: printerDelegate
        highlight: Rectangle {
            color: mainView.item.theme.grid.subColor
        }
    }
}
폴더가 이미 선택되어 있는 경우 버튼을 누르면 PDF 내보내기가 트리거됩니다.
PDF 내보내기 또는 인쇄가 트리거되면 다음 코드가 실행됩니다:
grabToImage메서드를 사용하여 이미지를 캡처합니다. 현재 그래프는 현재 인덱스에 있는 스택 레이아웃의 항목입니다.grabToImage매개변수에서 콜백을GraphPrinter클래스의generatePDF또는print함수로 지정합니다.PDF 내보내기:
onPressed: {
    if (!dialog.folderset) {
        message.title = "No Folder Set"
        message.text = "Please select folder first"
        message.open()
    } else {
        mainView.prepareForPrint()
        mainView.item.grabToImage(function (result) {
            message.title = "Save PDF"
            message.text = "PDF saved to " + graphPrinter.generatePDF(
                        dialog.currentFolder, result.image)
            message.open()
        }, mainView.outputsize)
    }
}

onReleased: {
    mainView.cleanAfterPrint()
}
Print:
onAccepted: {
    var selectedPrinter = printerModel.get(printerListView.currentIndex)
    mainView.prepareForPrint()
    mainView.item.grabToImage(function (result) {
        message.title = "Print"
        message.text = graphPrinter.print(result.image,
                                          selectedPrinter.name)
        message.open()
    }, mainView.outputsize)
}

onClosed: {
    mainView.cleanAfterPrint()
}
크기: 이 코드는 이미지가 실제 해상도의 4배로 렌더링되도록 합니다. 3D 그래프의 경우 인쇄하는 동안 항목을 확장해야 합니다:
function prepareForPrint() {
    if (stackLayout.currentIndex === 1) {
        var newsize = Qt.size(bargraph.width * 4, bargraph.height * 4)

        // check that we do not exceed maximum texture size
        if (newsize.width * Screen.devicePixelRatio > graphPrinter.maxTextureSize() ) {
            // scale to 25% under max texture size to be on the safe side; some GPUs seem
            // to glitch when using the abosulute max
            var ratio = (newsize.width * Screen.devicePixelRatio * 1.25)
                    / graphPrinter.maxTextureSize()
            newsize.width /= ratio
            newsize.height /= ratio
        }
        outputsize.width = Math.round(newsize.width)
        outputsize.height = Math.round(newsize.height)

        // resize the bar graph to match the PDF output size
        item.width = outputsize.width
        item.height = outputsize.height
    } else {
        outputsize = Qt.size(linegraph.width * 4, linegraph.height * 4)
    }
}

function cleanAfterPrint() {
    if (stackLayout.currentIndex === 1) {
        // resize the bar graph back to the actual visual size
        item.width = stackLayout.width
        item.height = stackLayout.height
    }
}
© 2025 The Qt Company Ltd. Documentation contributions included herein are the copyrights of their respective owners. The documentation provided herein is licensed under the terms of the GNU Free Documentation License version 1.3 as published by the Free Software Foundation. Qt and respective logos are trademarks of The Qt Company Ltd. in Finland and/or other countries worldwide. All other trademarks are property of their respective owners.

