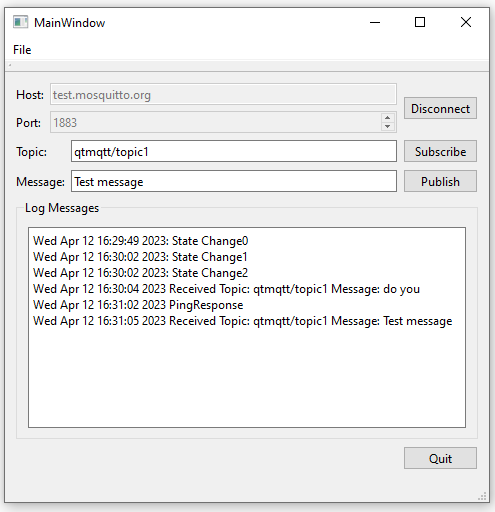
간단한 MQTT 클라이언트
최소한의 원격 분석 애플리케이션 만들기.

간단한 MQTT 클라이언트는 최소한의 클라이언트 애플리케이션을 만드는 방법을 보여줍니다.
애플리케이션을 사용하려면 먼저 호스트, 포트, 보안 켜기/끄기, 웹소켓 켜기/끄기 및 프로토콜을 지정합니다. 그런 다음 연결을 클릭합니다. 그 후에 토픽을 구독하고 메시지를 보낼 수 있으며, 수신도 할 수 있습니다. 애플리케이션을 두 번 실행할 수도 있습니다. 한 쪽에서는 게시를, 다른 쪽에서는 구독을 실행하면 메시지가 전송됩니다.
심플클라이언트 옵션
- 호스트 - test.mosquitto.org 또는 broker.hivemq.com을 사용할 수 있습니다.
- 포트 - 연결할 포트, WebSockets 선택 및 보안 선택에 따라 달라집니다.
- 웹 소켓 - 선택(활성화) 또는 선택하지 않음(비활성화)을 지정할 수 있습니다.
- 보안 - 선택(활성화) 또는 선택되지 않음(비활성화)을 지정할 수 있습니다.
- 프로토콜 - 다음을 지정할 수 있습니다.
- mqtt 3.1
- mqtt 3.1.1
- mqtt 5.0
- 토픽 - 게시하거나 구독할 토픽입니다.
- 메시지 - 게시하는 경우 주제에 대해 보낼 메시지입니다.
연결 설정
이 조합은 일반적인 조합이며 test.mosquitto.org와 함께 작동합니다. broker.hivemq.com의 경우 링크에서 정보를 확인하세요. 보안을 사용 설정한 경우 컴퓨터에 인증서를 설치해야 할 수도 있습니다. 또한 코드에서 mqtt 클라이언트에 인증서를 추가해야 할 수도 있습니다.
- 포트 1883, 보안=사용 안 함, 웹소켓=사용 안 함 - mqtt over tcp
- 포트 8883, 보안=사용됨, 웹 소켓=사용 안 함 - mqtt over ssl
- 포트 8080, 보안=사용 안 함, 웹 소켓=사용 - 웹 소켓을 통한 mqtt
- 포트 8081, 보안=사용됨, 웹 소켓=사용됨 - 보안 웹 소켓을 통한 mqtt
브로커에 대한 자세한 내용은 다음을 참조하세요:
참고: 포트 번호 1883 및 8080은 암호화되지 않으므로 개발 및 테스트 목적으로만 적합합니다. 프로덕션 환경에서는 항상 암호화된 연결을 사용하세요.
참고: 웹어셈블리는 웹소켓이 활성화된 경우에만 지원합니다.
클라이언트 만들기
먼저 QMqttClient 클래스를 사용하여 MQTT 클라이언트를 만듭니다. 이 클래스는 연결할 브로커 호스트 이름과 포트뿐만 아니라 고유한 클라이언트 ID를 설정하기 위한 속성을 제공합니다:
    m_client = new QMqttClient(this);
    m_client->setHostname(ui->lineEditHost->text());
    m_client->setPort(static_cast<quint16>(ui->spinBoxPort->value()));
클라이언트 ID는 설정하지 않으므로 자동으로 생성됩니다.
다음으로 QMqttClient::messageReceived()에 연결하여 브로커로 전송되는 모든 메시지를 수신합니다:
    connect(m_client, &QMqttClient::messageReceived, this, [this](const QByteArray &message, const QMqttTopicName &topic) {
        const QString content = QDateTime::currentDateTime().toString()
                    + " Received Topic: "_L1
                    + topic.name()
                    + " Message: "_L1
                    + message
                    + u'\n';
        ui->editLog->insertPlainText(content);
    });
사용자가 클라이언트에서 토픽을 구독하면 지정된 토픽에 대해 QMqttClient::subscribe()를 호출합니다:
void MainWindow::on_buttonSubscribe_clicked()
{
    auto subscription = m_client->subscribe(ui->lineEditTopic->text());
    if (!subscription) {
        QMessageBox::critical(this, u"Error"_s,
                              u"Could not subscribe. Is there a valid connection?"_s);
        return;
    }
이 예에서는 모든 토픽을 구독합니다. 특정 토픽에 대한 메시지를 수신하는 방법에 대한 자세한 내용은 MQTT 구독 예시를 참조하세요.
Qt Quick 애플리케이션에서 QMqttClient 클래스를 사용하는 방법에 대한 예는 Qt Quick 구독을 참조하세요.
파일:
© 2025 The Qt Company Ltd. Documentation contributions included herein are the copyrights of their respective owners. The documentation provided herein is licensed under the terms of the GNU Free Documentation License version 1.3 as published by the Free Software Foundation. Qt and respective logos are trademarks of The Qt Company Ltd. in Finland and/or other countries worldwide. All other trademarks are property of their respective owners.

