
QML 비디오 레코더
Qt Quick 를 사용하여 오디오 및 비디오 녹화하기.
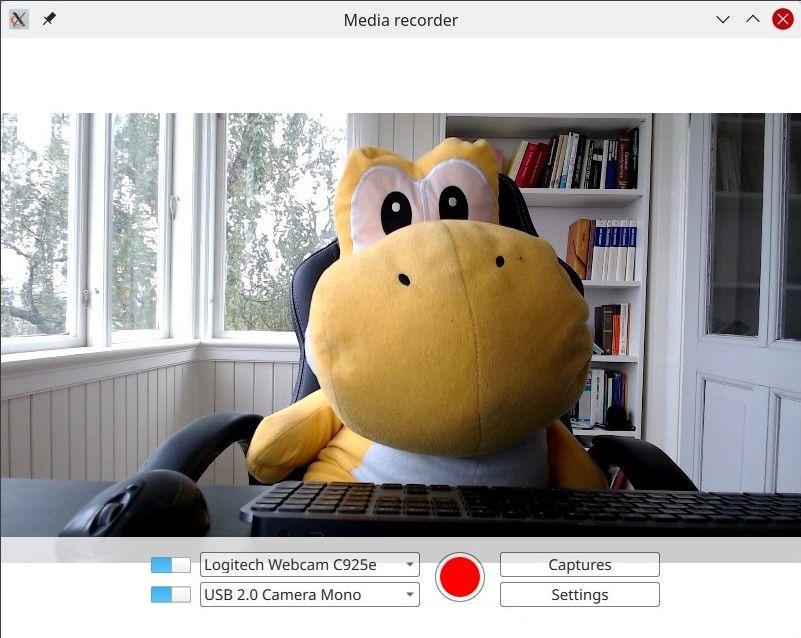
QML 레코더는 마이크, 카메라 또는 화면 캡처를 사용하여 오디오와 비디오를 개별적으로 또는 함께 녹화할 수 있는 간단한 애플리케이션을 보여줍니다.
예제 실행
다음 경로에서 예제를 실행할 수 있습니다.
- Qt Creator
Welcome 모드를 열고 Examples 에서 예제를 선택합니다. 자세한 내용은 Qt Creator: 튜토리얼: 빌드 및 실행을 참조하십시오.
- Qt Extension for Visual Studio Code
Command Palette 에서 Qt: Open Qt examples 명령을 실행하고 목록에서 예제를 선택합니다. 자세한 내용은 Qt Extension for Visual Studio Code: 튜토리얼: 빌드 및 실행을 참조하십시오.
개요
본질적으로 이 예제는 QML 애플리케이션입니다. ‘ Qt Quick 애플리케이션 시작하기’를 참조하십시오. 이 문서는 이 예제에서 Qt Multimedia QML Types를 사용하는 방법에 중점을 둡니다.
이 예제는 CaptureSession 에 연결된 QML Camera 및 AudioInput 유형을 사용합니다. 그런 다음 MediaRecorder 객체를 사용하여 캡처된 오디오와 비디오를 기록합니다.
QtMultimedia 외에도, 그래픽 사용자 인터페이스와 기능을 구현하기 위해 Qt Quick 의 Windows, Controls 및 Layouts 기능이 사용됩니다. 재생에 관한 내용은 여기에서 다루지 않으며, 이에 대해서는 QML 미디어 플레이어 예제를 참조하십시오.
이 예제는 다음 내용을 보여줍니다:
- 입력 장치를 선택할 수 있습니다.
- 입력 유형을 비활성화할 수 있습니다.
- 화질, 코덱 선택, 파일 형식, 메타데이터 할당과 같은 캡처 설정.
- 캡처된 파일을 저장하고 재생할 수 있습니다.
녹화
이 애플리케이션은 녹화 기능을 구현합니다.
captureSession
Main.qml 에서 captureSession 는 다음과 같이 선언됩니다:
    CaptureSession {
        id: captureSession
        recorder: recorder
        audioInput: controls.audioInput
        camera: controls.camera
        screenCapture: controls.screenCapture
        windowCapture: controls.windowCapture
        videoOutput: videoOutput
    }
recorder
Main.qml 에서 MediaRecorder recorder 는 미디어 녹화를 처리할 뿐만 아니라 파일의 썸네일을 캡처하여 ListModel mediaList 에 추가합니다.
    MediaRecorder {
        id: recorder
        onRecorderStateChanged:
            (state) => {
                if (state === MediaRecorder.StoppedState) {
                    root.contentOrientation = Qt.PrimaryOrientation
                    mediaList.append()
                } else if (state === MediaRecorder.RecordingState && captureSession.camera) {
                    // lock orientation while recording and create a preview image
                    root.contentOrientation = Screen.orientation;
                    videoOutput.grabToImage(function(res) { mediaList.mediaThumbnail = res.url })
                }
            }
        onActualLocationChanged: (url) => { mediaList.mediaUrl = url }
        onErrorOccurred: { recorderErrorText.text = recorder.errorString; recorderError.open(); }
    }
mediaList Frame 에서 선언됩니다 mediaListFrame
    Frame {
        id: mediaListFrame
        height: 150
        width: parent.width
        anchors.bottom: controlsFrame.top
        x: controls.capturesVisible ? 0 : parent.width
        background: Rectangle {
            anchors.fill: parent
            color: palette.base
            opacity: 0.8
        }

        Behavior on x { NumberAnimation { duration: 200 } }

        MediaList {
            id: mediaList
            anchors.fill: parent
            playback: playback
컨트롤
이들은 Controls.qml 에 정의되어 있으며 Main.qml에 선언되어 있습니다.
그 루트는 Row 이며, 여기에는 Columns inputControls , recordButton, optionButtons 가 포함되어 있으며, 각각은 별도의 .qml 파일에 정의되어 있습니다.
비디오 소스 선택
VideoSourceSelect.qml 에 정의된 VideoSourceSlect 는 Switch 와 ComboBox 로 구성되어 있으며, 사용자가 사용 가능한 카메라 중에서 선택할 수 있게 해줍니다.
Row {
    id: root
    height: Style.height
    property Camera selectedCamera: cameraAvailable ? camera : null
    property ScreenCapture selectedScreenCapture: screenAvailable ? screenCapture : null
    property WindowCapture selectedWindowCapture: windowAvailable ? windowCapture : null

    property bool sourceAvailable: typeof comboBox.currentValue !== 'undefined' &&
                                   comboBox.currentValue.type !== 'toggler' &&
                                   videoSourceSwitch.checked

    property bool cameraAvailable: sourceAvailable && comboBox.currentValue.type === 'camera'
    property bool screenAvailable: sourceAvailable && comboBox.currentValue.type === 'screen'
    property bool windowAvailable: sourceAvailable && comboBox.currentValue.type === 'window'

    Component.onCompleted: {
        videoSourceModel.populate()

        for (var i = 0; i < videoSourceModel.count; i++) {
            if (videoSourceModel.get(i).value.type !== 'toggler') {
                comboBox.currentIndex = i
                break
            }
        }
    }

    Camera {
        id: camera
        active:
            root.cameraAvailable
            && PermissionHelper.cameraStatus === Qt.PermissionStatus.Granted
    }

    ScreenCapture {
        id: screenCapture
        active: root.screenAvailable
    }

    WindowCapture {
        id: windowCapture
        active: root.windowAvailable
    }

    MediaDevices { id: mediaDevices
        onVideoInputsChanged: {

            videoSourceModel.populate()

            for (var i = 0; i < videoSourceModel.count; i++) {
                if (videoSourceModel.get(i).value.type !== 'toggler') {
                    comboBox.currentIndex = i
                    break
                }
            }
        }
    }

    Switch {
        id: videoSourceSwitch
        anchors.verticalCenter: parent.verticalCenter
        checked: true
    }

    ListModel {
        id: videoSourceModel
        property var enabledSources: {
            'camera': true,
            'screen': true,
            'window': false
        }

        function toggleEnabledSource(type) {
            enabledSources[type] = !enabledSources[type]
            populate()
        }

        function appendItem(text, value) {
            append({ text: text, value: value})
        }

        function appendToggler(name, sourceType) {
            appendItem((enabledSources[sourceType] ? "- Hide " : "+ Show ") + name,
                       { type: 'toggler', 'sourceType': sourceType })
        }

        function populate() {
            clear()

            appendToggler('Cameras', 'camera')
            if (enabledSources['camera'])
                for (var camera of mediaDevices.videoInputs)
                    appendItem(camera.description, { type: 'camera', camera: camera })

            appendToggler('Screens', 'screen')
            if (enabledSources['screen'])
                for (var screen of Application.screens)
                    appendItem(screen.name, { type: 'screen', screen: screen })

            appendToggler('Windows', 'window')
            if (enabledSources['window'])
                for (var window of windowCapture.capturableWindows())
                    appendItem(window.description, { type: 'window', window: window })
        }
}comboBox, 위 코드 조각에서 선언된 이 메서드는 현재 비디오 소스를 할당합니다.
    ComboBox {
        id: comboBox
        width: Style.widthLong
        height: Style.height
        background: StyleRectangle { anchors.fill: parent }
        model: videoSourceModel
        displayText: typeof currentValue === 'undefined' ||
                     currentValue.type === 'toggler' ? "Unavailable" : currentText
        font.pointSize: Style.fontSize
        textRole: "text"
        valueRole: "value"
        onCurrentValueChanged: {
            if (typeof currentValue === 'undefined')
                return
            if (currentValue.type === 'screen')
                screenCapture.screen = currentValue.screen
            else if (currentValue.type === 'camera')
                camera.cameraDevice = currentValue.camera
오디오 입력 선택
비디오 소스 선택과 동일한 방식으로 구현되며, AudioInputSelect.qml 에 다음과 같이 정의되어 있습니다:
Row {
    id: root
    height: Style.height
    property AudioInput selected: available ? audioInput : null
    property bool available: (typeof comboBox.currentValue !== 'undefined') && audioSwitch.checked

    Component.onCompleted: {
        audioInputModel.populate()
        comboBox.currentIndex = 0
    }

    MediaDevices { id: mediaDevices }

    AudioInput { id: audioInput; muted: !audioSwitch.checked }

    Switch {
        id: audioSwitch;
        height: Style.height;
        checked: true
    }

    ListModel {
        id: audioInputModel
        property var audioInputs: mediaDevices.audioInputs

        function populate() {
            audioInputModel.clear()

            for (var audioDevice of audioInputs)
                audioInputModel.append({ text: audioDevice.description, value:
                                        { type: 'audioDevice', audioDevice: audioDevice } })
        }
    }
    ComboBox {
        id: comboBox
        width: Style.widthLong
        height: Style.height
        background: StyleRectangle { anchors.fill: parent }
        model: audioInputModel
        textRole: "text"
        font.pointSize: Style.fontSize
        displayText: typeof currentValue === 'undefined' ? "unavailable" : currentText
valueRole: "value"© 2026 The Qt Company Ltd. Documentation contributions included herein are the copyrights of their respective owners. The documentation provided herein is licensed under the terms of the GNU Free Documentation License version 1.3 as published by the Free Software Foundation. Qt and respective logos are trademarks of The Qt Company Ltd. in Finland and/or other countries worldwide. All other trademarks are property of their respective owners.
