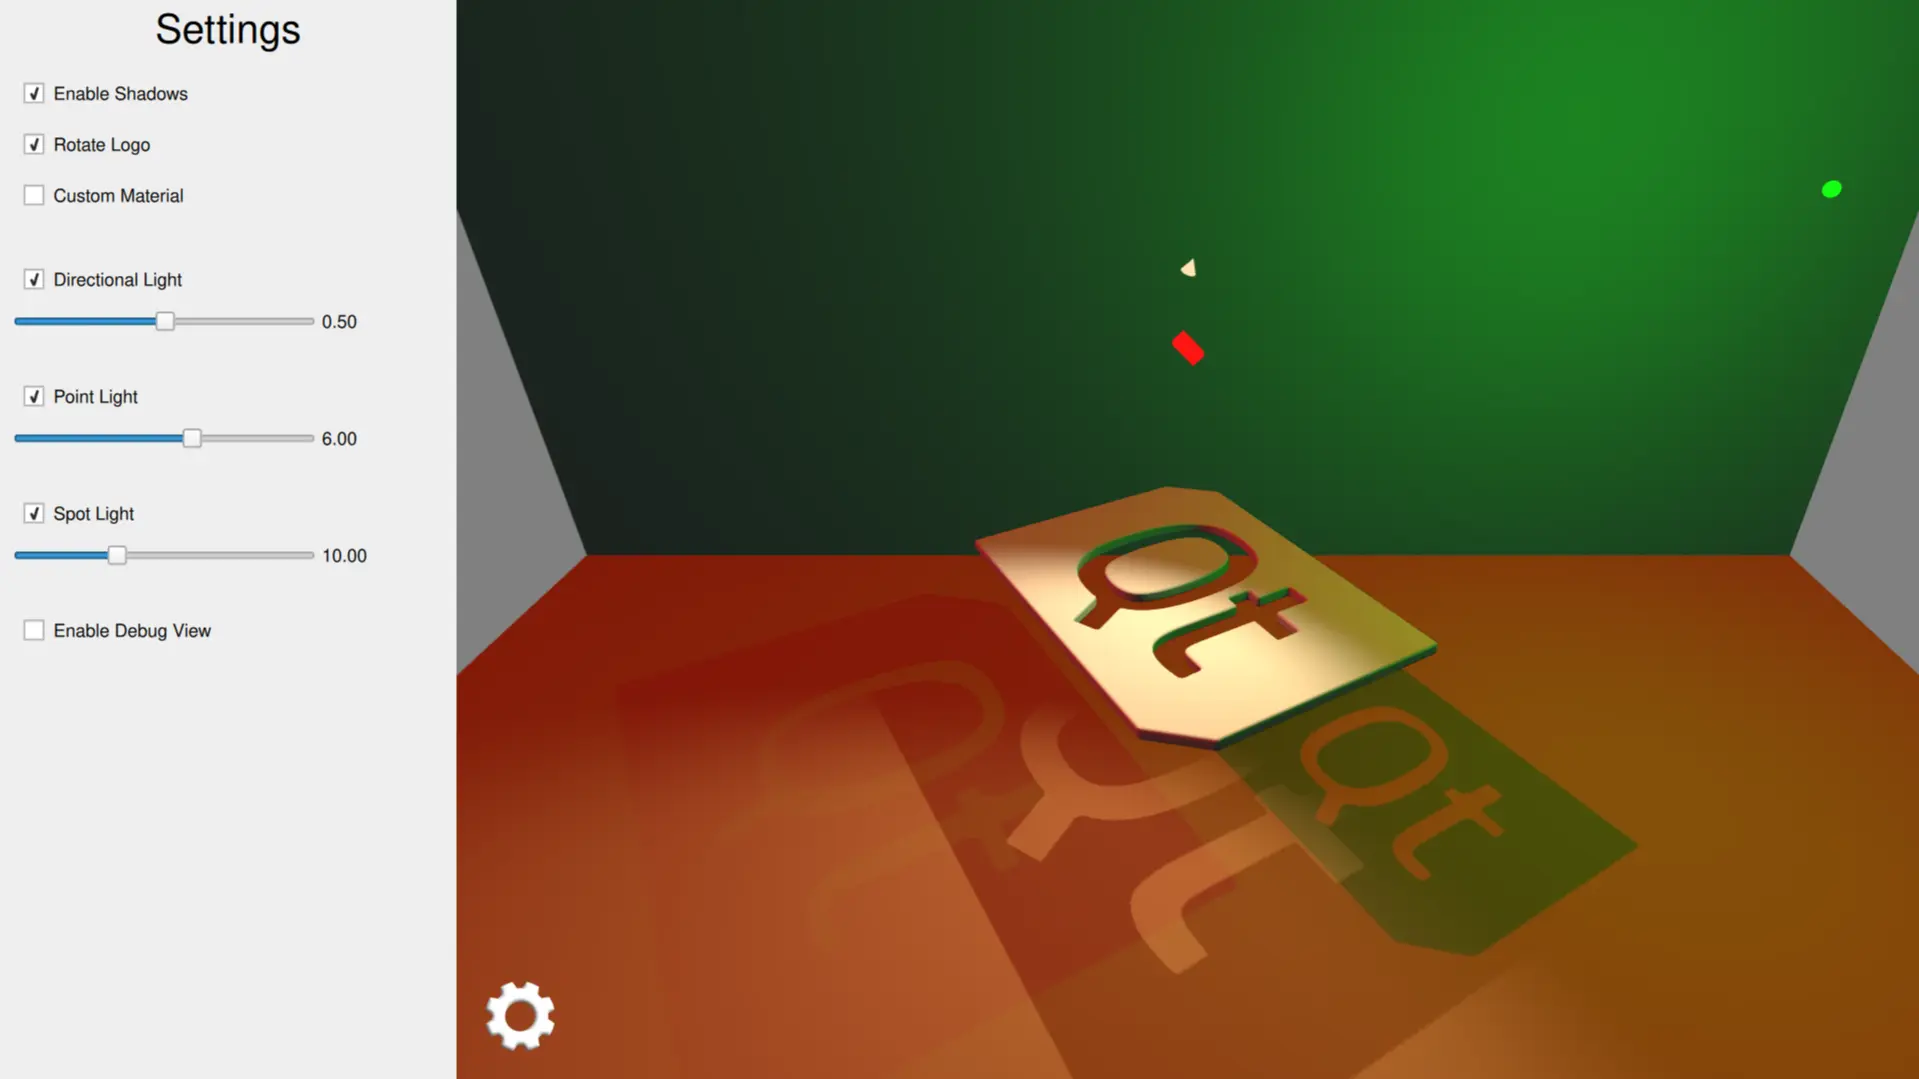
Qt Quick 3D - 조명 예시
다양한 조명 유형을 사용하는 방법을 보여줍니다.

이 예제에서는 애플리케이션에서 세 가지 다른 조명 유형을 사용하는 방법을 보여줍니다.
장면 조명 설정
방향성 조명
방향성 조명은 무한히 멀리 떨어진 식별할 수 없는 광원에서 한 방향으로 빛을 방출합니다. 이는 실생활에서 햇빛이 작동하는 방식과 유사합니다. 방향성 조명은 범위가 무한하며 줄어들지 않습니다.
방향성 조명을 설정하여 붉은색을 발산하고 X축을 중심으로 회전하도록 애니메이션을 적용했습니다.
DirectionalLight {
    id: light1
    color: Qt.rgba(1.0, 0.1, 0.1, 1.0)
    ambientColor: Qt.rgba(0.1, 0.1, 0.1, 1.0)
    position: Qt.vector3d(0, 200, 0)
    rotation: Quaternion.fromEulerAngles(-135, -90, 0)
    shadowMapQuality: Light.ShadowMapQualityVeryHigh
    pcfFactor: 1
    visible: directionalLightCheckBox.checked
    castsShadow: checkBoxShadows.checked
    brightness: directionalLightSlider.value
    SequentialAnimation on rotation {
        loops: Animation.Infinite
        QuaternionAnimation {
            to: Quaternion.fromEulerAngles(-45, -90, 0)
            duration: 2000
            easing.type: Easing.InOutQuad
        }
        QuaternionAnimation {
            to: Quaternion.fromEulerAngles(-135, -90, 0)
            duration: 2000
            easing.type: Easing.InOutQuad
        }
    }
}
포인트 라이트
포인트 라이트는 구체로 설명할 수 있으며, 빛의 중심에서 모든 방향으로 동일한 강도로 빛을 방출합니다. 이는 전구가 빛을 내는 방식과 유사합니다.
포인트 라이트가 녹색을 방출하도록 설정하고 그 위치를 x 좌표로 애니메이션합니다.
PointLight {
    id: light2
    color: Qt.rgba(0.1, 1.0, 0.1, 1.0)
    ambientColor: Qt.rgba(0.1, 0.1, 0.1, 1.0)
    position: Qt.vector3d(0, 300, 0)
    shadowMapFar: 2000
    shadowMapQuality: Light.ShadowMapQualityHigh
    visible: pointLightCheckBox.checked
    castsShadow: checkBoxShadows.checked
    brightness: pointLightSlider.value
    SequentialAnimation on x {
        loops: Animation.Infinite
        NumberAnimation {
            to: 400
            duration: 2000
            easing.type: Easing.InOutQuad
        }
        NumberAnimation {
            to: 0
            duration: 2000
            easing.type: Easing.InOutQuad
        }
    }
}
스포트 라이트
스포트 라이트는 모든 방향이 아닌 한 방향을 향해 원뿔 모양으로 빛을 방출한다는 점을 제외하면 포인트 라이트와 유사합니다. 원뿔 각도를 제외하면 스포트라이트는 포인트 조명과 동일한 특성과 속성을 가지고 있습니다.
따뜻한 색을 방출하도록 스포트라이트를 설정하고 Y 좌표로 회전을 애니메이션합니다.
SpotLight {
    id: light4
    color: Qt.rgba(1.0, 0.9, 0.7, 1.0)
    ambientColor: Qt.rgba(0.0, 0.0, 0.0, 0.0)
    position: Qt.vector3d(0, 250, 0)
    eulerRotation.x: -45
    shadowMapFar: 2000
    shadowMapQuality: Light.ShadowMapQualityHigh
    visible: spotLightCheckBox.checked
    castsShadow: checkBoxShadows.checked
    brightness: spotLightSlider.value
    coneAngle: 110
    innerConeAngle: 70
    PropertyAnimation on eulerRotation.y {
        loops: Animation.Infinite
        from: 0
        to: -360
        duration: 10000
    }
}
씬 모델 설정
먼저 씬의 바닥과 뒷벽 역할을 할 두 개의 직사각형 모델을 추가합니다. 이는 밝은 그림자를 표시하는 데 유용합니다.
Model {
    source: "#Rectangle"
    y: -200
    scale: Qt.vector3d(15, 15, 15)
    eulerRotation.x: -90
    materials: [
        PrincipledMaterial {
            baseColor: Qt.rgba(0.8, 0.6, 0.4, 1.0)
        }
    ]
}
Model {
    source: "#Rectangle"
    z: -400
    scale: Qt.vector3d(15, 15, 15)
    materials: [
         PrincipledMaterial {
            baseColor: Qt.rgba(0.8, 0.8, 0.9, 1.0)
        }
    ]
}
그런 다음 Y축을 중심으로 회전하는 메인 로고 모델을 추가합니다.
Model {
    id: logoDefault
    source: "qtlogo.mesh"
    scale: Qt.vector3d(5000, 5000, 5000)

    property variant material
    materials: [ material ]

    property bool animate: true
    NumberAnimation on eulerRotation.y {
        running: logoDefault.animate
        loops: Animation.Infinite
        duration: 5000
        from: 0
        to: -360
    }
}
또한 각 조명 유형의 위치 및 회전을 보여주기 위해 작은 큐브 모델을 추가합니다. 이 큐브는 사용자가 관련 슬라이더에 액세스할 때 더 크게 확장됩니다.
Model {
    // Directional Light Marker
    property real size: directionalLightSlider.highlight ? 0.2 : 0.1
    source: "#Cube"
    position: light1.position
    rotation: light1.rotation
    scale: Qt.vector3d(size, size, size * 2)
    materials: [
        PrincipledMaterial {
            baseColor: light1.color
            lighting: PrincipledMaterial.NoLighting
        }
    ]
    castsShadows: false
    visible: directionalLightCheckBox.checked
}
Model {
    // Point Light Marker
    source: "#Sphere"
    position: light2.position
    rotation: light2.rotation
    property real size: pointLightSlider.highlight ? 0.2 : 0.1
    scale: Qt.vector3d(size, size, size)
    materials: [
        PrincipledMaterial {
            baseColor: light2.color
            lighting: PrincipledMaterial.NoLighting
        }
    ]
    castsShadows: false
    visible: pointLightCheckBox.checked
}
Node {
    // Spot Light Marker
    position: light4.position
    rotation: light4.rotation
    property real size: spotLightSlider.highlight ? 0.2 : 0.1
    scale: Qt.vector3d(size, size, size)
    Model {
        source: "#Cone"
        castsShadows: false
        eulerRotation.x: 90
        materials: PrincipledMaterial {
            baseColor: light4.color
            lighting: PrincipledMaterial.NoLighting
        }
    }
    visible: spotLightCheckBox.checked
}
설정 패널에서 사용자는 그림자를 활성화하고 각 조명의 가시성과 밝기를 개별적으로 제어할 수 있습니다.
© 2025 The Qt Company Ltd. Documentation contributions included herein are the copyrights of their respective owners. The documentation provided herein is licensed under the terms of the GNU Free Documentation License version 1.3 as published by the Free Software Foundation. Qt and respective logos are trademarks of The Qt Company Ltd. in Finland and/or other countries worldwide. All other trademarks are property of their respective owners.

