Qt Quick 3D - 빠른 항목 예제
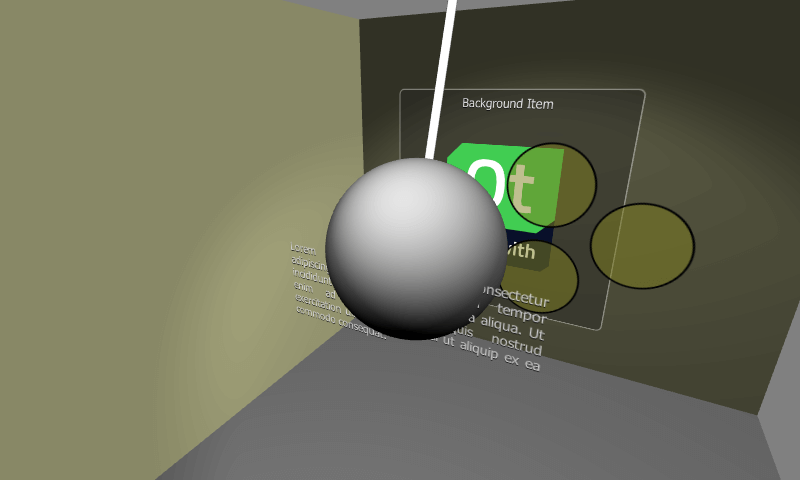
빠른 3D 장면에서 Qt Quick 아이템을 사용하는 방법을 보여줍니다.

이 예제에서는 빠른 3D 장면에서Qt Quick 2D 항목을 사용하는 방법을 보여줍니다.
빠른 3D 장면의 빠른 항목
Qt Quick 2D Item항목을 모든 하위 항목과 함께 빠른 3D 장면에 추가할 수 있습니다. 3D 씬에서 Qt Quick 유형을 사용할 때는 몇 가지 주의해야 할 사항이 있습니다:
- Item 가 Node 안에 있는 경우 왼쪽 상단 모서리가 노드의 원점에 배치됩니다. 즉, Node 의 원점이 Item 의 중심점이 되도록 하기 위해
anchors.centerIn: parent을 지정해야 하는 경우가 많습니다. - 3D 트랜스폼은 부모 Node 에서 상속됩니다. 둘 이상의
Item이 동일한 트랜스폼의 영향을 받아야 하는 경우, 이러한 항목은 공통 부모 Item 아래 Node 로 함께 그룹화할 수 있습니다. - Qt 6.0에서 아이템은
MouseArea와 같은 터치/마우스 이벤트를 수신하지 않으므로 비대화형이어야 합니다. - 퀵 아이템은 빛과 그림자의 영향을 받지 않습니다.
- Clipping 에 의존하지 말고 피해야 합니다.
이전 Qt 버전이나 다른 2D-in-3D 임베딩 접근 방식과 달리, Qt Quick 항목을 Qt Quick 3D 노드에 부모로 지정한다고 해서 텍스처를 생성하고 2D 콘텐츠를 렌더링한 다음 텍스처 쿼드를 그리는 것은 아닙니다. 오히려 Qt 6.0은 3D 씬과 동일한 렌더 패스 내에서 2D 콘텐츠를 렌더링하는 것을 지원합니다. 이는 실제로 엄청난 성능 향상을 가져올 수 있습니다. 예를 들어 아이템에 layer.enabled 이 true로 설정되어 있거나 ShaderEffectSource 과 같이 디자인상 추가 렌더 타깃을 사용하여 렌더링하는 경우에는 적용되지 않습니다.
테스트 장면
이 예제에서 중요한 부분은 View3D 요소의 장면 콘텐츠입니다.
카메라에서 가장 멀리 떨어진 레이어를 추가하는 것으로 시작합니다. 이 레이어에는 Rectangle, Text 및 Image 요소가 포함됩니다. 레이어의 요소가 올바르게 배치되도록 하기 위해 공통 부모 Item 아래에 함께 그룹화됩니다. 모든 콘텐츠는 이 루트 항목 안에 클리핑되므로 크기를 적절하게 조정해야 합니다.
Node {
    position: Qt.vector3d(0, 100, -120)
    Item {
        width: 400
        height: 400
        anchors.centerIn: parent
        Rectangle {
            anchors.fill: parent
            opacity: 0.4
            color: "#202020"
            radius: 10
            border.width: 2
            border.color: "#f0f0f0"
        }
        Text {
            anchors.top: parent.top
            anchors.topMargin: 10
            anchors.horizontalCenter: parent.horizontalCenter
            font.pixelSize: 20
            color: "#e0e0e0"
            style: Text.Raised
            text: qsTr("Background Item")
        }
        Image {
            anchors.centerIn: parent
            source: "Built_with_Qt_RGB_logo_vertical"
        }
    }
}
다음 Node 및 해당 항목은 카메라에 조금 더 가깝게 배치됩니다. 여기에는 x 위치와 회전을 모두 애니메이션하는 세 개의 Rectangle 항목이 포함되어 있습니다. 애니메이션은 상위 Node 에서 수행되는 반면 퀵 Item 의 콘텐츠는 정적으로 유지된다는 점에 유의하세요. 성능 관점에서 볼 때 이것은 더 복잡한 항목에서 좋은 접근 방식입니다.
Node {
    position: Qt.vector3d(0, 150, 100)
    SequentialAnimation on x {
        loops: Animation.Infinite
        NumberAnimation {
            to: -200
            duration: 1500
            easing.type: Easing.InOutQuad
        }
        NumberAnimation {
            to: 200
            duration: 1500
            easing.type: Easing.InOutQuad
        }
    }
    NumberAnimation on eulerRotation.z {
        loops: Animation.Infinite
        from: 0
        to: 360
        duration: 4000
        easing.type: Easing.InOutBack
    }
    Item {
        width: 400
        height: 400
        anchors.centerIn: parent
        // This allows rendering into offscreen surface and caching it.
        layer.enabled: true
        Rectangle {
            x: 150
            y: 100
            width: 100
            height: 100
            radius: 50
            color: "#80808020"
            border.color: "black"
            border.width: 2
        }
        Rectangle {
            x: 90
            y: 200
            width: 100
            height: 100
            radius: 50
            color: "#80808020"
            border.color: "black"
            border.width: 2
        }
        Rectangle {
            x: 210
            y: 200
            width: 100
            height: 100
            radius: 50
            color: "#80808020"
            border.color: "black"
            border.width: 2
        }
    }
}
이 예제의 세 번째 항목 레이어에는 불투명도 애니메이션이 있는 단일 Text 항목이 포함되어 있습니다. 텍스트 항목은 자동으로 상위 Node 로 중앙에 배치됩니다.
Node {
    position: Qt.vector3d(0, 80, 250)
    Text {
        anchors.centerIn: parent
        width: 300
        wrapMode: Text.WordWrap
        horizontalAlignment: Text.AlignJustify
        font.pixelSize: 14
        color: "#e0e0e0"
        style: Text.Raised
        text: "Lorem ipsum dolor sit amet, consectetur adipiscing elit, sed do eiusmod " +
              "tempor incididunt ut labore et dolore magna aliqua. Ut enim ad minim " +
              "veniam, quis nostrud exercitation ullamco laboris nisi ut aliquip ex ea " +
              "commodo consequat."
        SequentialAnimation on opacity {
            loops: Animation.Infinite
            NumberAnimation {
                to: 0
                duration: 1500
                easing.type: Easing.InOutQuad
            }
            NumberAnimation {
                to: 1
                duration: 1500
                easing.type: Easing.InOutQuad
            }
        }
    }
}
위의 빠른 항목 레이어의 z 정렬을 시각화하기 위해 3D 레킹볼에 대한 모델도 설정하겠습니다. 이 모델은 상단 Node 을 중심으로 회전하여 구가 다른 레이어를 통해 움직이도록 애니메이션합니다.
Node {
    position: Qt.vector3d(0, 800, 0)
    SequentialAnimation on eulerRotation.x {
        loops: Animation.Infinite
        NumberAnimation {
            to: 20
            duration: 3500
            easing.type: Easing.InOutQuad
        }
        NumberAnimation {
            to: -20
            duration: 3500
            easing.type: Easing.InOutQuad
        }
    }
    Model {
        source: "#Cylinder"
        y: -300
        scale: Qt.vector3d(0.1, 6.1, 0.1)
        materials: PrincipledMaterial {
            baseColor: Qt.rgba(0.9, 0.9, 0.9, 1.0)
        }
    }
    Model {
        source: "#Sphere"
        y: -700
        scale: Qt.vector3d(2, 2, 2)
        materials: PrincipledMaterial {
            baseColor: Qt.rgba(0.4, 0.4, 0.4, 1.0)
        }
    }
}
2D 콘텐츠가 있는 장면을Qt Quick 3D 참조하세요 .
© 2025 The Qt Company Ltd. Documentation contributions included herein are the copyrights of their respective owners. The documentation provided herein is licensed under the terms of the GNU Free Documentation License version 1.3 as published by the Free Software Foundation. Qt and respective logos are trademarks of The Qt Company Ltd. in Finland and/or other countries worldwide. All other trademarks are property of their respective owners.

