Qt Quick 3D - View3D 예제
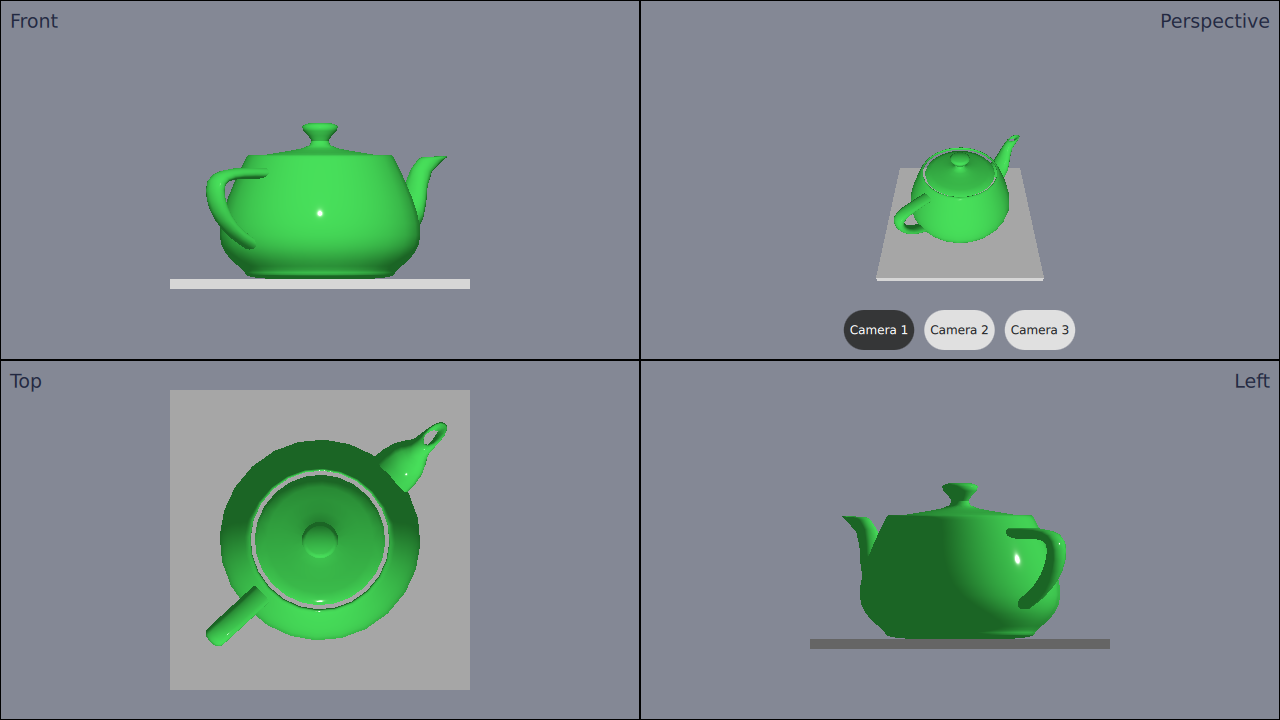
View3D 을 사용하여 여러 카메라의 장면을 표시하는 방법을 보여줍니다.

이 예제에서는 애플리케이션에서 서로 다른 카메라로 4개의 개별 View3D를 사용하는 방법을 보여줍니다.
카메라 정의하기
먼저 cameras 를 정의합니다. 뷰는 4개만 추가하지만 여러 대의 카메라를 정의하겠습니다. 이렇게 하는 이유는 뷰 중 하나에서 카메라를 전환할 수 있기를 원하기 때문입니다.
카메라는 Node 루트 안에 정의해야 합니다. 카메라가 정의되는 방식은 다음과 같습니다:
Node {
    id: standAloneScene
    ...
// The predefined cameras. They have to be part of the scene, i.e. inside the root node.
// Animated perspective camera
Node {
    PerspectiveCamera {
        id: cameraPerspectiveOne
        z: 600
    }

    PropertyAnimation on eulerRotation.x {
        loops: Animation.Infinite
        duration: 5000
        to: -360
        from: 0
    }
}

// Stationary perspective camera
PerspectiveCamera {
    id: cameraPerspectiveTwo
    z: 600
}
    ...
    // Stationary orthographic camera viewing from left
    OrthographicCamera {
        id: cameraOrthographicLeft
        x: -600
        eulerRotation.y: -90
    }
}
뷰 추가하기
카메라를 정의한 후 views. 화면을 네 부분으로 나누고 다음과 같이 뷰를 하나씩 추가할 수 있습니다:
// The views
Rectangle {
    id: topLeft
    anchors.top: parent.top
    anchors.left: parent.left
    width: parent.width * 0.5
    height: parent.height * 0.5
    color: "#848895"
    border.color: "black"

    View3D {
        id: topLeftView
        anchors.fill: parent
        importScene: standAloneScene
        camera: cameraOrthographicFront
    }

    Label {
        text: "Front"
        anchors.top: parent.top
        anchors.left: parent.left
        anchors.margins: 10
        color: "#222840"
        font.pointSize: 14
    }
}
    ...
오른쪽 상단 보기에는 3개의 버튼이 있습니다. 이 버튼을 사용하여 해당 보기에 사용되는 카메라를 즉시 전환할 수 있습니다. 카메라 속성을 설정하기만 하면 전환이 완료됩니다:
RoundButton {
    text: "Camera 1"
    highlighted: topRightView.camera == cameraPerspectiveOne
    implicitWidth: controlsContainer.buttonWidth
    onClicked: {
        topRightView.camera = cameraPerspectiveOne
    }
}
    ...
© 2025 The Qt Company Ltd. Documentation contributions included herein are the copyrights of their respective owners. The documentation provided herein is licensed under the terms of the GNU Free Documentation License version 1.3 as published by the Free Software Foundation. Qt and respective logos are trademarks of The Qt Company Ltd. in Finland and/or other countries worldwide. All other trademarks are property of their respective owners.

