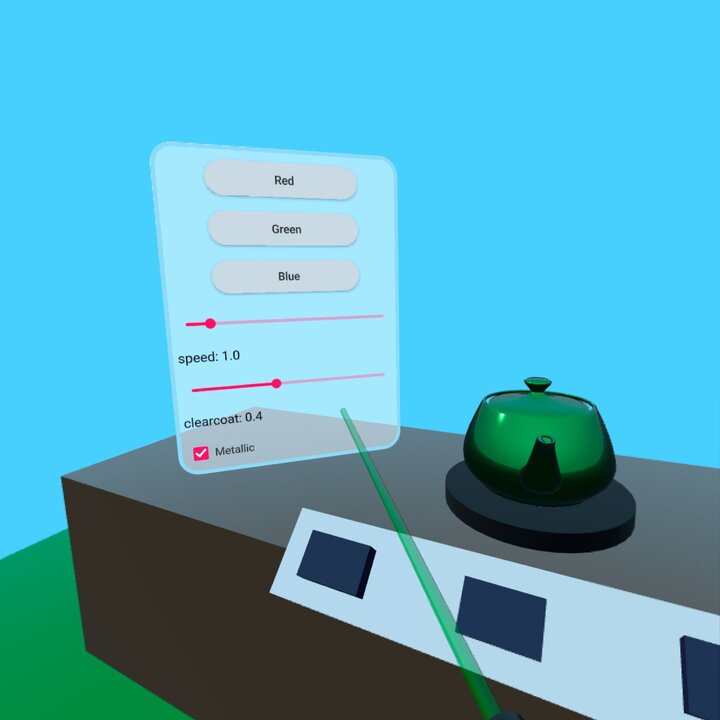
Qt Quick 3D - XR 단순 입력 예제
Qt Quick 3D XR에서 컨트롤러 입력을 시연합니다.

이 예제는 Qt Quick 3D XR의 저수준 입력 API를 사용하여 씬의 2D 및 3D 오브젝트와 상호 작용하는 방법을 보여줍니다. xr_simple 예제의 기본 구조를 따릅니다.
컨트롤러 입력
이 예제에서는 XrController 의 위치에서 ray picking 을 수행합니다:
XrController {
    id: rightController
    controller: XrController.RightController
    poseSpace: XrController.AimPose

    property QtObject hitObject

    onRotationChanged: {
        const pickResult = xrView.rayPick(scenePosition, forward)
        if (pickResult.hitType !== PickResult.Null) {
            pickRay.hit = true
            pickRay.length = pickResult.distance
            hitObject = pickResult.objectHit
            cursorSphere.position = pickResult.scenePosition
            cursorSphere.visible = true
        } else {
            pickRay.hit = false
            pickRay.length = 50
            hitObject = null
            cursorSphere.visible = false
        }
    }

    Node {
        id: pickRay
        property real length: 50
        property bool hit: false

        Model {
            eulerRotation.x: -90
            scale: Qt.vector3d(0.005, pickRay.length/100, 0.005)
            source: "#Cone"
            materials: PrincipledMaterial {
                baseColor: rightTrigger.pressed ? "#99aaff" : "#cccccc"
                lighting: PrincipledMaterial.NoLighting
            }
            opacity: 0.8
        }
    }

    Node {
        z: 5
        Model {
            eulerRotation.x: 90
            scale: Qt.vector3d(0.05, 0.10, 0.05)
            source: "#Cylinder"
            materials: PrincipledMaterial {
                baseColor: "black"
                roughness: 0.2
            }
        }
    }
}
이는 다음과 같은 기능을 수행합니다:
- 무언가에 부딪히면
pickRay의 길이를 변경하여 부딪힌 대상에 닿도록 합니다.pickRay은 반투명 원뿔(가늘어지는 원통)로 사용자가 조준하고 있는 위치를 표시합니다. 또한cursorSphere을 광선이 닿는 지점으로 이동합니다. (cursorSphere는 XrView 의 자식인 반투명 구입니다.) hitObject속성을 타격하는 오브젝트로 설정합니다.
또한 컨트롤러의 일반적인 표현으로 검은색 원통을 사용합니다.
이 예제에서는 ExampleButton.qml 파일에 간단한 3D 푸시 버튼을 만들었습니다. (버튼의 작동 방식에 대한 자세한 내용은 여기서는 설명하지 않습니다.) XrInputAction 을 만들어 누름에 반응하도록 합니다:
XrInputAction {
    id: rightTrigger
    controller: XrInputAction.RightController
    actionId: [XrInputAction.TriggerPressed, XrInputAction.TriggerValue, XrInputAction.IndexFingerPinch]
    onTriggered: {
        const button = rightController.hitObject as ExampleButton
        if (button && button !== panel.activeButton) {
            panel.activeButton = button
        }
    }
}
rightTrigger 액션은 손 추적과 다양한 유형의 컨트롤러를 모두 지원하기 위해 여러 가지 다른 ID에 반응합니다. 액션이 트리거되면 위에서 설정한 hitObject 이 ExampleButton 유형인지 확인합니다. 이 경우 버튼이 활성화됩니다.
3D 컨트롤러가 2D 콘텐츠와 상호 작용할 수 있도록 하려면 XrVirtualMouse 을 추가하여 둘 사이를 매핑해야 합니다:
XrInputAction {
    id: rightThumbstickX
    controller: XrInputAction.RightController
    actionId: [XrInputAction.ThumbstickX]
}
XrInputAction {
    id: rightThumbstickY
    controller: XrInputAction.RightController
    actionId: [XrInputAction.ThumbstickY]
}

XrVirtualMouse {
    view: xrView
    source: rightController
    leftMouseButton: rightTrigger.pressed
    scrollWheelX: rightThumbstickX.value
    scrollWheelY: rightThumbstickY.value
}
먼저 가로 및 세로 엄지손가락 위치를 감지하는 동작을 두 개 더 추가합니다. 그런 다음 XrController 을 위치 소스로 사용하여 XrVirtualMouse 을 만듭니다. 앞서 만든 rightTrigger 액션을 사용하여 마우스를 누르거나 놓는 동작을 생성하고 엄지손가락 액션을 사용하여 마우스 휠 이벤트를 생성합니다.
마지막으로 pickRay 이 물체에 닿을 때 햅틱 피드백을 추가합니다:
XrHapticFeedback {
    controller: XrHapticFeedback.RightController
    condition: XrHapticFeedback.RisingEdge
    trigger: pickRay.hit
    hapticEffect: XrSimpleHapticEffect {
        amplitude: 0.5
        duration: 30
        frequency: 3000
    }
}
pickRay.hit 프로퍼티가 false 에서 true 로 이동할 때마다 햅틱 효과가 트리거됩니다.
XrItem
3D 씬에 2D 사용자 인터페이스를 임베드하는 일반적인 방법은 XR에서도 작동하지만 단위 크기가 1센티미터이므로 해당 사용자 인터페이스를 유용하게 사용하려면 크기를 조정해야 합니다. XrItem 유형은 3D 항목의 물리적 크기와 2D 표면의 논리적 크기를 설정하여 자동으로 크기를 조정할 수 있는 편리한 방법을 제공합니다.
XrItem {
    width: 75
    height: 100
    x: -100
    y: height + table.height + 5
    z: 40
    eulerRotation.y: 45
    color: "transparent"
    contentItem: Rectangle {
        color: Qt.rgba(1, 1, 1, 0.5)
        border.width: 5
        border.color: "lightblue"
        height: 400
        width: 300
        radius: 25
    ...
        }
    }
XrItem 를 3차원으로 배치하고 가로 75cm, 세로 100cm로 설정합니다. 그런 다음 직사각형을 콘텐츠 항목으로 추가하고 300 x 400 단위로 설정합니다. 나머지 Qt Quick UI 요소는 일반적인 방법으로 직사각형의 하위 요소로 추가되며 여기에는 표시되지 않습니다. 2D 콘텐츠는 자동으로 크기가 조정되어 XrItem 을 채웁니다.
© 2025 The Qt Company Ltd. Documentation contributions included herein are the copyrights of their respective owners. The documentation provided herein is licensed under the terms of the GNU Free Documentation License version 1.3 as published by the Free Software Foundation. Qt and respective logos are trademarks of The Qt Company Ltd. in Finland and/or other countries worldwide. All other trademarks are property of their respective owners.

