
Qt Quick 3D Physics - 관절 예제
물리 시나리오에서 관절을 사용하는 방법을 보여줍니다.
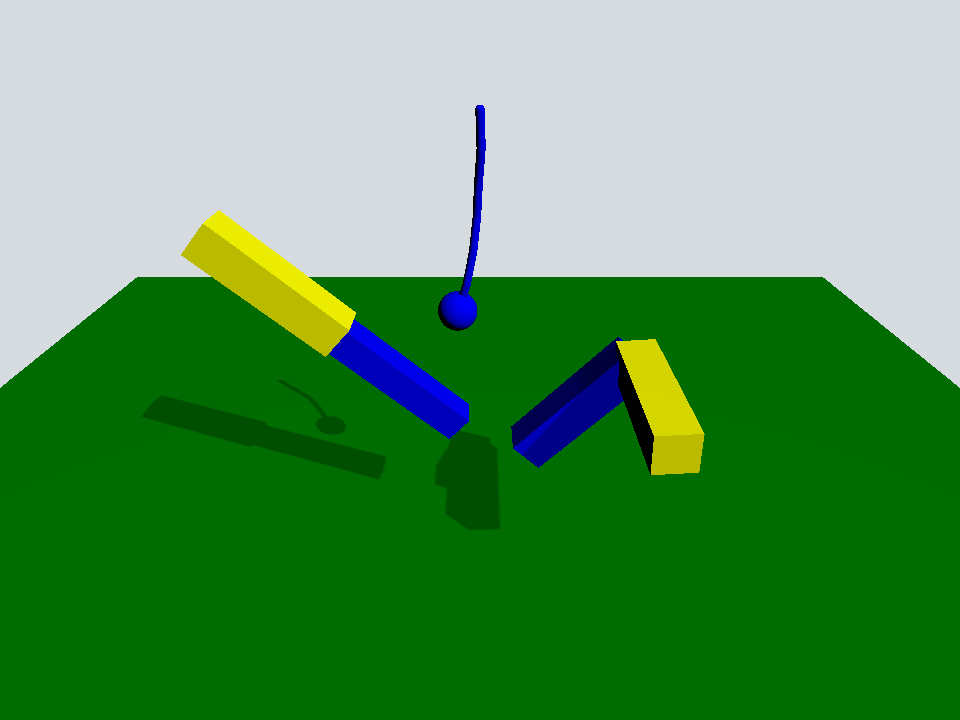
이 예제는 Quick 3D Physics에서 제공하는 몇 가지 조인트의 사용법을 보여줍니다.
이 장면은 PhysicsWorld, PerspectiveCamera 가 장착된 View3D, 그리고 DirectionalLight 로 구성된 전형적인 장면입니다:
Window {
    width: 640
    height: 480
    visible: true
    title: qsTr("Qt Quick 3D Physics - Joints")

    PhysicsWorld {
        scene: viewport.scene
        running: true
    }

    View3D {
        id: viewport
        anchors.fill: parent

        environment: SceneEnvironment {
            clearColor: "#d6dbdf"
            backgroundMode: SceneEnvironment.Color
        }

        PerspectiveCamera {
            position: Qt.vector3d(0, 600, 700)
            eulerRotation: Qt.vector3d(-30, 0, 0)
            clipFar: 5000
            clipNear: 1
        }

        DirectionalLight {
            eulerRotation.x: -45
            eulerRotation.y: 45
            castsShadow: true
            brightness: 1
            shadowFactor: 50
            shadowMapQuality: Light.ShadowMapQualityHigh
        }

        Rope {
            eulerRotation: Qt.vector3d(0, 0, -90)
            position: Qt.vector3d(0, 500, 0)
        }

        Prismatic {
            id: prismatic
            position: Qt.vector3d(-250, 100, 0)
        }

        Revolute {
            id: revolute
            position: Qt.vector3d(200, 200, 100)
        }

        StaticRigidBody {
            position: Qt.vector3d(0, -100, 0)
            eulerRotation: Qt.vector3d(-90, 0, 0)
            collisionShapes: PlaneShape {}
            Model {
                source: "#Rectangle"
                scale: Qt.vector3d(20, 20, 1)
                materials: PrincipledMaterial {
                    baseColor: "green"
                }
                castsShadows: false
                receivesShadows: true
            }
        }

        FrameAnimation {
            id: animator
            running: true
            onTriggered: {
                prismatic.jointRotation.z += 1
                revolute.jointRotation.x += 0.95
            }
        }
    }
}
바닥 역할을 하는 PlaneShape 이 연결된 StaticRigidBody 과, Rope, Prismatic, Revolute라는 세 개의 사용자 정의 QML 객체가 있습니다.
Rope {
    eulerRotation: Qt.vector3d(0, 0, -90)
    position: Qt.vector3d(0, 500, 0)
}

Prismatic {
    id: prismatic
    position: Qt.vector3d(-250, 100, 0)
}

Revolute {
    id: revolute
    position: Qt.vector3d(200, 200, 100)
}
Rope 객체는 일련의 캡슐과 구체로 구성되어 있으며, 캡슐은 spherical joints 로, 구체는 fixed joint 로 연결되어 있습니다.
Node {
    id: root

    SphericalJoint {
        bodyB: shape0
        positionA: root.position
        positionB: Qt.vector3d(-20, 0, 0)
    }

    SphericalJoint {
        bodyA: shape0
        bodyB: shape1
        positionA: Qt.vector3d(20, 0, 0)
        positionB: Qt.vector3d(-20, 0, 0)
    }

    SphericalJoint {
        bodyA: shape1
        bodyB: shape2
        positionA: Qt.vector3d(20, 0, 0)
        positionB: Qt.vector3d(-20, 0, 0)
    }

    SphericalJoint {
        bodyA: shape2
        bodyB: shape3
        positionA: Qt.vector3d(20, 0, 0)
        positionB: Qt.vector3d(-20, 0, 0)
    }

    SphericalJoint {
        bodyA: shape3
        bodyB: shape4
        positionA: Qt.vector3d(20, 0, 0)
        positionB: Qt.vector3d(-20, 0, 0)
    }

    SphericalJoint {
        bodyA: shape4
        bodyB: shape5
        positionA: Qt.vector3d(20, 0, 0)
        positionB: Qt.vector3d(-20, 0, 0)
    }

    FixedJoint {
        bodyA: shape5
        bodyB: sphere
        positionA: Qt.vector3d(20, 0, 0)
        positionB: Qt.vector3d(0, 0, 0)
    }

    DynamicRigidBody {
        id: shape0
        position: Qt.vector3d(0, 0, 0)
        collisionShapes: CapsuleShape {
            diameter: 10
            height: 40
        }
        Model {
            geometry: CapsuleGeometry {
                diameter: 10
                height: 40
            }
            materials: PrincipledMaterial {
                baseColor: "blue"
            }
        }
    }

    DynamicRigidBody {
        id: shape1
        position: Qt.vector3d(40, 0, 0)
        collisionShapes: CapsuleShape {
            diameter: 10
            height: 40
        }
        Model {
            geometry: CapsuleGeometry {
                diameter: 10
                height: 40
            }
            materials: PrincipledMaterial {
                baseColor: "blue"
            }
        }
    }

    DynamicRigidBody {
        id: shape2
        position: Qt.vector3d(80, 0, 0)
        collisionShapes: CapsuleShape {
            diameter: 10
            height: 40
        }
        Model {
            geometry: CapsuleGeometry {
                diameter: 10
                height: 40
            }
            materials: PrincipledMaterial {
                baseColor: "blue"
            }
        }
    }

    DynamicRigidBody {
        id: shape3
        position: Qt.vector3d(120, 0, 0)
        collisionShapes: CapsuleShape {
            diameter: 10
            height: 40
        }
        Model {
            geometry: CapsuleGeometry {
                diameter: 10
                height: 40
            }
            materials: PrincipledMaterial {
                baseColor: "blue"
            }
        }
    }

    DynamicRigidBody {
        id: shape4
        position: Qt.vector3d(160, 0, 0)
        collisionShapes: CapsuleShape {
            diameter: 10
            height: 40
        }
        Model {
            geometry: CapsuleGeometry {
                diameter: 10
                height: 40
            }
            materials: PrincipledMaterial {
                baseColor: "blue"
            }
        }
    }

    DynamicRigidBody {
        id: shape5
        position: Qt.vector3d(200, 0, 0)
        collisionShapes: CapsuleShape {
            diameter: 10
            height: 40
        }
        Model {
            geometry: CapsuleGeometry {
                diameter: 10
                height: 40
            }
            materials: PrincipledMaterial {
                baseColor: "blue"
            }
        }
    }

    DynamicRigidBody {
        id: sphere
        position: Qt.vector3d(240, 0, 0)
        scale: Qt.vector3d(0.5, 0.5, 0.5)
        collisionShapes: SphereShape {}
        Model {
            source: "#Sphere"
            materials: PrincipledMaterial {
                baseColor: "blue"
            }
        }
    }
}
Prismatic 객체는 두 개의 막대가 각각의 x축을 따라 prismatic joint 로 고정된 형태로 구성됩니다. 이 조인트를 통해 더 작은 막대는 upper 및 lower 제약 조건의 한계에 도달할 때까지 이 x축을 따라 자유롭게 움직일 수 있습니다.
Node {
    id: root
    property vector3d jointRotation : Qt.vector3d(0, 0, 0)

    PrismaticJoint {
        bodyA: prismaticBoxA
        bodyB: prismaticBoxB
        lowerLimit: -200
        upperLimit: 0
        positionA: Qt.vector3d(100, 0, 0)
        positionB: Qt.vector3d(-100, 0, 0)
    }

    DynamicRigidBody {
        id: prismaticBoxA
        kinematicPosition: Qt.vector3d(0, 200, 0)
        kinematicEulerRotation: root.jointRotation
        isKinematic: true
        scale: Qt.vector3d(2, 0.5, 0.5)
        collisionShapes: BoxShape {}
        Model {
            source: "#Cube"
            materials: PrincipledMaterial {
                baseColor: "yellow"
            }
        }
    }

    DynamicRigidBody {
        id: prismaticBoxB
        position: Qt.vector3d(0, 0, 0)
        scale: Qt.vector3d(2, 0.4, 0.4)
        collisionShapes: BoxShape {}
        Model {
            source: "#Cube"
            materials: PrincipledMaterial {
                baseColor: "blue"
            }
        }
    }
}
Revolute 객체는 90도 회전된 두 개의 막대로 구성되며, 이 막대들은 revolute joint 로 고정되어 있습니다.
Node {
    id: root
    property vector3d jointRotation : Qt.vector3d(0, 90, 0)

    RevoluteJoint {
        bodyA: revoluteBoxA
        bodyB: revoluteBoxB
        positionA: Qt.vector3d(100, 0, 0)
        positionB: Qt.vector3d(100, 0, 0)
        orientationB: Quaternion.fromEulerAngles(0, 0, 90)
        angularLimitLower: -Math.PI / 4
        angularLimitUpper: Math.PI / 4
        enableAngularLimit: true
    }

    DynamicRigidBody {
        id: revoluteBoxA
        kinematicPosition: Qt.vector3d(0, 0, 0)
        kinematicEulerRotation: root.jointRotation
        isKinematic: true
        scale: Qt.vector3d(2, 0.5, 0.5)
        collisionShapes: BoxShape {}
        Model {
            source: "#Cube"
            materials: PrincipledMaterial {
                baseColor: "yellow"
            }
        }
    }

    DynamicRigidBody {
        id: revoluteBoxB
        position: Qt.vector3d(0, 100, -100)
        eulerRotation: Qt.vector3d(0, 90, -90)
        scale: Qt.vector3d(2, 0.5, 0.5)
        collisionShapes: BoxShape {}
        Model {
            source: "#Cube"
            materials: PrincipledMaterial {
                baseColor: "blue"
            }
        }
    }
}
메인 장면으로 돌아가 보면, 키네마틱 조인트인 prismatic 와 revolute 를 회전시키는 ‘ FrameAnimation ’ 오브젝트가 있습니다.
FrameAnimation {
    id: animator
    running: true
    onTriggered: {
        prismatic.jointRotation.z += 1
        revolute.jointRotation.x += 0.95
    }
}
이처럼 움직이는 부품들이 모두 모여 물리 시나리오에서 서로 다른 관절들이 어떻게 상호작용하는지 확인할 수 있습니다.
파일:
© 2026 The Qt Company Ltd. Documentation contributions included herein are the copyrights of their respective owners. The documentation provided herein is licensed under the terms of the GNU Free Documentation License version 1.3 as published by the Free Software Foundation. Qt and respective logos are trademarks of The Qt Company Ltd. in Finland and/or other countries worldwide. All other trademarks are property of their respective owners.
