
Qt Quick Controls - 텍스트 편집기
Qt Quick Controls 를 사용하는 리치 텍스트 편집기 앱입니다.
이 텍스트 편집기 예제에서는 HTML, 마크다운 또는 일반 텍스트 파일을 WYSIWYG 방식으로 편집할 수 있습니다. 이 애플리케이션에는 두 가지 사용자 인터페이스가 포함되어 있습니다: 하나는 큰 화면용이고, 다른 하나는 소형 터치 기반 기기용 간소화된 UI입니다. 두 인터페이스 모두 "순수한" QML로 구현되었습니다. ` texteditor.cpp `에는 아이콘 폰트를 추가하기 위해 ` QFontDatabase::addApplicationFont()`를 호출하는 ` main() ` 함수가 포함되어 있습니다. (FontLoader 도 동일한 결과를 얻는 또 다른 방법입니다.)
데스크톱 사용자 인터페이스

데스크톱 버전은 텍스트 서식 지정 기능은 물론, HTML, 마크다운 및 일반 텍스트 파일을 열고 저장할 수 있는 기능을 갖춘 완전한 텍스트 편집기입니다.
MVC(모델-뷰-컨트롤) 디자인 패턴에서 컨트롤 계층은 수행 가능한 일련의 작업을 포함합니다. ` Qt Quick Controls`에서는 ` Action ` 타입을 사용하여 단일 작업이나 명령을 캡슐화합니다. 따라서 먼저 일련의 `Action` 객체부터 정의합니다:
    Action {
        id: openAction
        text: qsTr("&Open")
        shortcut: StandardKey.Open
        onTriggered: {
            if (textArea.textDocument.modified)
                discardDialog.open()
            else
                openDialog.open()
        }
    }
파일을 여는 ` Action `는 사용자의 변경 내용이 손실되지 않도록, 기존 문서가 변경되었는지 먼저 사용자에게 확인을 요청해야 합니다. 그렇지 않은 경우, 아래에서 선언된 ` FileDialog `를 단순히 열기만 하면 됩니다.
파일을 저장하는 Action 은 저장할 변경 사항이 있는 경우에만 활성화됩니다:
    Action {
        id: saveAction
        text: qsTr("&Save…")
        shortcut: StandardKey.Save
        enabled: textArea.textDocument.modified
        onTriggered: textArea.textDocument.save()
    }
선택된 텍스트를 복사하는 Action 는 텍스트가 선택된 경우에만 활성화됩니다:
    Action {
        id: copyAction
        text: qsTr("&Copy")
        shortcut: StandardKey.Copy
        enabled: textArea.selectedText
        onTriggered: textArea.copy()
    }
텍스트 서식(굵게, 기울임꼴, 정렬 등)을 변경하는 각 액션(Action)은 액션 컨트롤러( checkable)이며, 해당 액션 컨트롤러의 부울 상태( checked )는 액션 컨트롤러 클래스( selected text)의 관련 속성과 동기화됩니다. 선언적 양방향 동기화는 어렵기 때문에, 액션이 활성화될 때 속성을 변경하기 위해 onTriggered 스크립트를 사용합니다. cursorSelection 속성은 Qt 6.7에서 새로 추가된 것으로, 이를 통해 이전보다 훨씬 쉽게 구현할 수 있습니다.
    Action {
        id: boldAction
        text: qsTr("&Bold")
        shortcut: StandardKey.Bold
        checkable: true
        checked: textArea.cursorSelection.font.bold
        onTriggered: textArea.cursorSelection.font.bold = checked
    }

    Action {
        id: alignCenterAction
        text: qsTr("&Center")
        shortcut: "Ctrl+|"
        checkable: true
        checked: textArea.cursorSelection.alignment === Qt.AlignCenter
        onTriggered: textArea.cursorSelection.alignment = Qt.AlignCenter
    }
우리는 ` Menus ` 및 `MenuItems`의 계층 구조를 포함하는 ` MenuBar `를 가지고 있습니다. 각 ` MenuItem `는 UI 표현과 구현을 캡슐화하는 관련 ` action`를 바인딩하기만 하면 됩니다.
    menuBar: MenuBar {
        Menu {
            title: qsTr("&File")

            MenuItem {
                action: openAction
            }
            MenuItem {
                action: saveAction
            }
            MenuItem {
                action: saveAsAction
            }
            MenuItem {
                action: quitAction
            }
        }

        Menu {
            title: qsTr("&Edit")

            MenuItem {
                action: copyAction
            }
        ...
동일한 Action 객체들이 ToolBar 에서도 재사용되지만, 여기서는 각 Action의 text 속성을 재정의하여 아이콘 폰트에서 텍스트 아이콘을 선택합니다:
    header: ToolBar {
        Flow {
            width: parent.width

            Row {
                id: fileRow
                ToolButton {
                    id: openButton
                    text: "\uF115" // icon-folder-open-empty
                    font.family: "fontello"
                    action: openAction
                    focusPolicy: Qt.TabFocus
                }
                ToolButton {
                    id: saveButton
                    text: "\uE80A" // icon-floppy-disk
                    font.family: "fontello"
                    action: saveAction
                    focusPolicy: Qt.TabFocus
                }
                ToolSeparator {
                    contentItem.visible: fileRow.y === editRow.y
                }
            }

            Row {
                id: editRow
                ToolButton {
                    id: copyButton
                    text: "\uF0C5" // icon-docs
                    font.family: "fontello"
                    focusPolicy: Qt.TabFocus
                    action: copyAction
                }
            ...
텍스트 편집기의 주요 부분은 Flickable 내부에 위치한 TextArea 입니다:
    Flickable {
        id: flickable
        flickableDirection: Flickable.VerticalFlick
        anchors.fill: parent

        ScrollBar.vertical: ScrollBar {}

        TextArea.flickable: TextArea {
            id: textArea
            textFormat: Qt.AutoText
            wrapMode: TextArea.Wrap
            focus: true
            selectByMouse: true
            persistentSelection: true
            ...
ScrollBar 는 수직 축에 연결되어 있습니다. wrapMode 를 통해 단어 줄바꿈이 활성화되어 있으므로, 수평 ScrollBar 는 필요하지 않습니다.
TextArea.flickable 부착 속성은 텍스트 커서가 뷰포트 밖으로 이동할 때(예: 화살표 키를 사용하거나 많은 양의 텍스트를 입력할 때), TextArea 가 Flickable 를 스크롤하여 커서가 계속 보이도록 하기 위해 사용됩니다.
MenuBar 와 ToolBar 에서 선언한 동일한 동작을 취하고, 이를 TextArea 에서 제공하는 표준 context menu 의 기존 항목에 추가합니다:
                const menu = textArea.ContextMenu.menu
                menu.addItem(menuSeparatorComponent.createObject(menu.contentItem))
                menu.addAction(fontDialogAction)
                menu.addAction(colorDialogAction)
UI 텍스트를 번역할 수 있도록 qsTr() 함수를 일관되게 사용함으로써, 최종 사용자의 모국어와 관계없이 애플리케이션이 올바르게 작동하도록 합니다.
우리는 여러 종류의 dialogs 를 사용합니다:
    FileDialog {
        id: openDialog
        fileMode: FileDialog.OpenFile
        selectedNameFilter.index: 1
        nameFilters: ["Text files (*.txt)", "HTML files (*.html *.htm)", "Markdown files (*.md *.markdown)"]
        currentFolder: StandardPaths.writableLocation(StandardPaths.DocumentsLocation)
        onAccepted: {
            textArea.textDocument.modified = false // we asked earlier, if necessary
            textArea.textDocument.source = selectedFile
        }
    }

    FileDialog {
        id: saveDialog
        fileMode: FileDialog.SaveFile
        nameFilters: openDialog.nameFilters
        currentFolder: StandardPaths.writableLocation(StandardPaths.DocumentsLocation)
        onAccepted: textArea.textDocument.saveAs(selectedFile)
    }

    FontDialog {
        id: fontDialog
        onAccepted: textArea.cursorSelection.font = selectedFont
    }

    ColorDialog {
        id: colorDialog
        selectedColor: textArea.cursorSelection.color
        onAccepted: textArea.cursorSelection.color = selectedColor
    }

    MessageDialog {
        title: qsTr("Error")
        id: errorDialog
    }

    MessageDialog {
        id : quitDialog
        title: qsTr("Quit?")
        text: qsTr("The file has been modified. Quit anyway?")
        buttons: MessageDialog.Yes | MessageDialog.No
        onButtonClicked: function (button, role) {
            if (role === MessageDialog.YesRole) {
                textArea.textDocument.modified = false
                Qt.quit()
            }
        }
    }

    MessageDialog {
        id : discardDialog
        title: qsTr("Discard changes?")
        text: qsTr("The file has been modified. Open a new file anyway?")
        buttons: MessageDialog.Yes | MessageDialog.No
        onButtonClicked: function (button, role) {
            if (role === MessageDialog.YesRole)
                openDialog.open()
        }
    }
일반적으로 용도별로 별도의 인스턴스를 선언하는 것이 더 쉽습니다. 저희는 파일 열기와 저장을 위해 각각 별도의 FileDialog 인스턴스를 두 개 사용하고 있습니다. Qt 6.7에서 TextDocument 의 새로운 기능 덕분에 이 작업이 더 쉬워졌습니다.
FontDialog 와 ColorDialog 를 사용하면 텍스트 서식을 변경할 수 있습니다. (마크다운(Markdown) 형식에서는 특정 글꼴이나 색상을 지정하는 구문이 없지만, 굵게, 기울임꼴, 고정폭 글꼴과 같은 글꼴 특성은 저장됩니다. HTML 형식에서는 모든 서식이 저장됩니다.)
오류 메시지를 표시하기 위한 MessageDialog 가 하나 있고, 파일이 수정되었을 때 사용자에게 어떻게 할지 안내하기 위한 가 두 개 더 있습니다.
터치 사용자 인터페이스
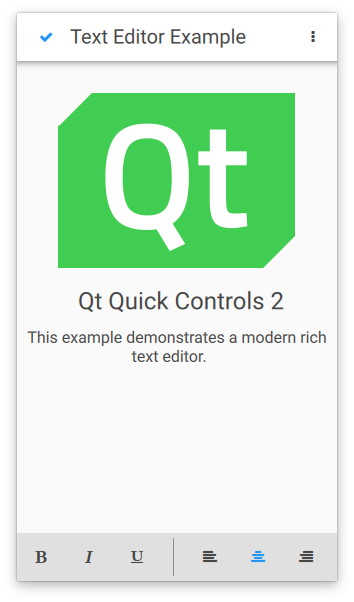
터치 사용자 인터페이스는 텍스트 편집기의 간소화된 버전입니다. 화면 크기가 제한된 터치 기기에 적합합니다. 이 예제에서는 파일 선택기를 사용하여 적절한 사용자 인터페이스를 자동으로 불러옵니다.
예제 실행
다음 위치에서 예제를 실행할 수 있습니다:
- Qt Creator
Welcome 모드를 열고 Examples 에서 예제를 선택하십시오. 자세한 내용은 Qt Creator: 튜토리얼: 빌드 및 실행을 참조하십시오.
- Qt Extension for Visual Studio Code
Command Palette 에서 Qt: Open Qt examples 명령을 실행한 후 목록에서 예제를 선택하십시오. 자세한 내용은 Qt Extension for Visual Studio Code: 튜토리얼: 빌드 및 실행을 참조하십시오.
© 2026 The Qt Company Ltd. Documentation contributions included herein are the copyrights of their respective owners. The documentation provided herein is licensed under the terms of the GNU Free Documentation License version 1.3 as published by the Free Software Foundation. Qt and respective logos are trademarks of The Qt Company Ltd. in Finland and/or other countries worldwide. All other trademarks are property of their respective owners.
