
5.3.5. Local Analyses
Local analyses are analyses which can be run on the development machine. They can be used to analyze code changes before they are committed.
Currently, the following local analyses are supported:
Local Build (Local Build)
CDT Integration (CDT Integration, CDT Managed Make projects only)
Makefile Integration (Makefile Integration, needs special target in makefile)
5.3.5.1. Common Configuration
In order to run the analyses, the Axivion Suite tools have to be configured.
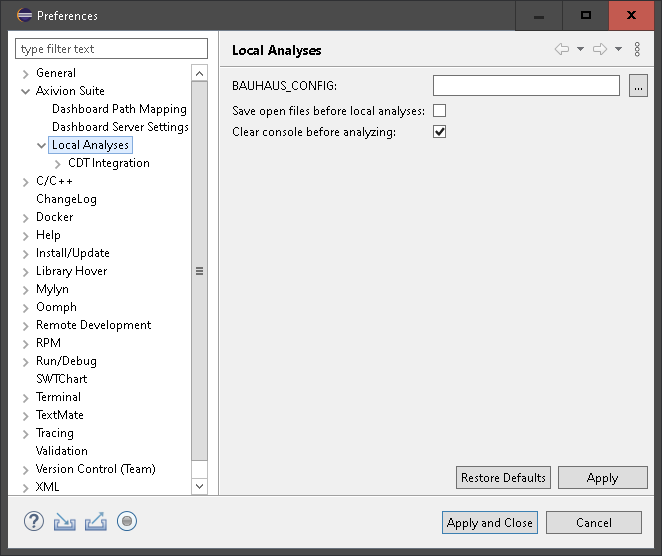
Common preferences of local analyses.
When the Axivion Eclipse Plugin starts the Axivion Suite tools, they have to be able to find this
configuration. This is done by the environment variable BAUHAUS_CONFIG. When
the tools are started, the Axivion Eclipse Plugin sets this variable accordingly to the Axivion Suite
version used for the analysis. With the option BAUHAUS_CONFIG, the
configuration directory can be set. The default value is the value of the variable
BAUHAUS_CONFIG in the environment of the Eclipse process. The BAUHAUS_CONFIG
defined here is not used for the Local Build, where this information is contained
in the startscript.
The analyses use the current source code on disk. So unsaved changes are not taken into
account. The option Save open files before local analyses triggers Eclipse
to save all open files with changes before the selected analysis is started.
The Axivion Eclipse Plugin uses its own console inside Eclipse to print the current status of the
local analyses as well as error messages and the raw analysis results. By default the
content of this console is cleared before an analysis starts. This behavior can be
changed with the option Clear console before analyzing.
The options Installation directory and BAUHAUS_CONFIG can be
set per project, too. When an option is set in the preferences and in the project
properties, the project property takes precedence.
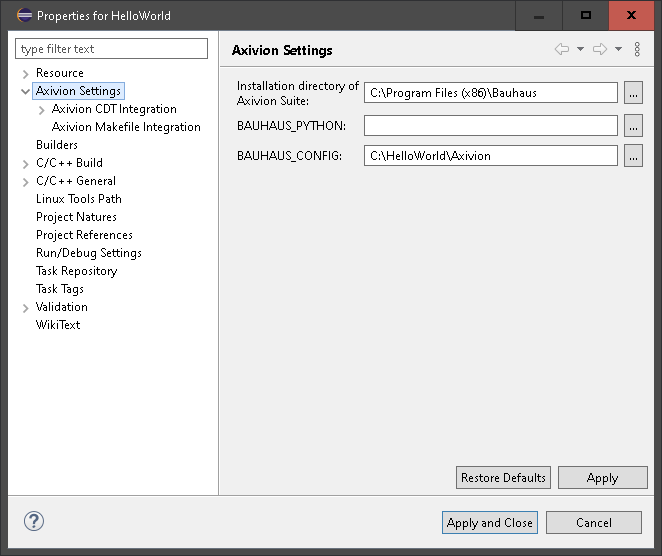
Common project properties of local analyses.
5.3.5.2. CDT Integration
The Axivion Eclipse Plugin allows you to start local analyses of your code from Eclipse. It uses the build information from CDT. Hence, it works only for managed make projects, where CDT generates the makefile. For standard make projects (CDT uses a user-generated and -maintained makefile), this feature is not available.
Note
The features Axivion Eclipse Plugin CDT Integration and Local Build (Local Build) are completely independent from each other. So the restriction to managed make projects of the CDT Integration does not apply for the Local Build.
Configuration
In order to run the analysis, the Axivion Suite tools have to be configured. The configuration is split into a (workspace) global and project-local ones. The project-local settings override the global settings if they exist.
(Workspace) Global Configuration
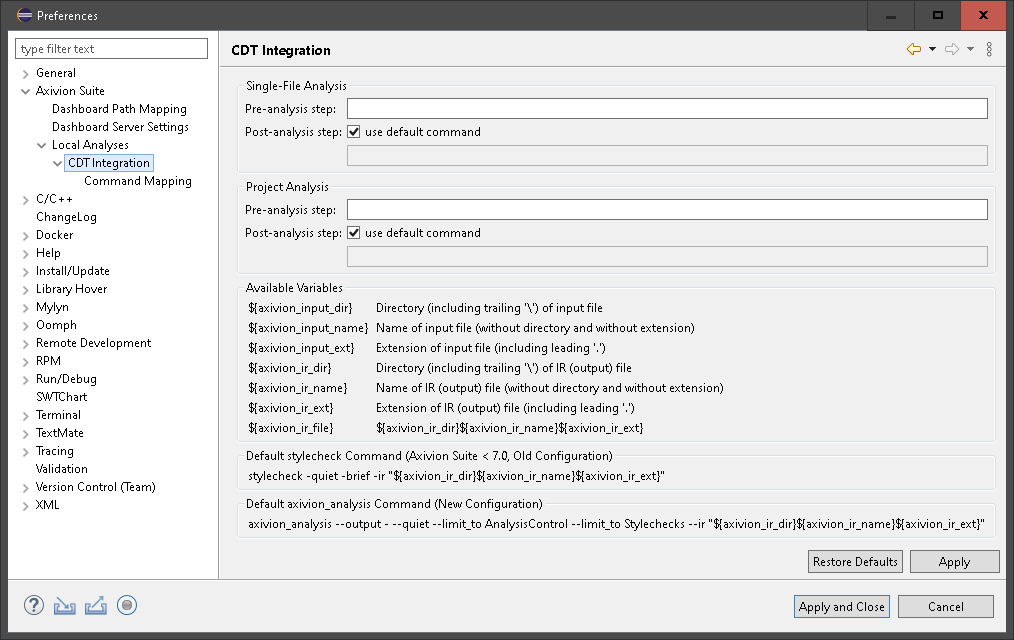
CDT Integration Preferences.
The Pre- and Post-analysis steps can be used to execute
arbitrary programs before and after the Axivion Suite tools compile the code.
Typically, the Post Analysis Step is used to run
axivion_analysis. The
variables shown on the preferences page can be used in all steps.
If use default command is set, the Axivion Eclipse Plugin guesses the
used analyzer tool (axivion_analysis or stylecheck) based
on the version of the Axivion Suite and the given Axivion Suite configuration.
Caution
If you use the commandline tools e.g. for checking style violations, you should also consider to set the corresponding exclude or include parameters in order to reduce the messages from parts of the code that you do not want to see.
The Axivion Eclipse Plugin has to invoke the Axivion Suite compiler and linker instead of the toolchain normally used. Therefore, a command mapping exists which maps the command that CDT would execute to the command the Axivion Eclipse Plugin executes in the analyses.
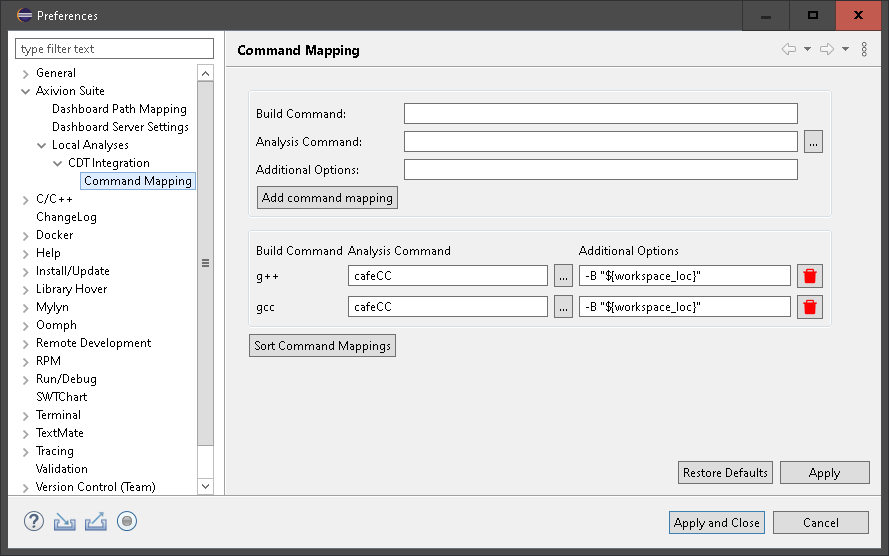
Command mapping preferences.
Apart from the sole command mapping, additional parameters can be set. These are passed to the executed process in addition to the parameters CDT would pass to the original command. In the command mapping, it is crucial to separate the parameters from the command.
Even when you click the button Restore Defaults, the changes are stored
only if you click Apply or OK. So accidentally restoring the
command mapping to defaults - and therefore deleting own command mappings - can be
undone by clicking the button Cancel.
<workspace>/.metadata/.plugins/org.eclipse.core.runtime/.settings/com.axivion.aclipse.plugin.prefs. To distribute the command mappings (and all
the other workspace global preferences of Axivion Eclipse Plugin, too) it is an option to simply
copy this file.(Project) Local Configuration
In addition to the workspace-global settings in the preferences, there are
project-specific (project-local) settings. These can be reached by right-clicking a
project and choosing Properties in the appearing context menu. The
category Axivion CDT Integration Settings will show the project-local
settings.
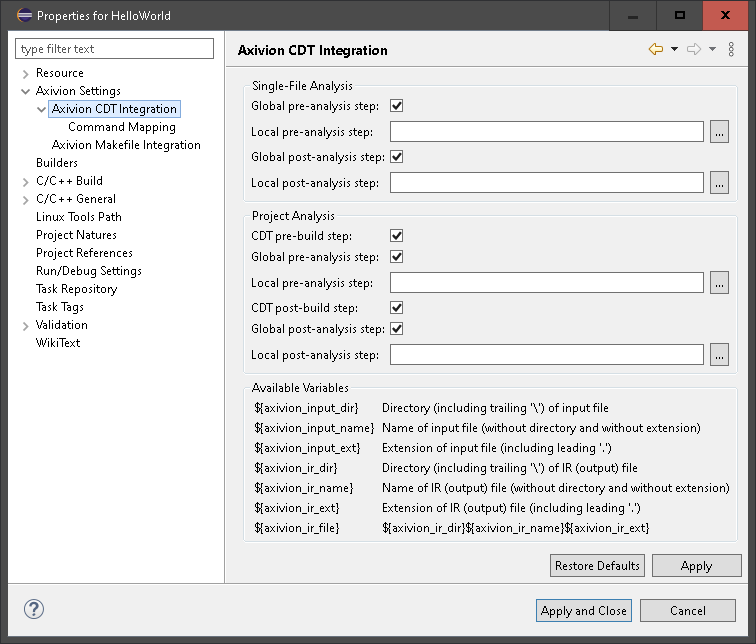
Axivion CDT Integration settings.
Pre- and Post-build steps allow you to control additional
steps which are executed before/after the actual build/analysis. Besides enabling or
disabling of the CDT and the Axivion global (determined in the preferences)
pre-/post-build steps, you can define local (project-specific) pre-/post-build steps.
The execution order is:
Axivion global pre-analysis step
Axivion local pre-analysis step
CDT build steps (pre-build step, build steps, post-build step)
Axivion local post-analysis step
Axivion global post-analysis step
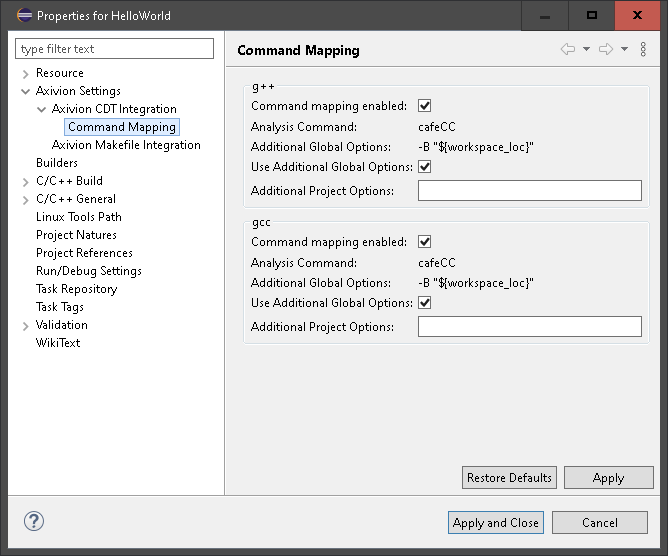
Command Mapping Properties.
The Command Mapping page allows the fine tuning of the command mapping for
the selected project. Mappings can be disabled to use the command which CDT would
execute. Besides the disabling of a command mapping, its options can be changed. It is
possible to disable the additional options defined in the global settings. Furthermore,
project-specific additional options can be defined.
Using the CDT Integration of Axivion Eclipse Plugin for Analysis
Besides using the Axivion Eclipse Plugin as dashboard viewer, it can be used to run analyses, too. It will detect which tools with which parameters CDT would use to build the project. The analysis tools are executed according to the information obtained from CDT and to the settings (e.g. the command mapping).
The execution of an analysis and the feedback of the results can be done with a
post-analysis step. The default will be to run axivion_analysis. It might
be necessary to configure the Axivion Suite installation directory (see
General Configuration). The Axivion Eclipse Plugin uses the CDT error parser
Axivion Analysis Error Parser to generate issue markers from the standard output (and
standard error) stream from the executed process.
The execution of axivion_analysis is just an example. You can define arbitrary
programs as post-analysis step. The available commandline options are described in
section Command-Line Switches.
Analyses are started from the context menu of the particular resource. On C/C++ projects, there are two menu items:
Axivion CDT Integration: Analyze ProjectandAxivion CDT Integration: Clean Project
The analysis of the project builds and analyzes dependencies, too. The clean command just cleans the selected project.
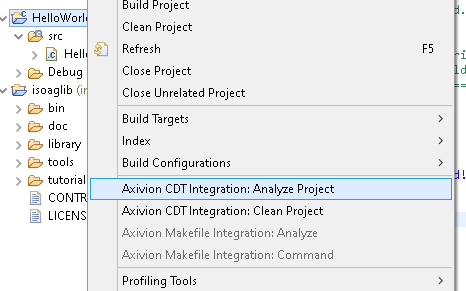
Project context menu with Axivion CDT Integration: Analyze Project and
Axivion CDT Integration: Clean Project.
It is also possible to analyze single files only. Therefore, you can use the item
Axivion CDT Integration: Analyze File(s) in the context menu of C/C++
source files.
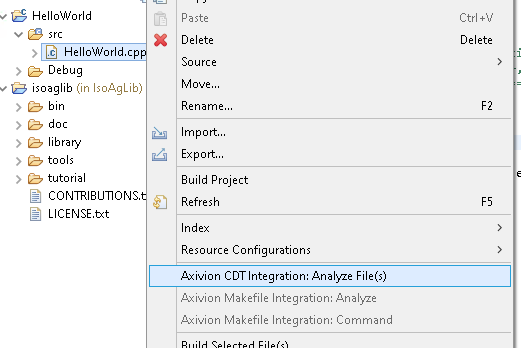
File context menu with Axivion CDT Integration: Analyze File(s).
The markers showing the found issues are removed on cleaning the project.
Note
The Axivion Eclipse Plugin will set the environment variable
AXIVION_USER_AGENT=AxivionEclipsePlugin/<version>
for every subprocess it starts.
5.3.5.3. Makefile Integration
The Makefile Integration allows quick checks of single files and folders. It requires that a customer-configured command (e.g. make with a special target) runs the build and the analysis tools of the Axivion Suite .
Caution
When analyzing folders, please be aware that you will not be able to run MISRA system checks on such a “module” because you only analyze part of the system.
Configuration
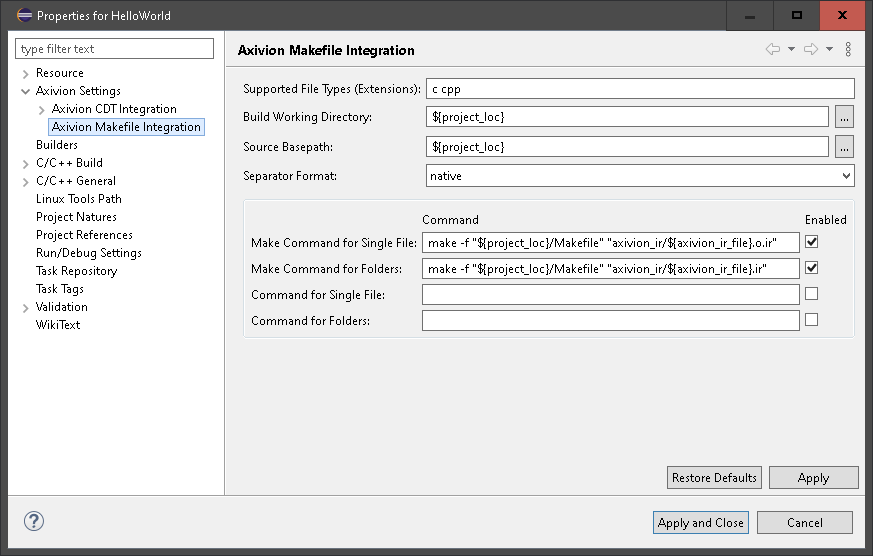
Single-File Analysis project properties.
The Supported File Types is a whitelist of file types which can be
analyzed. The context menu entry for analyzing single files is enabled only for files of
these types.
The command is started with the working directory specified in Build
Working Directory. Do not change this directory inside the analysis (e.g. in a
makefile) because it is used to parse the output for generating the markers.
The path of the selected file or folder will be made relative to the Source
Basepath path before it is injected into the make command (
${axivion_ir_file}). It must be an absolute path. E.g.:
source basepath: C:\Users\usr\project
selected file: C:\Users\usr\project\src\module\source.cpp
relative path: src\module\source.cpp
It might be necessary to not use the OS’s name separator for paths (Windows: “\\”,
Linux: “/”) but another separator. This can be achieved by the option
Separator Format.
The Enabled checkboxes enable/disable the corresponding Makefile
Integration context menu entries.
The Make Command for Single File is the command which executes the build
and the analysis for a single file. The Make Command for Folders is the
command which executes the build and analysis for folders.
Additionally to the commands for analysis, you can add two other commands:
Command for Single File and Command for Folders. They are
intended as “quick link” to common tasks but not for analyses.
By default, the commands do a make invocation with a special target but any command is
allowed. The variable ${axivion_ir_file} will be resolved to the
relativized selected file without file extension. The variable
${axivion_src_ext} is resolved to the extension of the source file without
the dot. For folders, the variable ${axivion_src_ext} will always be
empty. E.g.:
source basepath: C:\Users\usr\project
selected file: C:\Users\usr\project\src\module\source.cpp
${axivion_ir_file}: src\module\source
${axivion_src_ext}: cpp
The intended use case for the Makefile Integration is to call make with a special target which does the build and the analyses. A target could look like this example:
# Exemplary make target which builds the IR and does the analysis.
#
# Pattern rules cannot be phony, so use the trick of depending
# on a rule (FORCE) with empty recipe. As GNU Make supports
# phony targets, make FORCE phony.
# There must be no file or folder with the name "FORCE".
#
# Each invocation will build and analyze the given file.

IR_DIR = axivion_ir

.PHONY: FORCE

FORCE:

# Rule for analyzing a single file (cafeCC call may need adjustments):
$(IR_DIR)/%.o.ir: %.c %.cpp FORCE
     cafeCC -c $(CFLAGS) -o "$@" "$<"
     axivion_analysis --output - --quiet --limit_to AnalysisControl --limit_to Stylechecks --ir "$@"

# Rule for analyzing a folder (cafeCC call may need adjustments):
$(IR_DIR)/%.ir: % FORCE
     cafeCC -shared $(CFLAGS) -o "$@" $(wildcard $</*.c) $(wildcard $</*.cpp)
     axivion_analysis --output - --quiet --limit_to AnalysisControl --limit_to Stylechecks --ir "$@"
Configuration of Source basepath, ${axivion_ir_file} (make
command), and IR_DIR (Makefile):
$(IR_DIR)/%.o.ir: %.c %.cpp$(IR_DIR)/%.ir: %In the simplest case, ${axivion_ir_file} is the part of the target which
is matched by the %. So the target in the make command would be
$(IR_DIR)/${axivion_ir_file}.o.ir Eclipse and the Axivion Eclipse Plugin do
not know the value of the variable IR_DIR, so in the make command $(IR_DIR)
has to be replaced by its value.
Starting a Makefile Integration Analysis
To start the Makefile Integration analysis, open the context menu of the desired file
and click on the entry Axivion Makefile Integration: Analyze.
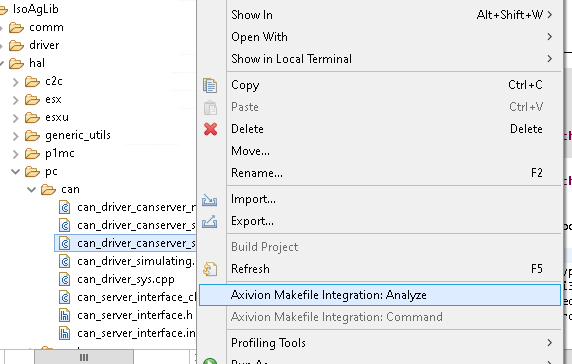
Makefile Integration context menu entry of a file.
Similarly, the analysis of a folder can be started from the context menu, too.
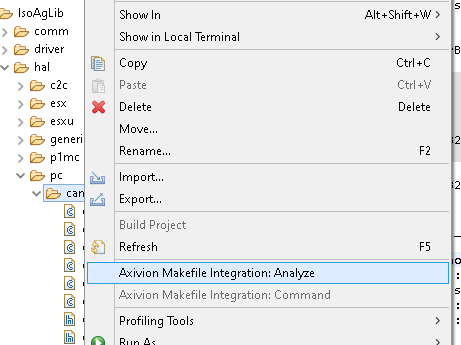
Makefile Integration context menu entry of a folder.
The output of the started process will be shown in a console. The plugin will convert the issues found into markers.