
5.5.4. Configuration
To access the settings, open File > Preferences > Settings and navigate to
Extensions > Axivion. Alternatively open the Extensions
sidebar panel and use the context menu on the Axivion extension to open
the Extension Settings.
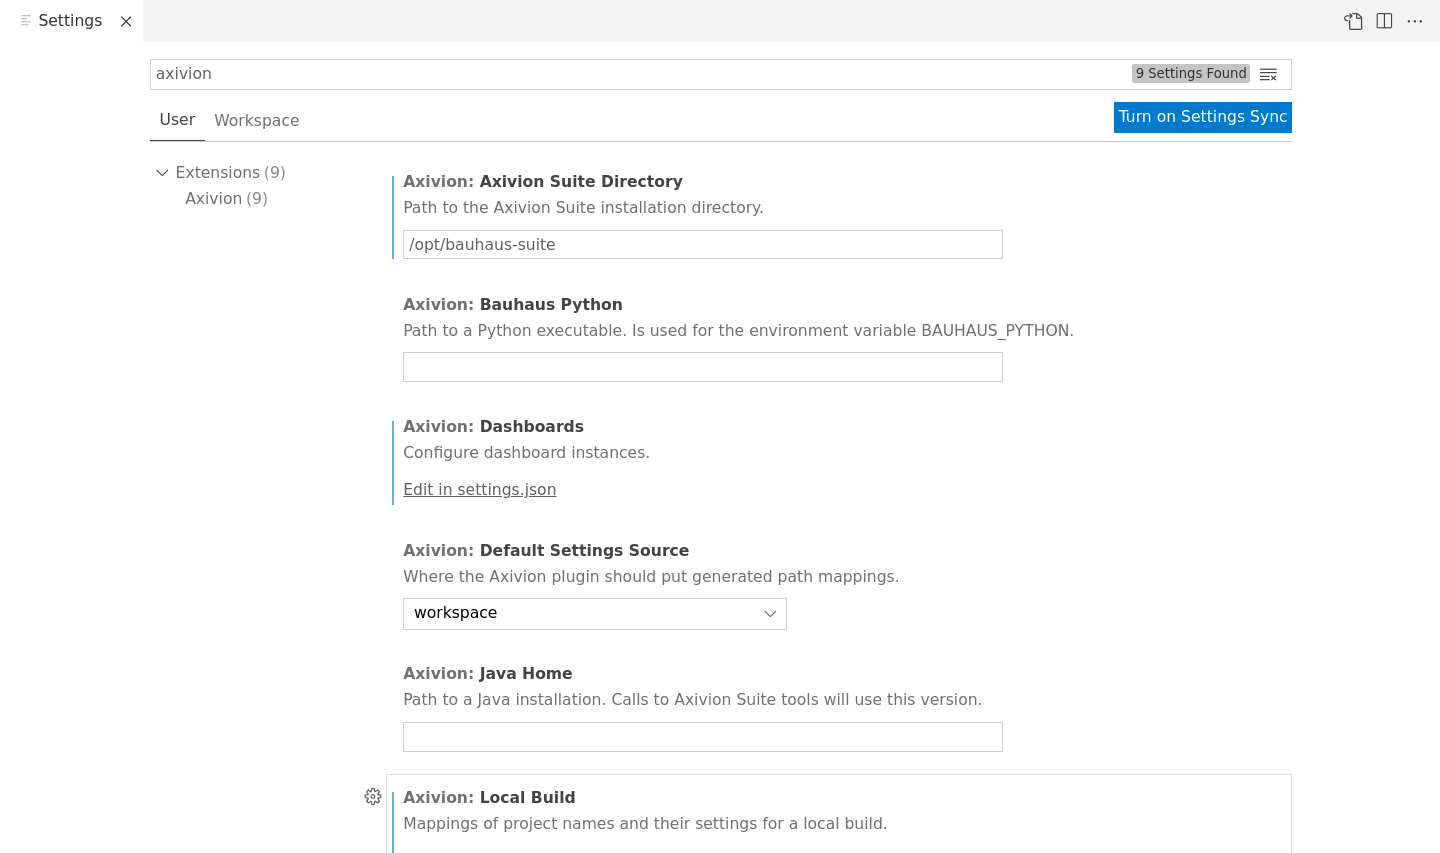
Axivion Visual Studio Code Plugin Settings
5.5.4.1. Connection to Axivion Dashboard Server
The Axivion Visual Studio Code Plugin is accessing the analysis results through the Axivion Dashboard Server. Therefore, the first step after installing the plugin is to configure the access to the Axivion Dashboard Server.
Here, click Axivion Dashboards > Edit in settings.json and specify a
workspace unique recognizable name as the Dashboard ID, the URL of the Axivion Dashboard Server,
and the username with which you wish to login to the Axivion Dashboard Server. The ID will be
used in the Issues View to select the Axivion Dashboard Server to connect to.
You can configure multiple Axivion Dashboard Servers.
Note
The settings.json mentioned throughout this section is the Visual Studio
Code settings file, not a configuration file of the Axivion Suite.
{
    "axivion.dashboards": [
        {
            "id": "user friendly Dashboard name",
            "url": "http://localhost:9090/axivion/"
        }
    ]
}
Please remember to save the settings.json file for the new configuration to
take effect.
Per default, anonymous authentication is used to connect to the Axivion Dashboard Server.
The Axivion Dashboard Server must be configured to support anonymous authentication.
You can specify a username per Axivion Dashboard Server in the Visual Studio Code
settings.json.
{
    "axivion.dashboards": [
        {
            "id": "user friendly Dashboard name",
            "url": "http://localhost:9090/axivion/",
            "username": "my-username"
        }
    ]
}
Instead of hard-coding the username, you can take it from an environment variable
using the ${env:VARIABLE} syntax (see
VSCode Variable Substitution). This is useful for a
workspace settings.json that is committed into source control and shared by
all developers working on the project. The environment variable holding the name of
the current user is USER on GNU/Linux and macOS and USERNAME
on Windows; the plugin treats the two as interchangeable and falls back to the other
one when the given variable is not set, so a single spelling works on all platforms.
{
    "axivion.dashboards": [
        {
            "id": "user friendly Dashboard name",
            "url": "http://localhost:9090/axivion/",
            "username": "${env:USER}"
        }
    ]
}
After the Axivion Dashboard Server is configured, open the Issues View pane
(Ax Status Bar Icon > Axivion: Show Issues View). If the dashboard
configuration is correct, you should be prompted for the Axivion Dashboard Server password. The
password/ApiToken is stored via the secret storage of Visual Studio Code. Since Visual Studio
Code 1.80, this storage no longer resides in the system keyring or the Windows
Credential Manager. Instead, Visual Studio Code encrypts the secrets and stores them
in its own database in the user data directory:
%APPDATA%\Code\User\globalStorage\state.vscdb on Windows,
~/.config/Code/User/globalStorage/state.vscdb on Linux, and
~/Library/Application Support/Code/User/globalStorage/state.vscdb on macOS.
Only the encryption key is protected by the operating system. On Windows, it uses
the Data Protection API of the user account, so no further steps are required. On
macOS, the key is kept in the Keychain as Code Safe Storage. On Linux, the key is
kept in the keyring (GNOME Keyring via libsecret, or KWallet), so you may be asked
for a password to unlock your keyring. If no keyring is available, Visual Studio Code
shows a warning; see the Visual Studio Code documentation on the --password-store
argument for the available options.
After entering the correct password, you should be able to select an analysis project
using the left-most combobox in the window, and view the list of issues within that
project. See Section Issue View for more details on the
Issues View window.
If the connection to the Axivion Dashboard Server fails, an error message will be displayed in place of the issue list.
The password will be transmitted to the Axivion Dashboard Server in clear text. Use HTTPS to prevent the password from being visible while it is being transmitted over the network.
If you are accessing the Axivion Dashboard Server over HTTPS, and the server is using a self-signed certificate, you might receive the error message:
Error while connecting to dashboard 'axivion.example.com':

request to https://axivion.example.com:9443/axivion/ failed, reason: unable to get local issuer certificate
Visual Studio Code (and therefore the Axivion Visual Studio Code Plugin) uses the system certificate store. Installing the root certificate of the Dashboard certificate should fix this error. https://code.visualstudio.com/docs/setup/network#_ssl-certificates
Caution
The error message
request to https://axivion.example.com:9443/axivion/ failed, reason: unable to verify the first certificate
indicates that the Axivion Dashboard Server only provides the server certificate during the TLS handshake. So Visual Studio Code failed to build and verify the certificate chain.
Visual Studio Code uses the system certificate store to retrieve the root certificate (trust anchor). But it does not read intermediate certificates from the system certificate store. So, for a working Axivion Visual Studio Code Plugin, it is crucial that the Axivion Dashboard Server delivers the whole certificate chain.
Caution
The error message
request to https://axivion.example.com:9443/axivion/ failed, reason: certificate has expired
in combination with a Let’s Encrypt certificate (New Default Chain) indicates that Visual Studio Code is incompatible with Let’s Encrypt’s hack to be compatible with old Android devices.
https://letsencrypt.org/2020/12/21/extending-android-compatibility.html
https://community.letsencrypt.org/t/production-chain-changes/150739
Switching to the Alternative Chain should fix the problem. For certbot,
the option preferred-chain = ISRG Root X1 (on command line
or in the file cli.ini, see
https://community.letsencrypt.org/t/what-is-the-chain-to-pass-to-preferred-chain-argument-to-keep-using-dst-root-x3-root-certificate/137889 )
can be used.
The New Default Chain and the Alternative Chain differ only in the intermediate certificates the server (Axivion Dashboard Server) provides during the TLS handshake. The New Default Chain contains one more certificate than the Alternative Chain:
Subject: C = US, O = Internet Security Research Group, CN = ISRG Root X1
Issuer: O = Digital Signature Trust Co., CN = DST Root CA X3
Serial number: 4001772137d4e942b8ee76aa3c640ab7
Thumbprint MD5: C1E1 FF07 F9F6 8849 8274 D1A1 8053 EABF
Thumbprint SHA-1: 933C 6DDE E95C 9C41 A40F 9F50 493D 82BE 03AD 87BF
Thumbprint SHA-256: 6D99 FB26 5EB1 C5B3 7447 65FC BC64 8F3C D8E1 BFFA FDC4 C2F9 9B9D 47CF 7FF1 C24F
So a workaround is to remove this certificate from the certificate chain the server (Axivion Dashboard Server or a (reverse) proxy server in front of the Dashboard) delivers.
Note
When there are certificate or TLS connection problems and you need support from Axivion, please send the following information with your support request e-mail:
The error message you are seeing and the content of the output pane channel
Axivion.The output of the OpenSSL command described in testing the Dashboard certificate configuration.
5.5.4.2. Path Mapping
Issues found by the Axivion Suite analysis will reference files on the build machine where the analysis was performed. In contrast, the Visual Studio Code editor operates on local files on the developer’s machine.
The path mapping in the Axivion Visual Studio Code Plugin determines the mappings between local
paths and analysis projects. This allows the plugin to jump to the corresponding local
file when double-clicking on an issue in the Issues View window.
It also works in the opposite direction: when opening a local file in the Visual Studio
Code editor, the path mapping is used to determine the corresponding analysis project and
file, and all the issues found in the latest analysis of that file are shown in the
breakpoint margin.
The path mapping configuration is stored in the Visual Studio Code settings.json.
This can be the user settings.json file or a workspace settings.json that
is committed into source control and shared by all developers working on the project.
Alternatively, path mapping configuration can also be stored in the “Global
configuration” ($HOME/.bauhaus/launcher.config).
Configuration of the Path Mapping
The Axivion Visual Studio Code Plugin can try to infer the path mapping automatically based on a local path.
This is done by double clicking on an issue in the Issues View.
If no matching path mapping is defined for the current project, the Axivion Visual Studio Code Plugin
searches for files inside the current workspace matching the file path.
The search is limited to five seconds and will return all files matched
within this search period.
If candidates are found, the user can choose one of the suggested files or pick
the option to “Search manually”.
Either by selecting the “Search manually” choice, cancelling the automatic search, or
when the Axivion Visual Studio Code Plugin does not find any local path candidates,
a file explorer window opens and prompts the user to locate the file containing this issue.
If this is successful, a path mapping entry is generated either in the workspace/user settings.json or the “Global
configuration” ($HOME/.bauhaus/launcher.config).
The default place where generated path mappings are stored can be chosen by specifying the defaultSettingsSource property
(options: “workspace” | “user” | “global”).
{
    "axivion.defaultSettingsSource": "workspace"
}
To configure the path mapping manually, open the settings for the Axivion extension and select
Axivion Path Mappings > Edit in settings.json. This is a list of path
mapping configurations. You need to specify a project name from the projects available
in your configured Axivion Dashboard Server and assign a local path to that, so that the Axivion Visual Studio Code Plugin
can open the correct file. The local path denotes a directory that corresponds to the base
path of the analysis. It is stored as an absolute path in your file system.
{
    "axivion.pathMappings": [
        {
            "analysisProject": "some-project",
            "localPath": "C:\\Users\\User\\Project\\src"
        }
    ]
}
Please remember to save the settings.json file for the new configuration to
take effect.
Optionally, you can select an analysis path prefix for which the mapping should be applied. That is, every path of an issue retrieved from the Axivion Dashboard Server that matches the analysis path is re-directed to your local path. This is useful, if only some parts of the analyzed source code are available locally.
The analysis path is a relative path describing a directory within the analysis project (relative to the basepath of the analysis project). If left empty, the mapping entry refers to the basepath of the analysis project.
{
    "axivion.pathMappings": [
        {
            "analysisProject": "some-project",
            "localPath": "C:\\Users\\User\\Project\\src",
            "analysisPath": "path/relative/to/the/analysis/basepath"
        }
    ]
}
The Axivion Visual Studio Code Plugin supports a special project name in form of *.
This will try to match the path mapping for every project.
This special path mapping can be useful when working with remote workspaces.
{
    "axivion.pathMappings": [
        {
            "analysisProject": "*",
            "localPath": "${workspaceFolder}"
        }
    ]
}
A more elaborated example of a configuration can be found in the documentation of the Axivion Visual Studio Plugin in Section Example Configuration.
5.5.4.3. Local Build Settings
For the Local Build to work, the Axivion Visual Studio Code Plugin needs access to your locally installed
Axivion Suite. You can either configure it as follows or ensure the Axivion Suite directory
is part of your PATH variable.
{
    "axivion.axivionSuiteDirectory": "C:\\Users\\User\\Tools\\AxivionSuite"
}
To configure the Local Build, you will need to specify the command which
triggers the analysis. Please refer to Starting Local Build from within the IDE Plugins.
If you have multiple versions of Axivion Suite installed, you can choose which one to
use for each project by overriding the global axivionSuiteDirectory setting.
{
    "axivion.localBuild": {
        "some-project": {
            "command": "analysis.bat"
        },
        "second-project": {
            "command": "C:\\Users\\User\\Project\\axivion\\start_analysis.bat",
            "axivionSuiteDirectory": "C:\\Users\\User\\Tools\\DifferentAxivionSuite"
        }
        "*": {
            "command": "my-works-with-all-projects.bat"
        },
    }
}
Caution
Please take care to correctly escape any special characters in the command
value (also applies to variables such as ${workspaceFolder}).
{
    "axivion.localBuild": {
        "my-project": {
            "command": "\"C:\\Users\\User\\Project With Spaces\\axivion\\start_analysis.bat\""
        },
        "my-other-project": {
            "command": "\"${workspaceFolder}\\axivion\\start_analysis.bat\""
        }
    }
}
5.5.4.4. Single-File Analysis Settings
For the Single-File Analysis to work, the Axivion Visual Studio Code Plugin needs access to your locally installed
Axivion Suite. You can either configure it as follows or ensure the Axivion Suite directory
is part of your PATH variable.
{
    "axivion.axivionSuiteDirectory": "C:\\Users\\User\\Tools\\AxivionSuite"
}
The Single-File Analysis command should point to an executable.
It is responsible for creating a IR for the analyzing file and calling the analyzer tool axivion_analysis.
The bauhausConfig property points to the configuration directory of the analyzer tool.
It corresponds to the BAUHAUS_CONFIG variable.
Upon starting the Single-File Analysis, you will be prompted to select one of the existing Single-File Analysis configurations, if there are multiple.
"axivion.singleFileAnalysis": [
    {
        "command": "${workspaceFolder}\\axivion\\single_file_analysis_variant_1.bat ${file}"
        "bauhausConfig": "${workspaceFolder}\\axivion",
    },
    {
        "command": "${workspaceFolder}\\axivion\\single_file_analysis_variant_2.bat ${file}"
        "bauhausConfig": "${workspaceFolder}\\axivion",
    }
]
See VSCode Variable Substitution for supported variable substitutions in the command property.
Caution
Please take care to correctly escape any special characters in the command
value (also applies to variables such as ${workspaceFolder}).
:: 1. Execute the Axivion compiler on source file "%1" to produce a Unit IR file.
cafeCC -B. -c -o "%1.o.ir" "%1"

:: 2. Execute the actual payload analysis on the Unit IR file from step 1.
axivion_analysis --output - --quiet --ir "%1.o.ir"
Note
The above is just meant as an example, not as a working solution. You will definitely have to adjust the compiler invocation call to your specific project.
When using any of the build integrations CompileCommandsIntegration,
IARIntegration, KeilIntegration, RenesasIntegration or any of
their command-line counterparts (build_compile_commands, build_ewp,
build_uvprojx, build_rcpe), then you can directly invoke a single-file
analysis using those command-line tools as follows:
build_compile_commands --single_file "%1" build_axivion/compile_commands.json
build_ewp --single_file "%1" MyProject.ewp
build_uvprojx --single_file "%1" MyProject.uvprojx
build_rcpe --single_file "%1" MyProject.rcpe
5.5.4.5. VSCode Variable Substitution
VSCode does not have built-in support for variable substitution in configuration files (settings.json) as they have for
tasks.json and launch.json. See https://code.visualstudio.com/docs/editor/variables-reference.
We decided to include support for the ${workspaceFolder} variable in our introduced properties listed below.
{
    "axivion.pathMappings": [
        {
            "analysisProject": "some-project",
            "localPath": "${workspaceFolder}\\src"
        }
    ],
    "axivion.axivionSuiteDirectory": "${workspaceFolder}\\third-party\\tools\\Axivion-Suite",
    "axivion.localBuild": {
        "some-project": {
            "command": "${workspaceFolder}\\axivion\\analysis.bat",
            "axivionSuiteDirectory": "${workspaceFolder}\\third-party\\tools\\Other-Axivion-Suite"
        }
    }
}
In a code workspace with multiple workspace folders, ${workspaceFolder:<workspace_name>} is also supported,
where <workspace_name> is the name of the workspace folder as shown in the VSCode explorer view.
We also support the substitution variable ${workspaceRoot} but highly discourage its usage as it has been deprecated.
See https://code.visualstudio.com/docs/editor/variables-reference#_why-isnt-workspaceroot-documented.
For the axivion.singleFileAnalysis.command property we support following variables which are also often used in tasks.json:
${file} - the current opened file
${fileWorkspaceFolder} - the current opened file's workspace folder
${relativeFile} - the current opened file relative to workspaceFolder
${relativeFileDirname} - the current opened file's dirname relative to workspaceFolder
${fileBasename} - the current opened file's basename
${fileBasenameNoExtension} - the current opened file's basename with no file extension
${fileDirname} - the current opened file's dirname
${fileExtname} - the current opened file's extension
{
    "axivion.singleFileAnalysis": {
         "bauhausConfig": "${workspaceFolder}\\axivion",
         "command": "${workspaceFolder}\\axivion\\analysis.bat ${file}"
    }
}
We support environment variable substitution using the ${env:VARIABLE} syntax, where VARIABLE is the name of the environment variable known to VSCode at startup time:
{
   "axivion.dashboards": [
     {
       "id": "...",
       "username": "${env:USER}",
       "url": "..."
     },
   ],
   "axivion.axivionSuiteDirectory": "${env:HOME}/axivion-suite",
}
The variables USER (set on GNU/Linux and macOS) and USERNAME
(set on Windows) are treated as interchangeable: if the given variable is not set,
the value of the other one is used. So the example above also works on Windows.