C
Getting started on NXP (BareMetal and FreeRTOS)
Overview
This topic provides all the necessary information to get started on the NXP platforms supported by Qt Quick Ultralite.
Note: These instructions apply when you are working with NXP targets that run on BareMetal or FreeRTOS. For information on how to get started with NXP targets that run on Linux or Zephyr®, see Getting started on NXP (Linux) and Getting started on NXP (Zephyr).
Installing prerequisites
Make sure you have all the prerequisites installed before setting up the development environment.
Setting up the development environment
Configuring the Qt Creator IDE (BareMetal and FreeRTOS)
To develop for MCUs using the Qt Creator IDE, the MCU plugin is required. Qt Online Installer enables it by default when you install the Qt for MCUs SDK.
To build and run your application on MCUs, you must create a kit:
- Select Edit > Preferences > SDKs > MCU.
Note: If you cannot see the MCU tab, select Help > About Plugins, enable the Qt for MCUs plugin, and restart Qt Creator to apply changes.
- If not already set, provide the path to the Qt for MCUs installation directory.
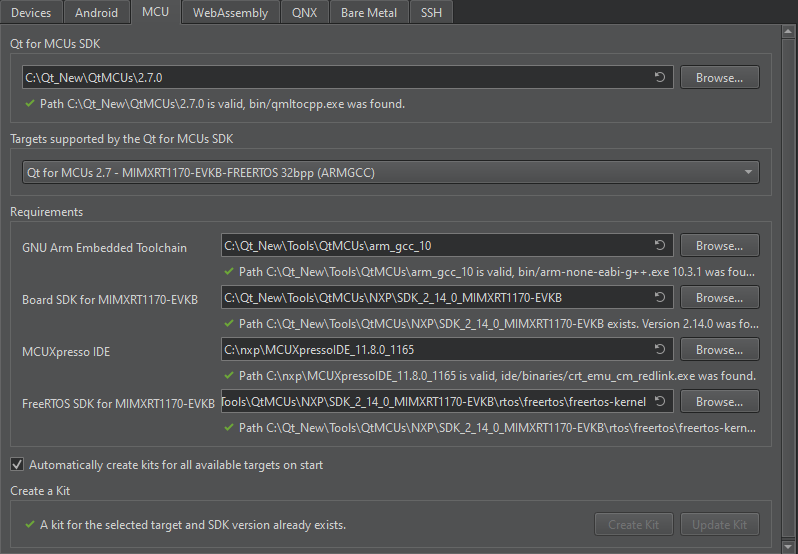
- Select a Target supported by the Qt for MCUs SDK. For example, Qt for MCUs 2.12.2 - MIMXRT1170-EVKB-FREERTOS 32BPP.
- In the Requirements section, ensure that the platform-specific requirements are met.
- Select Automatically create kits for all available targets on start to create kits automatically.
Note: You can also create/update kits manually using Create Kit and Update Kit.
- Select Apply and restart Qt Creator if you choose to create kits automatically.
Configuring CMake variables
You can also set up the development environment from the command prompt. For more information on how to use CMake with Qt Quick Ultralite when developing applications for NXP boards, see CMake manual for NXP boards.
Flashing the firmware (BareMetal and FreeRTOS)
Flashing and debugging NXP boards requires the board to have the OpenSDA firmware. If an incorrect firmware is flashed, the tools may fail to establish connection with the device.
To check the firmware, connect your device to your development host and open the provided USB storage device. In the DETAILS.TXT file, look for the line starting with "USB Interfaces". It has to list "CDC" and "HID". If these are missing, you are probably using an incorrect firmware.
NXP provides the firmware for download. On the download page, select the type of your type of board and download the "Default firmware application, DAPLink". After flashing this to your board by following the instructions from NXP, the CDC and HID interface should be listed.
Building applications with prebuilt Qt Quick Ultralite libraries
Building applications using Qt Creator IDE
- Open the CMake project file for the example you want to build.
- In the Configure Project window:
- Select the appropriate kit. For example, Qt for MCUs 2.12.2 - MIMXRT1170-EVKB-FREERTOS 32BPP.
- Select Configure Project.
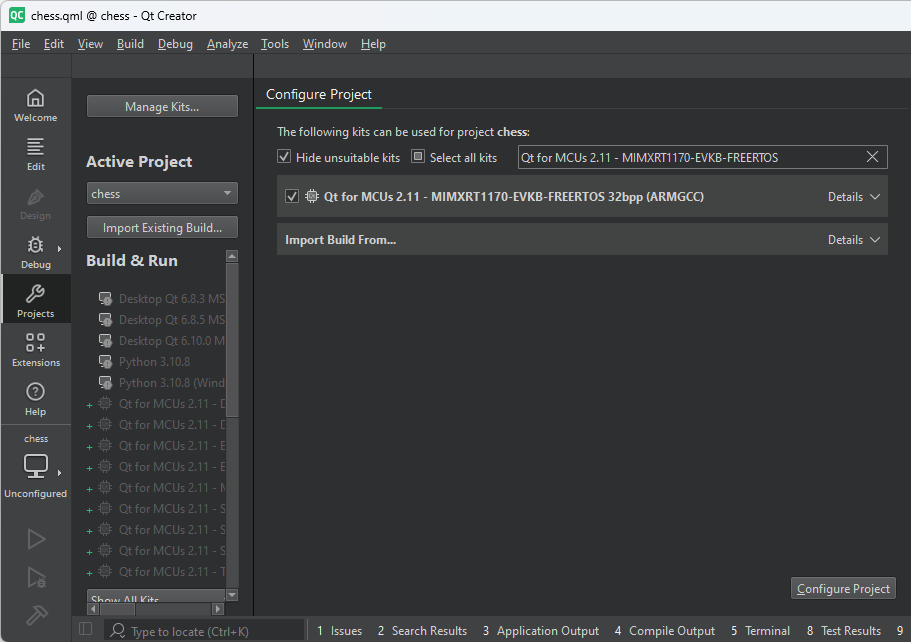
Once the project is configured, select Run or press Ctrl+r on your keyboard to build and flash the binary to the target.
Building applications using the command prompt
BareMetal and FreeRTOS
The examples below illustrate how to build the minimal example for MIMXRT1170-EVKB.
QUL_ROOT and QUL_TOOLS are used in the command line examples below as if they were set as environment variables. For example:
export QUL_ROOT=$HOME/Qt/QtMCUs/2.12.2
export QUL_TOOLS=$HOME/Qt/Tools/QtMCUs
set QUL_ROOT=C:\Qt\QtMCUs\2.12.2
set QUL_TOOLS=C:\Qt\Tools\QtMCUscd $QUL_ROOT/examples/minimal
mkdir build
cd build
cmake .. -G "Ninja" -DCMAKE_BUILD_TYPE=MinSizeRel -DQul_ROOT=$QUL_ROOT -DCMAKE_TOOLCHAIN_FILE=$QUL_ROOT/lib/cmake/Qul/toolchain/armgcc.cmake -DQUL_TARGET_TOOLCHAIN_DIR=$QUL_TOOLS/arm_gcc_12_3_1 -DQUL_BOARD_SDK_DIR=$QUL_TOOLS/NXP/SDK_2_15_0_MIMXRT1170-EVKB -DQUL_PLATFORM=MIMXRT1170-EVKB-freertos -DMCUXPRESSO_IDE_PATH=/path/to/the/MCUXpressoIDE -DFREERTOS_DIR=$QUL_TOOLS/NXP/SDK_2_15_0_MIMXRT1170-EVKB/rtos/freertos/freertos-kernel
cmake --build .cd %QUL_ROOT%\examples\minimal
mkdir build
cd build
cmake .. -G "Ninja" -DCMAKE_BUILD_TYPE=MinSizeRel -DQul_ROOT=%QUL_ROOT% -DCMAKE_TOOLCHAIN_FILE=%QUL_ROOT%\lib\cmake\Qul\toolchain\armgcc.cmake -DQUL_TARGET_TOOLCHAIN_DIR=%QUL_TOOLS%\arm_gcc_12_3_1 -DQUL_BOARD_SDK_DIR=%QUL_TOOLS%\NXP\SDK_2_15_0_MIMXRT1170-EVKB -DQUL_PLATFORM=MIMXRT1170-EVKB-freertos -DMCUXPRESSO_IDE_PATH=C:\path\to\the\MCUXpressoIDE -DFREERTOS_DIR=%QUL_TOOLS%\NXP\SDK_2_15_0_MIMXRT1170-EVKB\rtos\freertos\freertos-kernel
cmake --build .Once you have successfully built the minimal example application, use the following command to flash it:
cmake --build . --target flash_minimalThe same procedure applies to any other application.
Debugging
Reading debug messages
By default, the output of qul_printf and Qul::PlatformInterface::log calls are redirected to a virtual serial port, which is exposed on the host machine via USB.
Debugging via JTag
To debug application code, a hardware debugger can be connected to the board's JTag port, and J-Link software must be installed from here.
Note: The MIMXRT1170-EVKB board is used in the command examples below. For details on other NXP boards, follow the links under board-specific information.
The jumper JP5 must be enabled when debugging via JTag.
Warning: Enabling jumper JP5 prevents flashing via DAP-Link. It must be disabled before using DAP-Link again.
- Start the gdb server
JLinkGDBServer -endian little -noir -speed auto -port 2331 -vd -device MIMXRT1176xxxA_M7 -if SWD -halt -reportuseraction -JLinkScriptFile evkbmimxrt1170_connect_cm4_cm7side.jlinkscript - Run
arm-none-eabi-gdbin a separate consolec:\path\to\bin\arm-none-eabi-gdb.exe path\to\compiled.elf -ex "target remote localhost:2331" (gdb) monitor reset halt (gdb) continueNote: If the monitor reset gdb command does not reset the device, use the load command. JLink script file is delivered with SDK package.
Debugging via DAP-Link
For convenience, you can set an environment variable that points to the Redlink tool, which is part of the MCUXpresso IDE.
export REDLINK=$MCUXPRESSO_IDE_PATH/ide/LinkServer/binaries/crt_emu_cm_redlinkset REDLINK=%MCUXPRESSO_IDE_PATH%\ide\LinkServer\binaries\crt_emu_cm_redlinkWhere, MCUXPRESSO_IDE_PATH is an environment variable pointing to the MCUXpresso IDE installation directory.
Note: If your MCUXpresso IDE version is 11.8 or older, the crt_emu_cm_redlink binary is installed to the IDE itself and can be accessed from <MCUXPRESSO_IDE_PATH>/ide/binaries/crt_emu_cm_redlink.
- Connect a USB cable to the board (to J11) and to the host PC. Open a terminal window and run the following command.
Note: The MIMXRT1170-EVKB board is used in the command examples below. For details on other NXP boards, follow the links under board-specific information.
$REDLINK --server :50032 --mi -2 -vc -p MIMXRT1176xxxxx --ConnectScript RT1170_connect_M7_wake_M4.scp --resetscript RT1170_reset.scp -x .\platform\boards\nxp\mimxrt1170-evkb-freertos\cmake%REDLINK% --server :50032 --mi -2 -vc -p MIMXRT1176xxxxx --ConnectScript RT1170_connect_M7_wake_M4.scp --resetscript RT1170_reset.scp -x .\platform\boards\nxp\mimxrt1170-evkb-freertos\cmakeGDB Server is now listening for TCP connections on port,
50032.Note: To change TCP port used by
redlink_server, change--server :50032to different value. - Run
arm-none-eabi-gdbin a separate console/path/to/bin/arm-none-eabi-gdb <PATH_TO>/your_app.elfC:\path\to\bin\arm-none-eabi-gdb.exe <PATH_TO>\your_app.elf - Connect to the target via the
gdbserverin thearm-none-eabi-gdbconsole using(gdb) target remote :50032 - Alternatively, flash the target device from the
arm-none-eabi-gdbconsole using the following command:(gdb) load
Board-specific information
The currently supported NXP targets running on BareMetal or FreeRTOS are listed below. For more information on all the targets supported by Qt Quick Ultralite, see Supported target boards and development hosts.
Tier 1: Reference targets
| Hardware board | MCU | Compiler | Operating system(s) |
|---|---|---|---|
| MIMXRT1050-EVKB | MIMXRT1052DVL6B | GNU Arm GCC 12.3.rel1, IAR Build Tools for Arm V9.40 | BareMetal, FreeRTOS |
| MIMXRT1064-EVK | MIMXRT1064DVL6A | GNU Arm GCC 12.3.rel1, IAR Build Tools for Arm V9.40 | FreeRTOS |
| MIMXRT1170-EVKB | MIMXRT1176DVMAA | GNU Arm GCC 12.3.rel1, IAR Build Tools for Arm V9.40 | FreeRTOS |
Tier 2: Verified targets
| Hardware board | MCU / MPU | Compiler | Operating system(s) |
|---|---|---|---|
| MIMXRT1060-EVKB | MIMXRT1060DVL6B MCU | GNU Arm GCC 12.3.rel1, IAR Build Tools for Arm V9.40 | BareMetal |
Resource cache policy
By default, an application's resource data is copied to SDRAM on startup. In order to retain these resources in flash and not load them to RAM on startup, add the following QmlProject option to your qmlproject file:
MCU.Config {
    resourceCachePolicy: "NoCaching"
}
Alternatively, it can be enabled only for individual images like this:
ImageFiles {
    files: [
        "big/button.png"
    ]
    MCU.resourceCachePolicy: "NoCaching"
}Available under certain Qt licenses.
Find out more.
