Qt Quick für Android Studio-Projekte
Qt Quick für Android API Beispiele sind Android Studio Projekte
Die Qt Quick für Android API Beispiele werden als Android Studio Projekte bereitgestellt. Die Projektordner befinden sich in Ihrem Qt-Installationsverzeichnis.
Unter dem Standard-Windows-Installationspfad finden Sie sie zum Beispiel hier:
C:\Qt\Examples\Qt-<patch-release-number>\platforms\android\<example-name>
Diese Projekte sind bereits so konfiguriert, dass sie eine mit dieser Qt-Version kompatible Version des Qt Gradle Plugin verwenden.
Übersicht
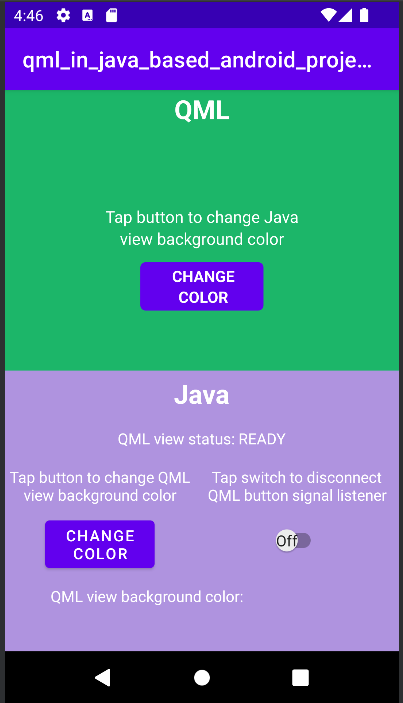
Dieses Beispiel enthält ein QML-Projekt, das Sie mit dem Qt Tools for Android Studio Plugin in Android Studio importieren können. Es gibt Java- und Kotlin-Projekte, die das QML-Projekt als Ansicht verwenden, indem sie die QtQuickView-API nutzen.
Weitere Informationen darüber, wie QML funktioniert, finden Sie unter Qt Qml. Diese Dokumentation konzentriert sich darauf, wie eine QML-Komponente in Android-Anwendungen mit Java oder Kotlin eingebettet wird.
Änderungen in main() werden von Qt Quick für Android-APIs benötigt.
Die main.cpp einer typischen Qt Quick -Anwendung sieht wie folgt aus:
#include <QGuiApplication>
#include <QQmlApplicationEngine>

int main(int argc, char *argv[])
{
    QGuiApplication app(argc, argv);

    QQmlApplicationEngine engine;
    QObject::connect(
        &engine,
        &QQmlApplicationEngine::objectCreationFailed,
        &app,
        []() { QCoreApplication::exit(-1); },
        Qt::QueuedConnection);
    engine.loadFromModule("MyQtQuickProject", "Main");

    return app.exec();
}
In main() müssen wir keine QML-Engine erstellen oder QML laden, das später von den Qt Quick View-APIs verarbeitet wird. Alles, was wir brauchen, ist in main() zu finden:
#include <QGuiApplication>

int main(int argc, char *argv[])
{
    QGuiApplication app(argc, argv);

    return app.exec();
}
Einrichten des Layouts
Sowohl für Java- als auch für Kotlin-Projekte müssen wir das Layout für die QtQuickViewsin app/src/main/res/layout/activity_main.xml einrichten.
Innerhalb von LinearLayout richten wir zwei FrameLayouts für jede QtQuickView ein.
 <FrameLayout
    android:id="@+id/firstQmlFrame"
    android:layout_width="match_parent"
    android:layout_height="0dp"
    android:layout_weight="1">
</FrameLayout>

<FrameLayout
    android:id="@+id/secondQmlFrame"
    android:layout_width="match_parent"
    android:layout_height="0dp"
    android:layout_weight="1">
</FrameLayout>
Die id ist das, worauf in der Kotlin- oder Java-codierten MainActivity verwiesen wird.
Importieren automatisch generierter QML-Typ-Java-Klassen
Die Java-Klassen für unsere QML-Typen werden generiert, wenn das Qt Quick Projekt erstellt wird. Diese müssen importiert werden, bevor wir sie in unserer MainActivity verwenden können.
import org.qtproject.example.qtquickview.QmlModule.Main;
import org.qtproject.example.qtquickview.QmlModule.Second;
import org.qtproject.example.qtquickview.QmlModule.Main
import org.qtproject.example.qtquickview.QmlModule.Second
Hinweis: Siehe die CMake-Variable QT_ANDROID_GENERATE_JAVA_QTQUICKVIEW_CONTENTS für weitere Informationen zur Java-Code-Generierung von QML-Komponenten.
Die onCreate()-Methode von MainActivity
Zunächst sehen wir uns die onCreate()-Methode von MainActivity in den Java- und Kotlin-Projekten an.
@Override
protected void onCreate(Bundle savedInstanceState) {
    super.onCreate(savedInstanceState);
    setContentView(R.layout.activity_main);

    m_qmlViewBackgroundText = findViewById(R.id.qmlViewBackgroundText);
    m_qmlStatus = findViewById(R.id.qmlStatusText);
    m_androidControlsLayout = findViewById(R.id.javaRelative);
    m_colorBox = findViewById(R.id.qmlColorBox);
    m_switch = findViewById(R.id.disconnectQmlListenerSwitch);
    m_switch.setOnClickListener(view -> switchListener());
    QtQuickView m_firstQuickView = new QtQuickView(this);
    QtQuickView m_secondQuickView = new QtQuickView(this);

    // Set status change listener for m_qmlView
    // listener implemented below in OnStatusChanged
    m_firstQmlContent.setStatusChangeListener(this);
    m_secondQmlContent.setStatusChangeListener(this);
    final ViewGroup.LayoutParams params = new FrameLayout.LayoutParams(
            ViewGroup.LayoutParams.MATCH_PARENT, ViewGroup.LayoutParams.MATCH_PARENT);
    FrameLayout m_firstQmlFrameLayout = findViewById(R.id.firstQmlFrame);
    m_firstQmlFrameLayout.addView(m_firstQuickView, params);
    FrameLayout m_secondQmlFrameLayout = findViewById(R.id.secondQmlFrame);
    m_secondQmlFrameLayout.addView(m_secondQuickView, params);
    m_firstQuickView.loadContent(m_firstQmlContent);
    m_secondQuickView.loadContent(m_secondQmlContent);

    Button m_changeColorButton = findViewById(R.id.changeQmlColorButton);
    m_changeColorButton.setOnClickListener(view -> onClickListener());
    Button m_rotateQmlGridButton = findViewById(R.id.rotateQmlGridButton);
    m_rotateQmlGridButton.setOnClickListener(view -> rotateQmlGrid());
}
override fun onCreate(savedInstanceState: Bundle?) {
super.onCreate(savedInstanceState)
m_binding = ActivityMainBinding.inflate(layoutInflater)
val view = m_binding.root
setContentView(view)
m_binding.disconnectQmlListenerSwitch.setOnCheckedChangeListener { button, checked ->
switchListener(
button,
checked
)
}
val firstQtQuickView = QtQuickView(this)
val secondQtQuickView = QtQuickView(this)
// Set status change listener for m_qmlView
// listener implemented below in OnStatusChanged
m_firstQmlContent.setStatusChangeListener(this)
m_secondQmlContent.setStatusChangeListener(this)
val params: ViewGroup.LayoutParams = FrameLayout.LayoutParams(
ViewGroup.LayoutParams.MATCH_PARENT, ViewGroup.LayoutParams.MATCH_PARENT
)
m_binding.firstQmlFrame.addView(firstQtQuickView, params)
m_binding.secondQmlFrame.addView(secondQtQuickView, params)
firstQtQuickView.loadContent(m_firstQmlContent)
secondQtQuickView.loadContent(m_secondQmlContent)
m_binding.changeQmlColorButton.setOnClickListener { onClickListener() }
m_binding.rotateQmlGridButton.setOnClickListener { rotateQmlGrid() }
}Hinweis: Im Kotlin-Projekt verwenden wir View-Binding für den Zugriff auf die UI-Komponenten der Anwendung:
m_binding = ActivityMainBinding.inflate(layoutInflater) val view = m_binding.root setContentView(view)
Innerhalb der Methode onCreate() werden zuvor deklarierte Variablen mit neuen QtQuickView-Instanzen initialisiert. Diese Instanzen nehmen die Context der Java/Kotlin-Aktivität als Argumente an.
QtQuickView m_firstQuickView = new QtQuickView(this);
QtQuickView m_secondQuickView = new QtQuickView(this);
val firstQtQuickView = QtQuickView(this)
val secondQtQuickView = QtQuickView(this)
Die QtQuickView-Instanzen werden dem Android-Layout mit den entsprechenden Layout-Parametern hinzugefügt.
final ViewGroup.LayoutParams params = new FrameLayout.LayoutParams(
        ViewGroup.LayoutParams.MATCH_PARENT, ViewGroup.LayoutParams.MATCH_PARENT);
FrameLayout m_firstQmlFrameLayout = findViewById(R.id.firstQmlFrame);
m_firstQmlFrameLayout.addView(m_firstQuickView, params);
FrameLayout m_secondQmlFrameLayout = findViewById(R.id.secondQmlFrame);
m_secondQmlFrameLayout.addView(m_secondQuickView, params);
val params: ViewGroup.LayoutParams = FrameLayout.LayoutParams(
ViewGroup.LayoutParams.MATCH_PARENT, ViewGroup.LayoutParams.MATCH_PARENT
)
m_binding.firstQmlFrame.addView(firstQtQuickView, params)
m_binding.secondQmlFrame.addView(secondQtQuickView, params)Die Java-Klassen Main und Second erben von der Klasse QtQuickViewContent. Diese Klassen werden aus dem QML-Projekt generiert, das wir importiert haben.
private final Main m_firstQmlContent = new Main();
private final Second m_secondQmlContent = new Second();
private val m_firstQmlContent: Main = Main()
private val m_secondQmlContent: Second = Second()
Der Inhalt von Qt Quick wird über die Methode QtQuickView.loadContent() geladen, die einen QtQuickViewContent als Argument annimmt.
m_firstQuickView.loadContent(m_firstQmlContent);
m_secondQuickView.loadContent(m_secondQmlContent);
firstQtQuickView.loadContent(m_firstQmlContent)
secondQtQuickView.loadContent(m_secondQmlContent)
Interaktion mit QML-Komponenten
Um mit den eingebetteten QML-Komponenten zu interagieren, implementieren wir die QtQmlStatusChangeListener-Schnittstelle und überschreiben die onStatusChanged -Methode, um den Ladestatus des QtQuickViewContent zu erhalten, der gerade in den QtQuickView geladen wird.
public class MainActivity extends AppCompatActivity implements
QtQmlStatusChangeListener {
    ...
}
class MainActivity : AppCompatActivity(), QtQmlStatusChangeListener {
    ...
}
Die Umsetzung von onStatusChanged:
@Override
public void onStatusChanged(QtQmlStatus qtQmlStatus, QtQuickViewContent content) {
    Log.i(TAG, "Status of QtQuickView: " + qtQmlStatus);

    // Show current QML View status in a textview
    m_qmlStatus.setText(getString(R.string.qml_view_status, m_statusNames.get(qtQmlStatus)));
    updateColorDisplay();

    if (content == m_firstQmlContent) {
        // Connect signal listener to "onClicked" signal from main.qml
        // addSignalListener returns int which can be used later to identify the listener
        if (qtQmlStatus == QtQmlStatus.READY && m_switch.isChecked()) {
            m_qmlButtonSignalListenerId = m_firstQmlContent.connectOnClickedListener(
                    (String name, Void v) -> {
                        Log.i(TAG, "QML button clicked");
                        m_androidControlsLayout.setBackgroundColor(Color.parseColor(
                                m_colors.getColor()
                        ));
                    });
        }
    }
}
override fun onStatusChanged(status: QtQmlStatus?, content: QtQuickViewContent?) {
Log.v(TAG, "Status of QtQuickView: $status")
// Show current QML View status in a textview
m_binding.qmlStatusText.text = getString(R.string.qml_view_status, m_statusNames[status])
updateColorDisplay()
if (content == m_firstQmlContent) {
// Connect signal listener to "onClicked" signal from main.qml
// addSignalListener returns int which can be used later to identify the listener
if (status == QtQmlStatus.READY && m_binding.disconnectQmlListenerSwitch.isChecked) {
m_qmlButtonSignalListenerId =
m_firstQmlContent.connectOnClickedListener { _: String, _: Void? ->
Log.i(TAG, "QML button clicked")
m_binding.kotlinRelative.setBackgroundColor(
Color.parseColor(
m_colors.getColor()
)
)
}
}
}
}Die MainActivity wird als statusChangeListener der m_mainQmlContent und m_secondQmlContent mit der Methode QtQuickViewContent.setStatusChangeListener eingestellt.
m_firstQmlContent.setStatusChangeListener(this);
m_secondQmlContent.setStatusChangeListener(this);
m_firstQmlContent.setStatusChangeListener(this)
m_secondQmlContent.setStatusChangeListener(this)
Die überschriebene Callback-Funktion onStatusChanged() empfängt das Signal StatusChanged(), das den aktuellen Status, ein QtQmlStatus Enum, des Ladens der aktuellen QtQuickViewContent in die QtQuickView enthält. Wenn dieses QtQmlStatus als QtQmlStatus.READY bestätigt wird, können wir mit der QML-Ansicht interagieren.
Abrufen und Setzen von QML-Komponenteneigenschaftswerten
Das Abrufen und Setzen von Eigenschaftswerten von QML-Komponenten erfolgt über die in der Klasse Main.java beschriebenen Methoden. In diesem Fall verwenden wir die Methoden m_mainQmlContent.setColorStringProperty() und m_mainQmlContent.getColorStringProperty(). Diese Methoden werden je nach den in der QML-Komponente enthaltenen Eigenschaften generiert.
public void onClickListener() {
    // Set the QML view root object property "colorStringFormat" value to
    // color from Colors.getColor()
    m_firstQmlContent.setColorStringFormat(m_colors.getColor());
    updateColorDisplay();
}
private void updateColorDisplay() {
    String qmlBackgroundColor = m_firstQmlContent.getColorStringFormat();
    // Display the QML View background color code
    m_qmlViewBackgroundText.setText(qmlBackgroundColor);

    // Display the QML View background color in a view
    // if qmlBackGroundColor is not null
    if (qmlBackgroundColor != null) {
        m_colorBox.setBackgroundColor(Color.parseColor(qmlBackgroundColor));
    }
}
private fun onClickListener() {
// Set the QML view root object property "colorStringFormat" value to
// color from Colors.getColor()
m_firstQmlContent.colorStringFormat = m_colors.getColor()
updateColorDisplay()
}
private fun updateColorDisplay() {
val qmlBackgroundColor = m_firstQmlContent.colorStringFormat
// Display the QML View background color code
m_binding.qmlViewBackgroundText.text = qmlBackgroundColor
// Display the QML View background color in a view
// if qmlBackgroundColor is not null
if (qmlBackgroundColor != null) {
m_binding.qmlColorBox.setBackgroundColor(Color.parseColor(qmlBackgroundColor))
}
}Mit der Methode m_mainQmlContent.setColorStringProperty() setzen wir den Eigenschaftswert colorStringFormat des m_mainQmlContent auf einen zufälligen Farbwert, der aus der Klasse Colors.java (oder Colors.kt) geholt wird.
Die Methode m_mainQmlContent.getColorStringProperty() wird hier verwendet, um die aktuelle Hintergrundfarbe des Root-Objekts des m_mainQmlContent abzurufen und sie dann dem Benutzer auf der Java/Kotlin-Android-Seite der Anwendung anzuzeigen.
m_secondQmlContent m_mainQmlContent hat eine Grid QML-Komponente, die wir von der Java-Seite aus mit der generierten Methode m_secondQmlContent.setGridRotation() drehen können.
private void rotateQmlGrid() {
    Integer previousGridRotation = m_secondQmlContent.getGridRotation();
    if (previousGridRotation != null) {
        m_secondQmlContent.setGridRotation(previousGridRotation + 45);
    }
}
private fun rotateQmlGrid() {
val previousGridRotation = m_secondQmlContent.gridRotation
if (previousGridRotation != null) {
m_secondQmlContent.gridRotation = previousGridRotation + 45
}
}Signal-Listener
Die Klasse QtQuickViewContent bietet die Methoden connectSignalListener() und disconnectSignalListener(), die zum Verbinden und Trennen von Signalhörern zwischen Signalen verwendet werden, die im Stammobjekt der QML-Komponente deklariert sind. Die Methode QtQuickViewContent.connectSignalListener() gibt eine eindeutige Signal-Listener-ID zurück, die wir speichern und später verwenden, um den Listener zu identifizieren und die Verbindung zu trennen.
Hier verbinden wir einen Signal-Listener mit dem onClicked() Signal der QML-Komponente:
if (qtQmlStatus == QtQmlStatus.READY && m_switch.isChecked()) {
    m_qmlButtonSignalListenerId = m_firstQmlContent.connectOnClickedListener(
            (String name, Void v) -> {
                Log.i(TAG, "QML button clicked");
                m_androidControlsLayout.setBackgroundColor(Color.parseColor(
                        m_colors.getColor()
                ));
            });
}
if (status == QtQmlStatus.READY && m_binding.disconnectQmlListenerSwitch.isChecked) {
m_qmlButtonSignalListenerId =
m_firstQmlContent.connectOnClickedListener { _: String, _: Void? ->
Log.i(TAG, "QML button clicked")
m_binding.kotlinRelative.setBackgroundColor(
Color.parseColor(
m_colors.getColor()
)
)
}
}Das Signal onClicked() wird jedes Mal ausgegeben, wenn die Schaltfläche der QML-Komponente angeklickt wird. Dieser Listener empfängt dann dieses Signal, und die Hintergrundfarbe des Layouts, das die Android-Seite der Anwendung enthält, wird auf einen zufälligen Farbwert gesetzt, der von der Klasse Colors.java abgerufen wird.
Als nächstes wird der Signal-Listener mit der Methode QtQuickViewContent.disconnectSignalListener() getrennt, indem ihm die eindeutige Signal-Listener-ID gegeben wird.
m_firstQmlContent.disconnectSignalListener(m_qmlButtonSignalListenerId);
m_firstQmlContent.disconnectSignalListener(m_qmlButtonSignalListenerId)
Wenn Sie es noch nicht getan haben, sollten Sie sich den Kurs Qt Academy ansehen: Einbettung von Qt Quick 3D-Inhalten in eine Android-App, in dem die Werkzeuge und APIs vorgestellt werden, auf die in diesem Beispiel Bezug genommen wird.
© 2026 The Qt Company Ltd. Documentation contributions included herein are the copyrights of their respective owners. The documentation provided herein is licensed under the terms of the GNU Free Documentation License version 1.3 as published by the Free Software Foundation. Qt and respective logos are trademarks of The Qt Company Ltd. in Finland and/or other countries worldwide. All other trademarks are property of their respective owners.
