QMLの第一歩
QMLドキュメントの作成
QML文書は、読みやすく構造化されたレイアウトでオブジェクトの階層構造を定義します。すべてのQML文書は、importセクションとオブジェクト宣言セクションの2つの部分から構成されています。ユーザーインターフェースで最も一般的な型や機能は、QtQuick のインポートで提供されます。
QtQuick モジュールのインポートと使用
QtQuickモジュールを使うためには Qt Quickモジュールを使用するためには、QMLドキュメントがそれをインポートする必要があります。インポートの構文は以下のようになります:
import QtQuick
QtQuickモジュールが提供する型や機能は Qt Quickの提供する型や機能を QML ドキュメントで使用することができます!
オブジェクト階層の定義
QMLドキュメントのオブジェクト宣言は、ビジュアルシーンに何が表示されるかを定義します。 Qt Quick例えば、画像やテキストを表示するためのオブジェクトや、ユーザーの入力を処理するためのオブジェクトなどです。
単純なオブジェクト宣言としては、色つきのウィンドウにテキストを表示するようなものが考えられます:
Window {
    width: 640
    height: 480
    visible: true
    color: "red"

    Text {
        anchors.centerIn: parent
        text: "Hello, World!"
    }
}
これは、子オブジェクトText を持つルートWindow オブジェクトを持つオブジェクト階層を定義します。Text オブジェクトのparent は自動的にWindow に設定され、同様にText オブジェクトは QML によってWindow オブジェクトのchildren プロパティに追加されます。
すべてをまとめる
上の例で使われているWindow とText の型はどちらもQtQuick のインポートによって提供されています。importとオブジェクト宣言をまとめると、完全なQML文書ができあがります:
import QtQuick

Window {
    width: 640
    height: 480
    visible: true
    color: "red"

    Text {
        anchors.centerIn: parent
        text: "Hello, World!"
    }
}
この文書を "HelloWorld.qml "として保存すれば、それを読み込んで表示することができます。
QMLプロジェクトの作成と実行
QMLドキュメントで定義されたグラフィカルなシーンを表示するには、次のようにしてロードします。 Qt Creator.新しいQMLプロジェクトを作成するには、Qt Creator :
- File >New Project > を選択します。 Qt Quick ApplicationQt Creatorを選択します。
- プロジェクトの名前を入力し、保存場所を選択します。
- 適切な Qt のバージョンを選択し、プロジェクトのバージョン管理設定を行います。
- プロジェクト設定の概要を確認し、プロジェクトのビルドを完了します。
完了すると、Qt Creator が必要なファイルを生成し、開発用にプロジェクトを開きます。緑色の実行ボタンを押すと、アプリケーションが実行されます。赤い四角形の中央に「Hello, World!」というテキストが表示されるはずです。
Qt Creator でのプロジェクトの作成と実行の詳細については、以下のページを参照してください:
コントロールを使ったQMLアプリケーションの作成
Qt Quick 、基本的なグラフィカル要素を提供します、 Qt Quick Controlsはアプリケーション内で使用するための既製のQML型を提供します。
ApplicationWindow タイプを挿入することは、アプリケーションを作成するための良い出発点となります。アプリケーションのUIはこのような基本的なレイアウトになっています:
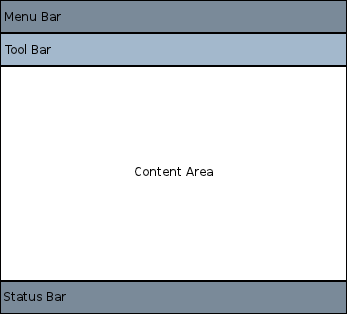
アプリケーションのUIは、このような基本的なレイアウトになっています。各領域の中に、さまざまなコントロールを追加し、接続することで、アプリケーションを構成することができます。例えば、次のスニペットは、利用可能なスペースの使い方を示す基本的なアプリケーションです:
//import related modules
import QtQuick
import QtQuick.Controls

//window containing the application
ApplicationWindow {
    width: 640
    height: 480
    visible: true
    //title of the application
    title: qsTr("Hello World")

    //menu containing two menu items
    header: MenuBar {
        Menu {
            title: qsTr("&File")
            Action {
                text: qsTr("&Open...")
                onTriggered: console.log("Open action triggered")
            }
            MenuSeparator { }
            Action {
                text: qsTr("&Exit")
                onTriggered: Qt.quit()
            }
        }
    }

    //Content Area

    //a button in the middle of the content area
    Button {
        text: qsTr("Hello World")
        anchors.horizontalCenter: parent.horizontalCenter
        anchors.verticalCenter: parent.verticalCenter
    }
}
このアプリケーションには、2つのメニュー項目と真ん中にボタンがあります。Exit 、アプリケーションを閉じます。
また、異なるナビゲーション方法や、ボタンやスライダーのような異なるコントロールもあります。以下のサンプルはQt Creator 、さまざまなコントロールとレイアウトを実演しています。
このシンプルなHello Worldアプリケーションにスニペットをコピー&ペーストして、QMLがどのように動作するかを自由にご覧ください。
ユーザー入力の処理
QMLを使ってユーザインタフェースを定義することの大きな利点の一つは、ユーザインタフェース設計者が簡単なJavaScriptの式を使って、アプリケーションのイベントに対する反応を定義できることです。QMLではこれらのイベントをシグナルと呼び、シグナルはシグナルハンドラによって処理されます。
例えば、次のような例を考えてみましょう:
import QtQuick

Window {
    id: root
    width: 200
    height: 100
    color: isRed ? "red" : "blue"
    visible: true

    property bool isRed: true  // Track the color state

    Text {
        anchors.centerIn: parent
        text: "Hello, World!"
    }

    TapHandler {
        onTapped: root.isRed = !root.isRed  // Toggle state
    }
}
この例は、"ClickableHelloWorld.qml "として保存し、qml(QML Runtime ツール)で実行することができます。ユーザーがウィンドウのどこかをクリックすると、矩形が赤から青に変わります。もう一度タップすると赤に戻ります。
注: TapHandler はタッチ・イベントでもタップされたシグナルを発するので、このコードはモバイル・デバイスでも動作する。
キーボードのユーザー入力も同様に、簡単な式で処理できる:
import QtQuick

Window {
    id: root
    width: 200
    height: 100
    color: "red"
    visible: true

    Text {
        id: myText
        anchors.centerIn: parent
        text: toggle ? "Hello, World!" : "Goodbye, World!"
        focus: true
        property bool toggle: true
        Keys.onReturnPressed: (event)=>{
            myText.toggle = !myText.toggle;
            event.accepted = true;
        }
    }
}
Enterキーを押すたびに、"Hello, World "と "Goodbye, World "が交互に表示されます。
プロパティのバインディング
オブジェクトとそのプロパティは、QML文書で定義されるグラフィカル・インターフェースの基礎となります。QML言語では、プロパティ同士を様々な方法でバインドすることができ、非常に動的なユーザインタフェースを実現することができます。
次の例では、それぞれの子オブジェクトRectangle のジオメトリは、親オブジェクトWindow のジオメトリにバインドされています。親Window オブジェクトのジオメトリが変更された場合、各子Rectangle のジオメトリは、プロパティのバインディングによって自動的に更新されます。
import QtQuick

Window {
    id: root
    width: 200
    height: 100
    color: "red"
    visible: true


    Rectangle {
        width: root.width / 2
        height: root.height
        color: "blue"
    }

    Rectangle {
        width: root.width / 2
        height: root.height
        x: root.width / 2
        color: "green"
    }
}
アニメーション
アニメーションによって、プロパティを動的に更新することもできます。QtQuick インポートには、プロパティの値の変更をアニメーション化するために使用できる、さまざまなアニメーションタイプが用意されています。次の例では、プロパティがアニメーション化され、Text 領域に表示されます:
import QtQuick

Window {
    id: root
    width: 200
    height: 100
    color: "red"
    visible: true

    property int animatedValue

    SequentialAnimation on animatedValue {
        loops: Animation.Infinite
        PropertyAnimation {
            to: 150
            duration: 1000
        }
        PropertyAnimation {
            to: 0
            duration: 1000
        }
    }

    Text {
        anchors.centerIn: parent
        text: root.animatedValue
    }
}
表示される値は0から150まで周期的に変化します。
再利用のためのカスタム QML タイプの定義
QMLの最も重要な概念のひとつに、型の再利用があります。QMLでは、このようなものを再利用可能なカスタム型として定義することで、コードの重複を最小化し、可読性を最大化することができます。
例えば、開発者がMessageLabel.qml ファイルで新しいMessageLabel 型を定義したとします:
// MessageLabel.qml
import QtQuick

Rectangle {
    height: 50
    property string message: "debug message"
    property var msgType: ["debug", "warning" , "critical"]
    color: "black"

    Column {
        anchors.fill: parent
        padding: 5.0
        spacing: 2
        Text {
            text: msgType.toString().toUpperCase() + ":"
            font.bold: msgType == "critical"
            font.family: "Terminal Regular"
            color: msgType === "warning" || msgType === "critical" ? "red" : "yellow"
            ColorAnimation on color {
                running: msgType == "critical"
                from: "red"
                to: "black"
                duration: 1000
                loops: msgType == "critical" ? Animation.Infinite : 1
            }
        }
        Text {
            text: message
            color: msgType === "warning" || msgType === "critical" ? "red" : "yellow"
            font.family: "Terminal Regular"
        }
    }

}
その型は、次のようにアプリケーション内で複数回再利用することができます:
// application.qml import QtQuick Window { id: root width: 180 height: 180 visible: true Column { anchors.fill: parent padding: 1.5 topPadding: 10.0 bottomPadding: 10.0 spacing: 5 MessageLabel{ width: root.width - 2 msgType: "debug" } MessageLabel { width: root.width - 2 message: "This is a warning!" msgType: "warning" } MessageLabel { width: root.width - 2 message: "A critical warning!" msgType: "critical" } } } |
このようにして、モジュール化されたユーザーインターフェースの型は、アプリケーション内で組み立てられ、再利用されます。
再利用可能なコンポーネントを開発する方法の詳細については、QMLオブジェクト属性を参照してください。
これからの展開
QMLが実際に使われているのを見たところで、次のステップに進みましょう。次のページでは、QMLを使ったあなたの旅を紹介します。
© 2026 The Qt Company Ltd. Documentation contributions included herein are the copyrights of their respective owners. The documentation provided herein is licensed under the terms of the GNU Free Documentation License version 1.3 as published by the Free Software Foundation. Qt and respective logos are trademarks of The Qt Company Ltd. in Finland and/or other countries worldwide. All other trademarks are property of their respective owners.
