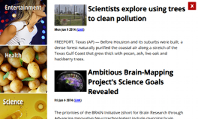
Qt Quick 데모 - RSS 뉴스
XmlListModel 및 XmlListModelRole 사용자 정의 QML 유형을 사용하여 XML 데이터를 다운로드하고, ListModel 및 ListElement 를 사용하여 카테고리 목록을 만들고, ListView 를 사용하여 데이터를 표시하는 QML RSS 뉴스 리더입니다.
RSS 뉴스는 다음을 보여줍니다. Qt Quick 기능:
- 사용자 지정 QML 유형 사용.
- 목록 모델 및 목록 요소를 사용하여 데이터 표현하기.
- XML 목록 모델을 사용하여 XML 데이터 다운로드하기.
- 목록 보기를 사용하여 데이터 표시하기.
- Component 유형을 사용하여 뉴스 항목 목록 보기의 바닥글 만들기.
- Image 유형을 사용하여 앱 닫기 버튼 만들기.
예제 실행하기
에서 예제를 실행하려면 Qt Creator에서 Welcome 모드를 열고 Examples 에서 예제를 선택합니다. 자세한 내용은 Qt Creator: 튜토리얼을 참조하세요 : 빌드 및 실행을 참조하세요.
사용자 정의 유형 사용
RSS 뉴스 앱에서는 각각 별도의 .qml 파일에 정의된 다음과 같은 사용자 정의 유형을 사용합니다:
BusyIndicator.qmlCategoryDelegate.qmlNewsDelegate.qmlRssFeeds.qmlScrollBar.qml
기본 창 만들기
Main.qml 에서는 사용자 지정 속성이 있는 Rectangle 유형을 사용하여 앱 기본 창을 만듭니다:
Rectangle {
    id: window

    width: 800
    height: 480

    property string currentFeed: rssFeeds.get(0).feed
    property bool loading: feedModel.status === XmlListModel.Loading
    property bool isPortrait: Screen.primaryOrientation === Qt.PortraitOrientation
나중에 XML 데이터를 로드하고 방향에 따라 화면 레이아웃을 조정하는 데 사용자 지정 속성을 사용할 것입니다.
카테고리 목록 만들기
Main.qml 에서는 RssFeeds.qml 에서 지정한 RssFeeds 사용자 정의 유형을 사용하여 피드 카테고리 목록을 만듭니다:
RssFeeds { id: rssFeeds }
RssFeeds.qml 에서는 ListModel 유형과 ListElement 유형을 사용하여 목록 요소가 피드 카테고리를 나타내는 카테고리 목록을 만듭니다:
ListModel {
    ListElement { name: "Top Stories"; feed: "news.yahoo.com/rss/topstories"; image: "images/TopStories.jpg" }
    ListElement { name: "World"; feed: "news.yahoo.com/rss/world"; image: "images/World.jpg" }
    ListElement { name: "Europe"; feed: "news.yahoo.com/rss/europe"; image: "images/Europe.jpg" }
    ListElement { name: "Asia"; feed: "news.yahoo.com/rss/asia"; image: "images/Asia.jpg" }
    ListElement { name: "U.S. National"; feed: "news.yahoo.com/rss/us"; image: "images/USNational.jpg"  }
    ListElement { name: "Politics"; feed: "news.yahoo.com/rss/politics"; image: "images/Politics.jpg" }
    ListElement { name: "Business"; feed: "news.yahoo.com/rss/business"; image: "images/Business.jpg" }
    ListElement { name: "Technology"; feed: "news.yahoo.com/rss/tech"; image: "images/Technology.jpg" }
    ListElement { name: "Entertainment"; feed: "news.yahoo.com/rss/entertainment"; image: "images/Entertainment.jpg" }
    ListElement { name: "Health"; feed: "news.yahoo.com/rss/health"; image: "images/Health.jpg" }
    ListElement { name: "Science"; feed: "news.yahoo.com/rss/science"; image: "images/Science.jpg" }
    ListElement { name: "Sports"; feed: "news.yahoo.com/rss/sports"; image: "images/Sports.jpg" }
}
목록 요소는 속성 대신 역할 정의 모음을 포함한다는 점을 제외하면 다른 QML 유형처럼 정의됩니다. 역할은 데이터에 액세스하는 방법을 정의하고 데이터 자체를 포함합니다.
각 목록 요소에 대해 name 역할은 카테고리 이름을 지정하고 feed 역할은 데이터를 로드할 URL을 지정하며 image 역할은 카테고리에 대한 이미지를 표시하는 데 사용합니다.
Main.qml 에서는 ListView 유형을 사용하여 카테고리 목록을 표시합니다:
    ListView {
        id: categories
        property int itemWidth: 190

        width: window.isPortrait ? parent.width : itemWidth
        height: window.isPortrait ? itemWidth : parent.height
        orientation: window.isPortrait ? ListView.Horizontal : ListView.Vertical
        anchors.top: parent.top
        model: rssFeeds
        delegate: CategoryDelegate {
            itemSize: categories.itemWidth
            isLoading: window.loading
            onClicked: function () {
                if (window.currentFeed == feed)
                    feedModel.reload()
                else
                    window.currentFeed = feed

            }
        }
카테고리 목록을 세로 방향으로 창 상단에 가로로, 가로 방향으로 왼쪽에 세로로 배치하려면 orientation 속성을 사용합니다. 방향에 따라 목록의 너비 또는 높이를 고정 값(itemWidth)에 바인딩합니다.
anchors.top 속성을 사용하여 두 방향 모두에서 목록 보기를 화면 상단에 배치합니다.
model 속성을 사용하여 rssFeeds 모델에서 XML 데이터를 로드하고 CategoryDelegate 을 델리게이트로 사용하여 목록의 각 항목을 인스턴스화합니다.
목록 요소 만들기
CategoryDelegate.qml 에서는 사용자 지정 속성과 함께 Rectangle 유형을 사용하여 목록 요소를 만듭니다:
Rectangle {
    id: delegate

    required property real itemSize
    required property string name
    required property string feed
    required property string image
    required property int index
    required property bool isLoading

    property bool selected: ListView.isCurrentItem
required 을 사용하여 모델에서 기대하는 속성을 선언합니다.
selected 속성을 ListView.isCurrentItem 첨부 속성으로 설정하여 delegate 이 현재 항목인 경우 selected 이 true 이 되도록 지정합니다.
Image 유형 source 속성을 사용하여 rssFeeds 목록 모델에서 image 역할이 목록 요소에 지정한 이미지를 델리게이트 중앙에 표시합니다:
    Image {
        anchors.centerIn: parent
        source: delegate.image
    }
Text 유형을 사용하여 목록 요소에 제목을 추가합니다:
    Text {
        id: titleText

        anchors {
            left: parent.left; leftMargin: 20
            right: parent.right; rightMargin: 20
            top: parent.top; topMargin: 20
        }

        font { pixelSize: 18; bold: true }
        text: delegate.name
        color: delegate.selected ? "#ffffff" : "#ebebdd"
        scale: delegate.selected ? 1.15 : 1.0
        Behavior on color { ColorAnimation { duration: 150 } }
        Behavior on scale { PropertyAnimation { duration: 300 } }
anchors 속성을 사용하여 목록 요소의 상단에 20픽셀 여백을 두고 제목을 배치합니다. font 속성을 사용하여 글꼴 크기와 텍스트 서식을 조정합니다.
color 및 scale 속성을 사용하여 목록 항목이 현재 항목인 경우 텍스트를 밝게 하고 크기를 약간 크게 조정합니다. Behavior 속성을 적용하여 목록 항목 선택 및 선택 해제 동작에 애니메이션을 적용합니다.
사용자가 카테고리 목록 요소를 탭하면 MouseArea 유형을 사용하여 XML 데이터를 다운로드합니다:
    MouseArea {
        anchors.fill: delegate
        onClicked: {
            delegate.ListView.view.currentIndex = delegate.index
            delegate.clicked()
        }
    }
anchors.fill 속성은 delegate 으로 설정하여 사용자가 목록 요소 내의 아무 곳이나 탭할 수 있도록 합니다.
clicked 이벤트에서 카테고리 목록의 XML 데이터를 로드하려면 ListView 첨부 속성의 currentIndex 을 설정하고 onClicked 에서 clicked 신호()를 내보냅니다.
XML 데이터 다운로드
Main.qml 에서는 ListView 요소의 데이터 소스로 XmlListModel 유형을 사용하여 선택한 카테고리의 뉴스 항목을 표시합니다:
    XmlListModel {
        id: feedModel

        source: "https://" + window.currentFeed
        query: "/rss/channel/item"
source 속성 및 window.currentFeed 사용자 정의 속성을 사용하여 선택한 카테고리의 뉴스 항목을 가져옵니다.
query 속성은 XmlListModel 이 XML 문서에서 각 <item> 에 대한 모델 항목을 생성하도록 지정합니다.
XmlListModelRole 유형을 사용하여 모델 항목 속성을 지정합니다. 각 모델 항목에는 XML 문서에서 해당 <item> 의 값과 일치하는 title, content, link, pubDate 속성이 있습니다:
        XmlListModelRole { name: "title"; elementName: "title"; attributeName: ""}
        XmlListModelRole { name: "content"; elementName: "content"; attributeName: "url" }
        XmlListModelRole { name: "link"; elementName: "link"; attributeName: "" }
        XmlListModelRole { name: "pubDate"; elementName: "pubDate"; attributeName: "" }
    }
ListView 유형에 feedModel 모델을 사용하여 데이터를 표시합니다:
    ListView {
        id: list

        anchors.left: window.isPortrait ? window.left : categories.right
        anchors.right: closeButton.left
        anchors.top: window.isPortrait ? categories.bottom : window.top
        anchors.bottom: window.bottom
        anchors.leftMargin: 30
        anchors.rightMargin: 4
        clip: window.isPortrait
        model: feedModel
        footer: footerText
        delegate: NewsDelegate {}
    }
카테고리 목록 아래에 뉴스 항목을 세로 방향으로 나열하고 그 오른쪽에 가로 방향으로 나열하려면 isPortrait 사용자 지정 속성을 사용하여 뉴스 항목 목록의 상단을 세로 방향으로 window 왼쪽과 categories 아래쪽에, 가로 방향으로 categories 오른쪽과 window 아래쪽에 앵커링합니다.
anchors.bottom 속성을 사용하여 목록 보기의 하단을 두 방향 모두에서 창 하단에 고정합니다.
세로 방향에서는 뉴스 항목이 다른 항목 위로 스크롤될 때 그래픽 아티팩트를 방지하기 위해 뉴스 항목의 그림을 목록 보기의 경계 사각형에 클립합니다. 가로 방향에서는 목록이 화면 전체에 걸쳐 세로로 표시되므로 이 작업이 필요하지 않습니다.
model 속성을 사용하여 feedModel 모델에서 XML 데이터를 로드하고 NewsDelegate 을 델리게이트로 사용하여 목록의 각 항목을 인스턴스화합니다.
NewsDelegate.qml 에서는 Column 유형을 사용하여 XML 데이터를 레이아웃합니다:
Column {
    id: delegate

    required property string title
    required property string content
    required property string link
    required property string pubDate

    width: delegate.ListView.view.width
    spacing: 8
열 내에서 행과 다른 열을 사용하여 이미지와 제목 텍스트를 배치합니다:
    Row {
        width: parent.width
        spacing: 8

        Column {
            Item {
                width: 4
                height: titleText.font.pixelSize / 4
            }

            Image {
                id: titleImage
                source: delegate.content
                width: Math.min(delegate.width / 2, sourceSize.width)
                fillMode: Image.PreserveAspectFit
            }
        }

        Text {
            id: titleText

            text: delegate.title.replace(/'/g, "'")
            width: delegate.width - titleImage.width
            wrapMode: Text.WordWrap
            font.pixelSize: 26
            font.bold: true
        }
    }
timeSinceEvent() JavaScript 함수를 사용하여 항목이 게시된 지 얼마나 되었는지에 대한 텍스트 표현을 생성합니다:
    Text {
        width: delegate.width
        font.pixelSize: 12
        textFormat: Text.RichText
        font.italic: true
        text: delegate.timeSinceEvent(delegate.pubDate) + " (<a href=\"" + delegate.link + "\">Link</a>)"
        onLinkActivated: function(link) {
            Qt.openUrlExternally(link)
        }
    }
사용자가 링크를 선택하면 onLinkActivated 시그널 핸들러를 사용하여 외부 브라우저에서 URL을 엽니다.
사용자에게 피드백 제공
CategoryDelegate.qml 에서는 BusyIndicator 사용자 정의 유형을 사용하여 XML 데이터가 로드되는 동안의 활동을 표시합니다:
    BusyIndicator {
        scale: 0.8
        visible: delegate.ListView.isCurrentItem && delegate.isLoading
        anchors.centerIn: parent
    }
scale 속성을 사용하여 표시기 크기를 0.8 로 줄입니다. visible 속성을 delegate 목록 보기의 isCurrentItem 첨부 속성 및 기본 창의 loading 속성에 바인딩하여 카테고리 목록 항목이 현재 항목이고 XML 데이터가 로드 중일 때 표시기 이미지를 표시합니다.
BusyIndicator 유형은 BusyIndicator.qml 에서 정의합니다. Image 유형을 사용하여 이미지를 표시하고 rotation 속성에 NumberAnimation 을 적용하여 이미지를 무한 반복으로 회전합니다:
Image {
    id: container

    source: "images/busy.png";

    NumberAnimation on rotation {
        running: container.visible
        from: 0; to: 360;
        loops: Animation.Infinite;
        duration: 1200
    }
}
앱에서 BusyIndicator 유형을 사용할 수도 있습니다. Qt Quick Controls 모듈에서 사용할 수도 있습니다.
스크롤 막대 만들기
Main.qml 에서는 자체 사용자 정의 ScrollBar 유형을 사용하여 카테고리 및 뉴스 항목 목록 보기에 스크롤 막대를 만듭니다. 앱에서는 모듈의 ScrollView 유형을 사용할 수도 있습니다. Qt Quick Controls 모듈에서 사용할 수도 있습니다.
먼저 카테고리 목록 보기에 스크롤 막대를 만듭니다. orientation 속성을 isPortrait 속성 및 Qt::Orientation 열거형 유형의 Horizontal 값에 바인딩하여 가로 방향으로 가로 스크롤 막대를 표시하고, Vertical 값에 바인딩하여 세로 방향으로 세로 스크롤 막대를 표시합니다:
    ScrollBar {
        id: listScrollBar

        orientation: window.isPortrait ? Qt.Horizontal : Qt.Vertical
        height: window.isPortrait ? 8 : categories.height;
        width: window.isPortrait ? categories.width : 8
        scrollArea: categories;
        anchors.right: categories.right
    }
categories 목록 보기와 마찬가지로 isPortrait 속성을 기준으로 스크롤 막대의 너비와 높이를 조정합니다.
scrollArea 속성을 사용하여 categories 목록 보기에 스크롤 막대를 표시합니다.
anchors.right 속성을 사용하여 카테고리 목록의 오른쪽에 스크롤 막대를 고정합니다.
    ScrollBar {
        scrollArea: list
        width: 8
        anchors.right: window.right
        anchors.top: window.isPortrait ? categories.bottom : window.top
        anchors.bottom: window.bottom
    }
둘째, 뉴스 항목 목록 보기에 또 다른 스크롤 막대를 만듭니다. 화면 방향에 관계없이 뷰의 오른쪽에 세로 스크롤 막대가 표시되도록 하려면 width 속성을 8 으로 설정하고 anchors.right 속성을 window.right 속성에 바인딩하면 됩니다. anchors.top 속성을 사용하여 세로 방향에서는 카테고리 목록의 맨 위에 스크롤 막대를 고정하고 가로 방향에서는 뉴스 항목 목록의 맨 위에 스크롤 막대를 고정합니다. anchors.bottom 속성을 사용하여 두 방향 모두에서 스크롤 막대 하단을 목록 보기 하단에 고정합니다.
ScrollBar.qml 에서 ScrollBar 유형을 정의합니다. 사용자 정의 속성과 함께 Item 유형을 사용하여 스크롤 막대의 컨테이너를 만듭니다:
BorderImage 유형을 사용하여 position() 함수를 사용하여 계산한 x 및 y 위치에 스크롤 막대 썸을 표시합니다:
    BorderImage {
        source: "images/scrollbar.png"
        border { left: 1; right: 1; top: 1; bottom: 1 }
        x: container.orientation == Qt.Vertical ? 2 : container.position()
        y: container.orientation == Qt.Vertical ? container.position() : 2
        width: container.orientation == Qt.Vertical ? container.width - 4 : container.size()
        height: container.orientation == Qt.Vertical ? container.size() : container.height - 4
    }
size 함수를 사용하여 화면 방향에 따라 엄지손가락 너비와 높이를 계산합니다.
states 함수를 사용하여 사용자가 스크롤 영역을 이동할 때 스크롤바를 표시합니다:
    states: State {
        name: "visible"
        when: container.orientation == Qt.Vertical ?
                  container.scrollArea.movingVertically :
                  container.scrollArea.movingHorizontally
        PropertyChanges { container { opacity: 1.0 } }
    }
상태가 "visible" 에서 기본 상태로 변경될 때 opacity 속성에 NumberAnimation 을 적용하기 위해 transitions 을 사용합니다:
    transitions: Transition {
        from: "visible"; to: ""
        NumberAnimation { properties: "opacity"; duration: 600 }
    }
}
바닥글 만들기
Main.qml 에서 Component 유형과 Rectangle 유형을 사용하여 뉴스 목록 보기의 바닥글을 만듭니다:
pragma ComponentBehavior: Bound

import QtQuick
import QtQuick.Window
import QtQml.XmlListModel

Rectangle {
    id: window

    width: 800
    height: 480

    property string currentFeed: rssFeeds.get(0).feed
    property bool loading: feedModel.status === XmlListModel.Loading
    property bool isPortrait: Screen.primaryOrientation === Qt.PortraitOrientation

    onLoadingChanged: {
        if (feedModel.status == XmlListModel.Ready)
            list.positionViewAtBeginning()
    }

    RssFeeds { id: rssFeeds }

    XmlListModel {
        id: feedModel

        source: "https://" + window.currentFeed
        query: "/rss/channel/item"

        XmlListModelRole { name: "title"; elementName: "title"; attributeName: ""}
바닥글의 width 을 컴포넌트의 너비에, height 을 닫기 버튼의 높이에 바인딩하여 뉴스 항목이 표시되지 않을 때 정렬합니다.
버튼 만들기
Main.qml 에서는 Image 유형을 사용하여 사용자가 탭하여 앱을 닫을 수 있는 간단한 푸시 버튼을 만듭니다:
        XmlListModelRole { name: "content"; elementName: "content"; attributeName: "url" }
        XmlListModelRole { name: "link"; elementName: "link"; attributeName: "" }
        XmlListModelRole { name: "pubDate"; elementName: "pubDate"; attributeName: "" }
    }

    ListView {
        id: categories
        property int itemWidth: 190

        width: window.isPortrait ? parent.width : itemWidth
        height: window.isPortrait ? itemWidth : parent.height
        orientation: window.isPortrait ? ListView.Horizontal : ListView.Vertical
        anchors.top: parent.top
        model: rssFeeds
        delegate: CategoryDelegate {
            itemSize: categories.itemWidth
            isLoading: window.loading
            onClicked: function () {
                if (window.currentFeed == feed)
                    feedModel.reload()
                else
                    window.currentFeed = feed

            }
        }
        spacing: 3
    }

    ScrollBar {
        id: listScrollBar

        orientation: window.isPortrait ? Qt.Horizontal : Qt.Vertical
        height: window.isPortrait ? 8 : categories.height;
        width: window.isPortrait ? categories.width : 8
        scrollArea: categories;
        anchors.right: categories.right
    }

    ListView {
        id: list

        anchors.left: window.isPortrait ? window.left : categories.right
        anchors.right: closeButton.left
        anchors.top: window.isPortrait ? categories.bottom : window.top
        anchors.bottom: window.bottom
        anchors.leftMargin: 30
        anchors.rightMargin: 4
        clip: window.isPortrait
        model: feedModel
        footer: footerText
        delegate: NewsDelegate {}
    }

    ScrollBar {
        scrollArea: list
        width: 8
        anchors.right: window.right
        anchors.top: window.isPortrait ? categories.bottom : window.top
        anchors.bottom: window.bottom
    }

    Component {
        id: footerText

        Rectangle {
            width: parent.width
            height: closeButton.height
            color: "lightgray"

            Text {
                text: "RSS Feed from Yahoo News"
                anchors.centerIn: parent
                font.pixelSize: 14
            }
        }
    }

    Image {
        id: closeButton
        source: "content/images/btn_close.png"
        scale: 0.8
        anchors.top: parent.top
        anchors.right: parent.right
        anchors.margins: 4
        opacity: (window.isPortrait && categories.moving) ? 0.2 : 1.0
        Behavior on opacity {
            NumberAnimation { duration: 300; easing.type: Easing.OutSine }
        }

        MouseArea {
            anchors.fill: parent
            onClicked: {
                Qt.quit()
            }
        }
    }
anchors 을 사용하여 뉴스 목록 보기의 오른쪽 상단에 4픽셀 여백을 두고 닫기 버튼을 배치합니다. 닫기 버튼은 세로 방향으로 카테고리 목록과 겹치기 때문에 사용자가 카테고리 목록을 스크롤할 때 버튼이 거의 완전히 투명하게 보이도록 opacity 속성에 애니메이션을 적용합니다.
사용자가 닫기 버튼을 선택하면 MouseArea 내에 onClicked 시그널 핸들러를 사용하여 quit() 함수를 호출합니다.
QML 애플리케이션도참조하세요 .
© 2026 The Qt Company Ltd. Documentation contributions included herein are the copyrights of their respective owners. The documentation provided herein is licensed under the terms of the GNU Free Documentation License version 1.3 as published by the Free Software Foundation. Qt and respective logos are trademarks of The Qt Company Ltd. in Finland and/or other countries worldwide. All other trademarks are property of their respective owners.
